# BLUETOOTH APP<->ARDUINO

##### <span style="color: rgb(22, 145, 121);">**Nos preguntamos...**</span>

P: ¿Y pasar datos de nuestra maqueta a la APP ?   
R: Se puede pero tendremos que hacer la APP a medida  
P: ¿Podríamos tener libertad de poner botones?   
R: Por supuesto,

<p class="callout info">Recuerda que con la APP que existen en GOOGLE PLAY como la utilizada en el capítulo anterior [https://libros.catedu.es/books/domotica-con-arduino/page/bluetooth](https://libros.catedu.es/books/domotica-con-arduino/page/bluetooth-app-arduino-I6y) la comunicación es PLACA&lt;-APP</p>

### <span style="color: rgb(22, 145, 121);">**RETO BÁSICO** </span>

<span style="color: rgb(22, 145, 121);">**Enunciado reto básico**</span>

<span style="color: rgb(22, 145, 121);"><span style="color: rgb(0, 0, 0);">Vamos a realizar :</span></span>

- <span style="color: rgb(22, 145, 121);"><span style="color: rgb(0, 0, 0);">Que desde la APP -&gt;Placa</span></span>
    - Con el comando A abre la puerta
    - Con el comando R que cierre la puerta
    - Con el comando L que se encienda o se apague el láser (es decir, si estaba encendido, que se apague, y viceversa)
- <span style="color: rgb(22, 145, 121);"><span style="color: rgb(0, 0, 0);">Que desde la Placa -&gt;APP</span></span>
    - <span style="color: rgb(22, 145, 121);"><span style="color: rgb(0, 0, 0);">Si detecta ladrón que avise</span></span>

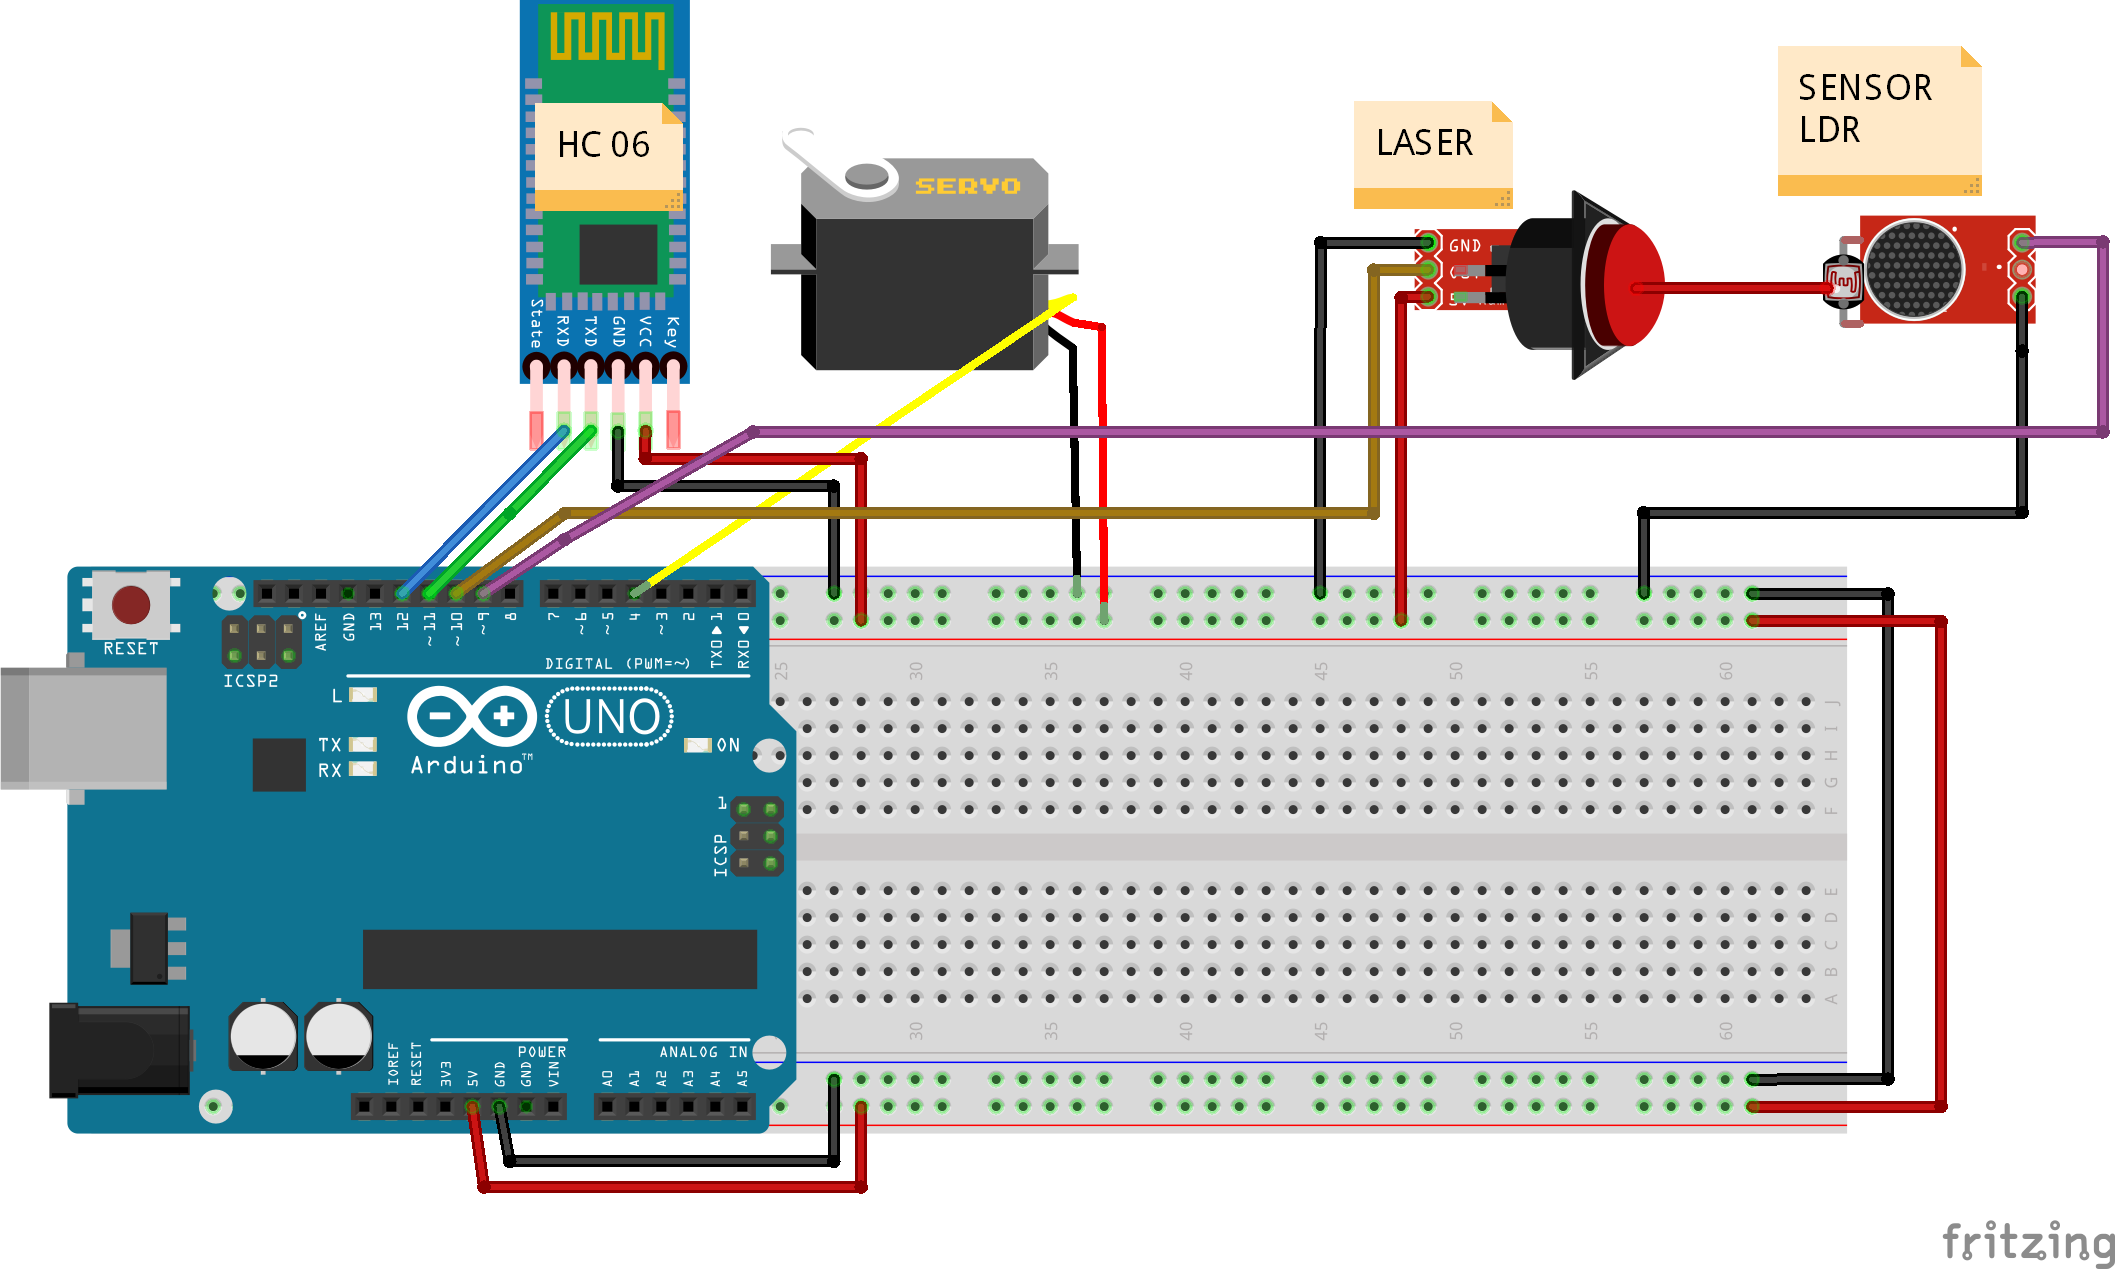
<span style="color: rgb(22, 145, 121);">**Conexiones reto básico**</span>

- <span style="color: rgb(22, 145, 121);"><span style="color: rgb(0, 0, 0);">Bluetooth HC-06 RX al 12 y TX al 11</span></span>
- <span style="color: rgb(22, 145, 121);"><span style="color: rgb(0, 0, 0);">Puerta servo D4</span></span>
- <span style="color: rgb(22, 145, 121);"><span style="color: rgb(0, 0, 0);">Láser D10 apuntando al LDR</span></span>
- <span style="color: rgb(22, 145, 121);"><span style="color: rgb(0, 0, 0);">Sensor LDR D9</span></span>

<span style="color: rgb(22, 145, 121);"><span style="color: rgb(0, 0, 0);">[![ARDUINO-DOMOTICA-BASICO-BIDIRECCIONAL-BLUETOOTH_bb.png](https://libros.catedu.es/uploads/images/gallery/2024-02/scaled-1680-/arduino-domotica-basico-bidireccional-bluetooth-bb.png)](https://libros.catedu.es/uploads/images/gallery/2024-02/arduino-domotica-basico-bidireccional-bluetooth-bb.png)</span></span>

<span style="color: rgb(22, 145, 121);">**RETO BÁSICO LA APP EN APP INVENTOR**</span>

los pasos son parecidos a los tratados en [https://libros.catedu.es/books/arduino-en-el-aula/page/app-tdr-steam-app-inventor-blocks](https://libros.catedu.es/books/arduino-en-el-aula/page/app-tdr-steam-app-inventor-blocks)

<iframe allowfullscreen="allowfullscreen" frameborder="0" height="569" src="https://docs.google.com/presentation/d/e/2PACX-1vTarhvN0P1AON9aL9gmx95tCT7i09_mbJh_81reCJ2QAHNNTb8UFA9wS5b4Ek82NVu9nxR_Wj9Jc6R0/embed?start=false&loop=false&delayms=3000" width="100%"></iframe>

<p class="callout success">Lo tienes en [https://gallery.appinventor.mit.edu/?galleryid=286eb7c2-792d-436c-b7d0-3d9e1e0592aa](https://gallery.appinventor.mit.edu/?galleryid=286eb7c2-792d-436c-b7d0-3d9e1e0592aa)</p>

<span style="color: rgb(0, 0, 0);">Para llevar la APP al móvil mira [https://libros.catedu.es/books/arduino-en-el-aula/page/llevar-la-app-creada-en-app-inventor-al-movil](https://libros.catedu.es/books/arduino-en-el-aula/page/llevar-la-app-creada-en-app-inventor-al-movil)</span>

<span style="color: rgb(22, 145, 121);">**RETO BÁSICO PROGRAMA EN EL ARDUINO CON CODIGO**</span>

<p class="callout success"><span style="color: rgb(0, 0, 0);">El programa lo tienes aquí [https://create.arduino.cc/editor/javierquintana/ea8fa750-8cd1-48fd-8ea1-65bac09b78ce/preview](https://create.arduino.cc/editor/javierquintana/ea8fa750-8cd1-48fd-8ea1-65bac09b78ce/preview)</span></p>

<iframe frameborder="0" src="https://create.arduino.cc/editor/javierquintana/ea8fa750-8cd1-48fd-8ea1-65bac09b78ce/preview?embed" style="height: 510px; width: 100%; margin: 10px 0;"></iframe>

<p class="callout warning">**BUG**: Cuando el laser pasa de APAGADO a ENCENDIDO, el LDR es más lento que el programa Arduino y detecta LADRÓN luego desaparece, pero ya se ha quedado el fondo de pantalla rojo.  
**RETO**: Habría que poner un pequeño retardo delay(500); para solucionar este problema ¿Dónde?</p>

<span style="color: rgb(22, 145, 121);">**Resultado video**</span>

<span style="color: rgb(22, 145, 121);">**[https://www.youtube.com/shorts/RZ\_0EX4OulI?feature=share](https://www.youtube.com/shorts/RZ_0EX4OulI?feature=share)**</span>

<span style="color: rgb(22, 145, 121);">**<iframe allow="accelerometer; autoplay; clipboard-write; encrypted-media; gyroscope; picture-in-picture; web-share" allowfullscreen="allowfullscreen" frameborder="0" height="817" src="https://www.youtube.com/embed/RZ_0EX4OulI" title="BIDIRECCIONAL BLUETOOTH APP INVENTOR RETO BÁSICO" width="460"></iframe>** </span>

### <span style="color: rgb(22, 145, 121);">**RETO AVANZADO**</span>

<span style="color: rgb(0, 0, 0);">Como en la página anterior</span>

##### <span style="color: rgb(22, 145, 121);">**RETO AVANZADO LA APP EN APP INVENTOR**</span>

los pasos son parecidos a los tratados en [https://libros.catedu.es/books/arduino-en-el-aula/page/app-tdr-steam-app-inventor-blocks](https://libros.catedu.es/books/arduino-en-el-aula/page/app-tdr-steam-app-inventor-blocks)  
<iframe allowfullscreen="allowfullscreen" frameborder="0" height="569" src="https://docs.google.com/presentation/d/e/2PACX-1vQFlnimw99RcGAICOHnRLcSQYpNUw41M-e84ZOOXVbeLS6jT8wuTOVgz_hNbCSMAtMusp-XyBEG-tFu/embed?start=false&loop=false&delayms=3000" width="100%"></iframe>

  
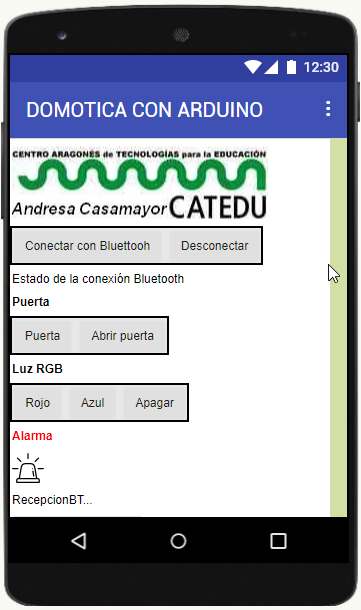
Pero en la vista de **Designer**, hemos añadido más botones, imagen, etc...  
[![designer.jpg](https://libros.catedu.es/uploads/images/gallery/2023-12/scaled-1680-/designer.jpg)](https://libros.catedu.es/uploads/images/gallery/2023-12/designer.jpg)
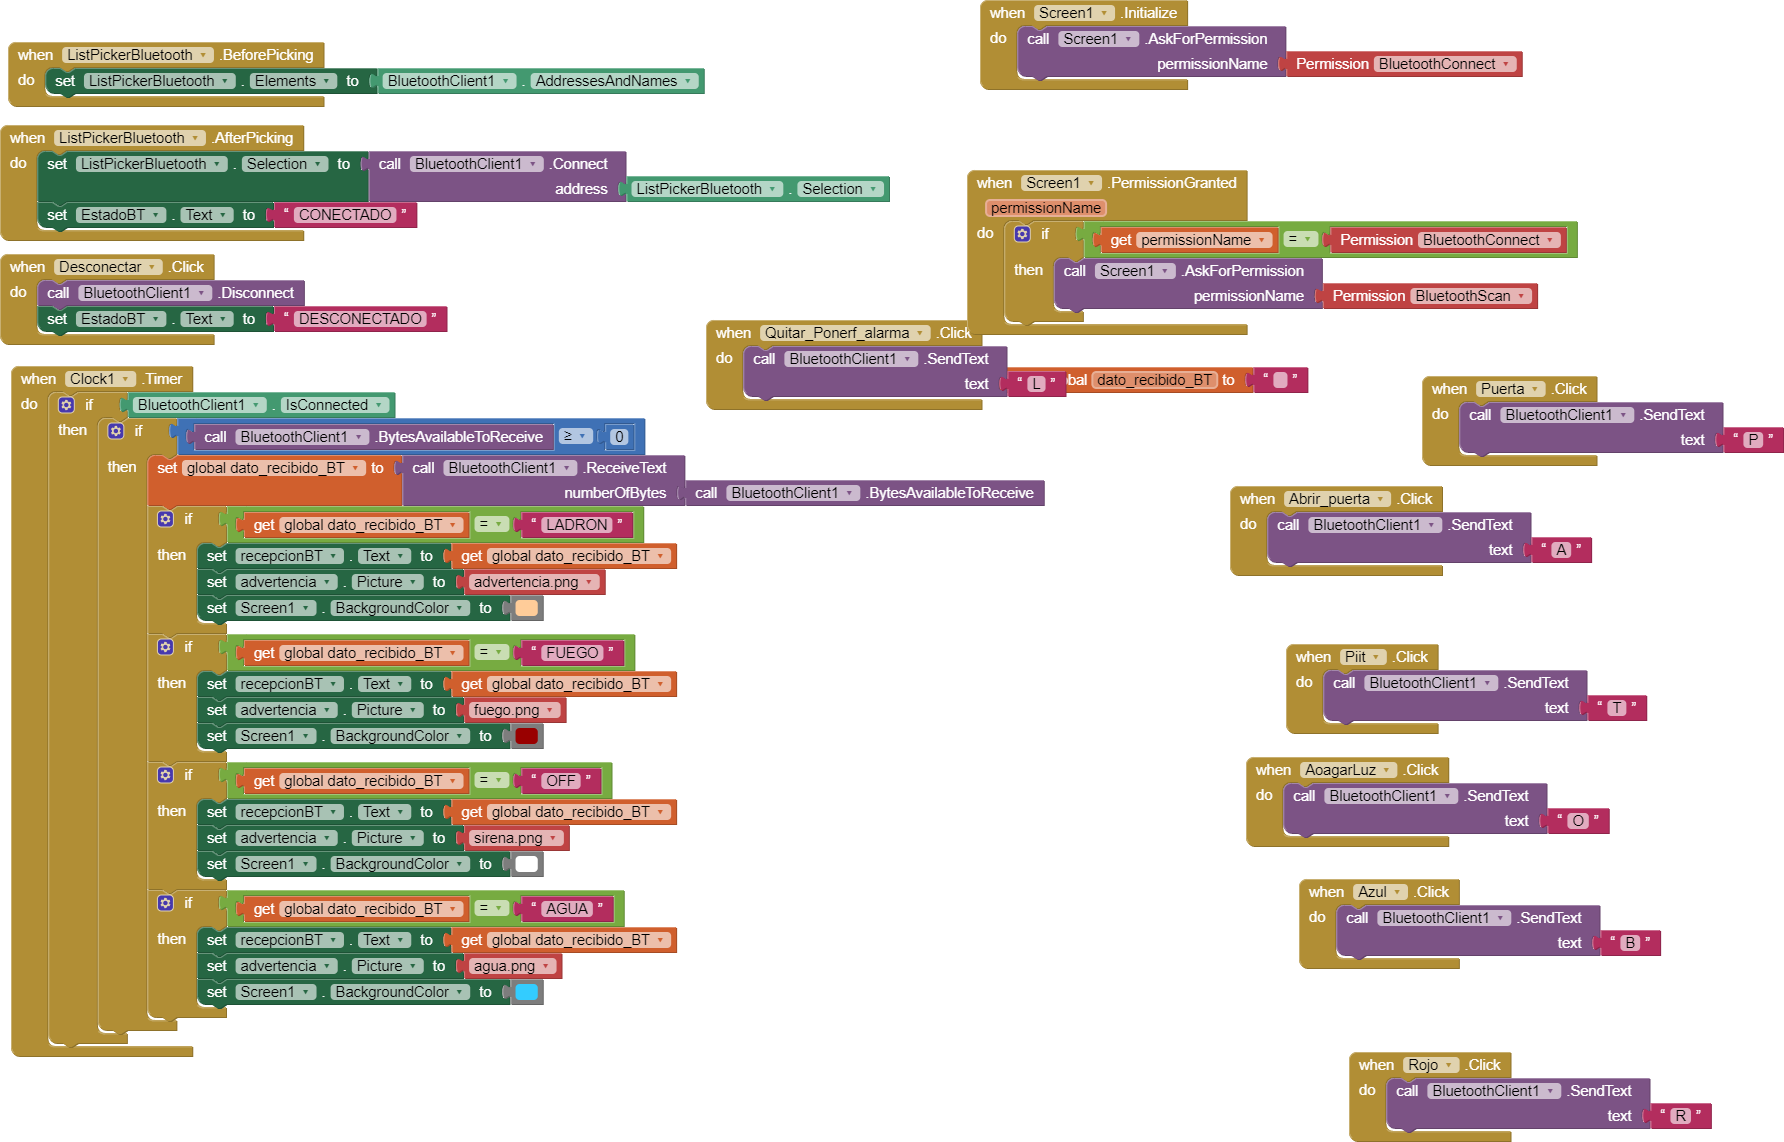
Y la vista de **Blocks** es más completa

[![blocks.png](https://libros.catedu.es/uploads/images/gallery/2023-12/scaled-1680-/mlGblocks.png)](https://libros.catedu.es/uploads/images/gallery/2023-12/mlGblocks.png)
El programa lo tienes aquí :  
[https://gallery.appinventor.mit.edu/?galleryid=b4979892-5df3-4225-90be-538a64d469e0](https://gallery.appinventor.mit.edu/?galleryid=b4979892-5df3-4225-90be-538a64d469e0)

##### <span style="color: rgb(22, 145, 121);">**RETO AVANZADO** </span><span style="color: rgb(22, 145, 121);">**EL PROGRAMA EN EL ARDUINO**</span>

Y hemos modificado el programa en Arduino para que envíe los comandos por bluetooth

<p class="callout success">Busca los comandos **Serial1.print(...);**</p>

[https://create.arduino.cc/editor/javierquintana/b2c39d6f-d0ef-44e2-bb5b-2d9351dddb94/preview](https://create.arduino.cc/editor/javierquintana/b2c39d6f-d0ef-44e2-bb5b-2d9351dddb94/preview)<iframe frameborder="0" src="https://create.arduino.cc/editor/javierquintana/b2c39d6f-d0ef-44e2-bb5b-2d9351dddb94/preview?embed" style="height: 510px; width: 100%; margin: 10px 0;"></iframe>

##### <span style="color: rgb(22, 145, 121);">**RETO AVANZADO** </span><span style="color: rgb(22, 145, 121);">**RESULTADO**</span>

[https://youtu.be/gtuJzYvTBJM](https://youtu.be/gtuJzYvTBJM)

<iframe allowfullscreen="allowfullscreen" height="314" src="https://www.youtube.com/embed/gtuJzYvTBJM" width="560"></iframe>