# MicroPython con Thonny

# Instalación de micropython

##### <span style="color: rgb(22, 145, 121);">**¿Dónde se instala el Micropython?**</span>

{{@12238#bkmrk-como-puedes-ver-en-e}}

[![2024-07-04 18_44_27-(1) Exploring the Arduino Nano ESP32 _ MicroPython & IoT Cloud - YouTube.png](https://libros.catedu.es/uploads/images/gallery/2024-07/scaled-1680-/2024-07-04-18-44-27-1-exploring-the-arduino-nano-esp32-micropython-iot-cloud-youtube.png)](https://libros.catedu.es/uploads/images/gallery/2024-07/2024-07-04-18-44-27-1-exploring-the-arduino-nano-esp32-micropython-iot-cloud-youtube.png)  
[Fuente vídeo Exploring the Arduino Nano ESP32 | MicroPython &amp; IoT](https://youtu.be/R51tf66es9w?t=1512)

##### <span style="color: rgb(22, 145, 121);">**¿Qué programa vamos a usar?**</span>

Usaremos el Thonny [https://thonny.org/](https://thonny.org/) que lo puedes descargar e instalar de esta página: [https://thonny.org/](https://thonny.org/)

[![2024-12-26 22_31_14-Thonny, Python IDE for beginners.png](https://libros.catedu.es/uploads/images/gallery/2024-12/scaled-1680-/2024-12-26-22-31-14-thonny-python-ide-for-beginners.png)](https://libros.catedu.es/uploads/images/gallery/2024-12/2024-12-26-22-31-14-thonny-python-ide-for-beginners.png)

##### <span style="color: rgb(22, 145, 121);">**¿Cómo se instala micropython con Thonny en Picobricks?**</span>

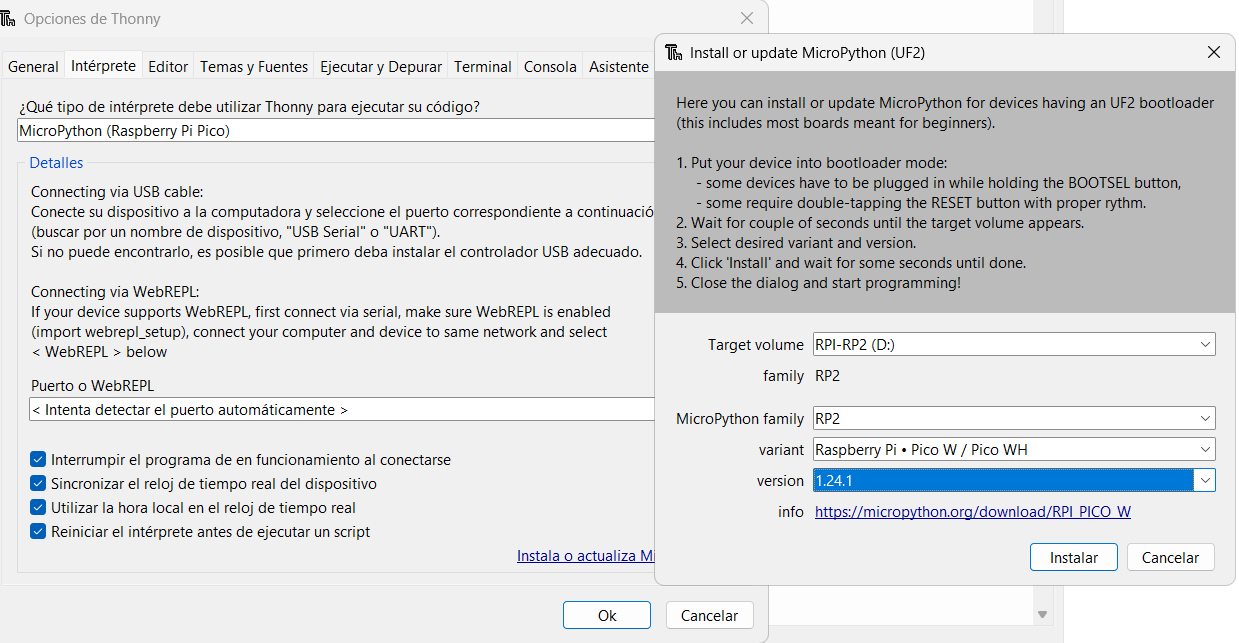
<span style="color: rgb(0, 0, 0);">Entramos en ejecutar-configurar intérprete</span>

<span style="color: rgb(0, 0, 0);">[![2024-12-26 22_33_05-.png](https://libros.catedu.es/uploads/images/gallery/2024-12/scaled-1680-/2024-12-26-22-33-05.png)](https://libros.catedu.es/uploads/images/gallery/2024-12/2024-12-26-22-33-05.png)</span>

<span style="color: rgb(0, 0, 0);">Seleccionamos en ¿Qué tipo de interprete ...? le decimos que **Rasbperry Pi pico** y el puerto si lo sabemos lo seleccionamos o si no lo sabemos que lo detecte automáticamente</span>

<span style="color: rgb(0, 0, 0);">[![2024-12-26 22_34_50-Thonny  -  _sin nombre_  @  1 _ 1.png](https://libros.catedu.es/uploads/images/gallery/2024-12/scaled-1680-/2024-12-26-22-34-50-thonny-sin-nombre-at-1-1.png)](https://libros.catedu.es/uploads/images/gallery/2024-12/2024-12-26-22-34-50-thonny-sin-nombre-at-1-1.png)  
</span>

<p class="callout warning"><span style="color: rgb(0, 0, 0);">{{@12670#bkmrk-atenci%C3%93n-desconectam}}</span></p>

<span style="color: rgb(0, 0, 0);">Entonces le damos a Instalar y lo instala en la unidad nueva que ha detectado, en el siguiente diálogo seleccionamos v**ariante Raspberry pico W:**</span>

[![2024-12-26 23_51_38-Thonny  -  _sin nombre_  @  1 _ 1.png](https://libros.catedu.es/uploads/images/gallery/2024-12/scaled-1680-/2024-12-26-23-51-38-thonny-sin-nombre-at-1-1.png)](https://libros.catedu.es/uploads/images/gallery/2024-12/2024-12-26-23-51-38-thonny-sin-nombre-at-1-1.png)

Si visualizamos la ventana de archivos

[![2024-12-27 00_20_16-.png](https://libros.catedu.es/uploads/images/gallery/2024-12/scaled-1680-/2024-12-27-00-20-16.png)](https://libros.catedu.es/uploads/images/gallery/2024-12/2024-12-27-00-20-16.png)
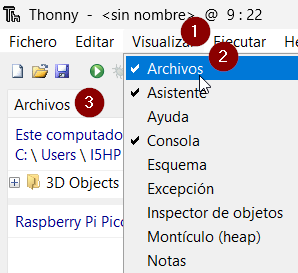
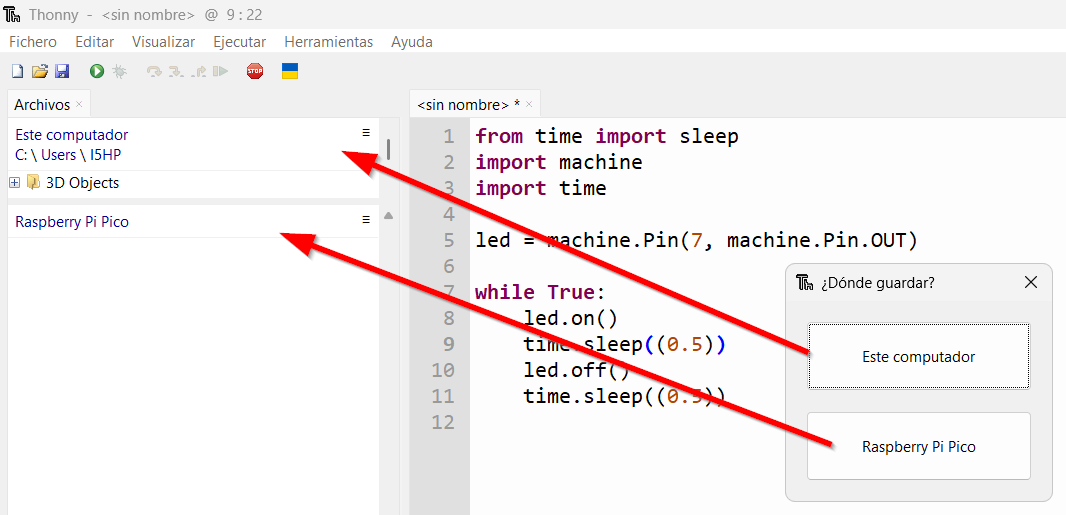
Podemos ver que a la hora de guardar nos pregunta si lo queremos guardar en el chip de PicoBricks o en tu ordenador

[![2024-12-27 00_23_20-Thonny  -  _sin nombre_  @  9 _ 22.png](https://libros.catedu.es/uploads/images/gallery/2024-12/scaled-1680-/2024-12-27-00-23-20-thonny-sin-nombre-at-9-22.png)](https://libros.catedu.es/uploads/images/gallery/2024-12/2024-12-27-00-23-20-thonny-sin-nombre-at-9-22.png)
<p class="callout info">**¿SABIAS QUE ...?**  
Si lo grabas en Raspberry Pi Pico con el nombre de **main.py**, entonces cuando enciendas el Picobricks, se ejecutará automáticamente sin necesidad de ningún ordenador</p>

# El primer programa con Python: Blink

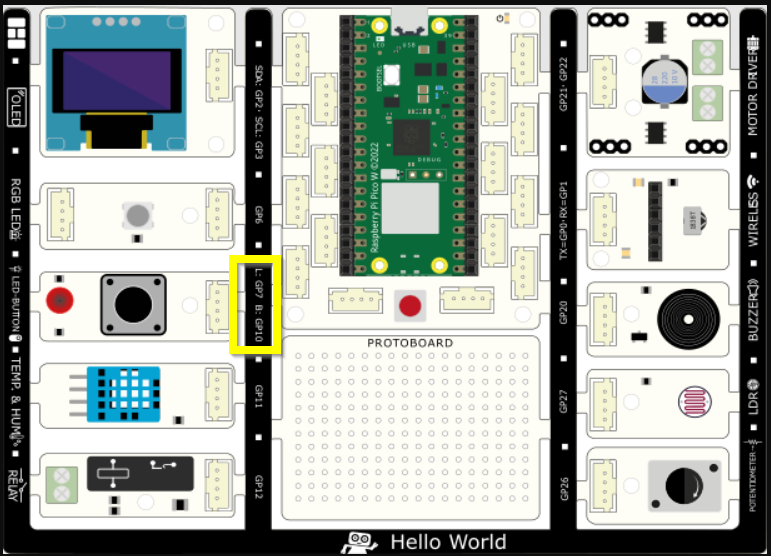
El led rojo está en el pin GPI7 tal y como lo indica en la placa

[![2024-12-27 00_17_32-picobricks.png (611×439).png](https://libros.catedu.es/uploads/images/gallery/2024-12/scaled-1680-/2024-12-27-00-17-32-picobricks-png-611439.png)](https://libros.catedu.es/uploads/images/gallery/2024-12/2024-12-27-00-17-32-picobricks-png-611439.png)
Luego ponemos en el Thonny el siguiente programa

```
from time import sleep
import machine
import time

led = machine.Pin(7, machine.Pin.OUT)

while True:
    led.on()
    time.sleep((0.5))
    led.off()
    time.sleep((0.5))
```

Ejecutamos con F5

[![2024-12-27 00_03_30-Thonny  -  _sin nombre_  @  1 _ 1.png](https://libros.catedu.es/uploads/images/gallery/2024-12/scaled-1680-/2024-12-27-00-03-30-thonny-sin-nombre-at-1-1.png)](https://libros.catedu.es/uploads/images/gallery/2024-12/2024-12-27-00-03-30-thonny-sin-nombre-at-1-1.png)
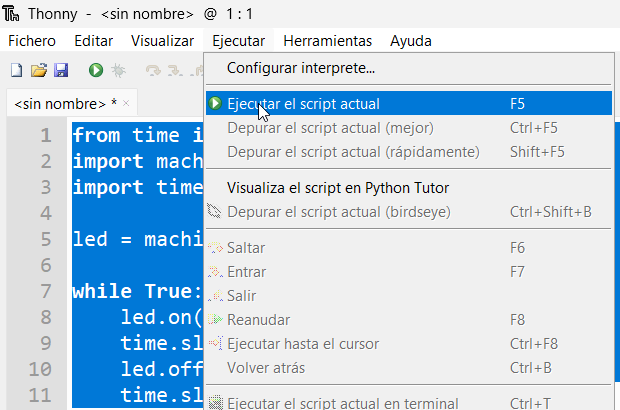
y el led parpadea como estaba previsto

Otra forma de conseguir el programa es con la ventana de Python de PicoBlockly

[![2024-12-27 00_15_08-PicoBricks Blocks.png](https://libros.catedu.es/uploads/images/gallery/2024-12/scaled-1680-/2024-12-27-00-15-08-picobricks-blocks.png)](https://libros.catedu.es/uploads/images/gallery/2024-12/2024-12-27-00-15-08-picobricks-blocks.png)
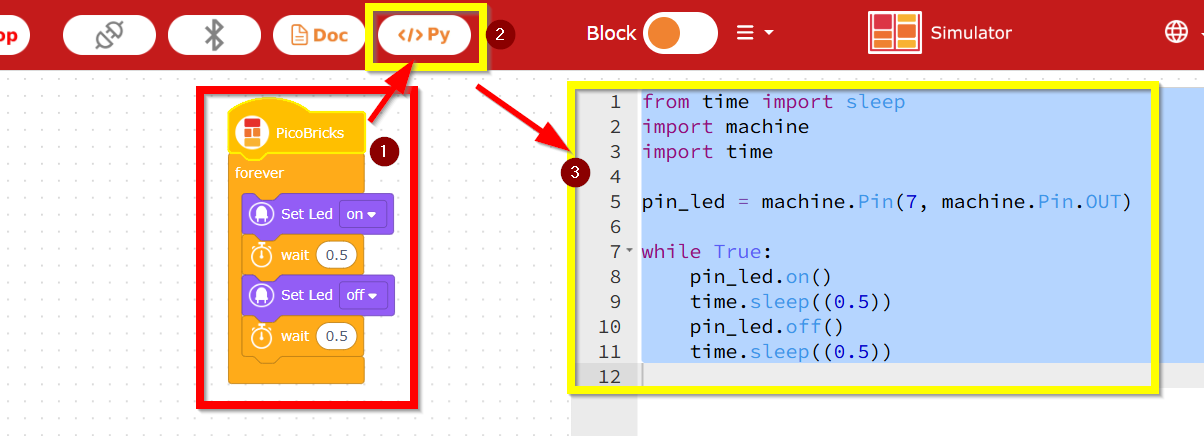
Otra manera de ver el mismo programa, está en la página 25 del libro [https://picobricks.com/pages/projectbook](https://picobricks.com/pages/projectbook)

se encuentra el mismo código pero usando la instrucción

```
 led.toggle() 
```

 <iframe allow="autoplay" height="480" src="https://drive.google.com/file/d/1PDql_GYyxcz68JqmQAGOLs0YE6SXgPCm/preview" width="640"></iframe>

# Proyectos

<span style="text-decoration: underline;">Los mismos proyectos </span>vistos con PicoBlockly se pueden hacer igual con código.

##### <span style="color: rgb(22, 145, 121);">**Repositorio ide picobrkics**</span>

<span style="color: rgb(0, 0, 0);">[https://ide.picobricks.com/examples/examples.ht](https://ide.picobricks.com/examples/examples.ht)</span>

##### <span style="color: rgb(22, 145, 121);">**Repositorio Github**</span>

<span style="color: rgb(0, 0, 0);">En la ruta [https://github.com/Robotistan/PicoBricks/tree/main/Software/Activities](https://github.com/Robotistan/PicoBricks/tree/main/Software/Activities) los tienes listos los programas para copiar y pegar</span>

1. [- Blink](https://github.com/Robotistan/PicoBricks/tree/main/Software/Activities/Blink "Heading Link")[<svg aria-hidden="true" class="octicon octicon-link" height="16" version="1.1" viewbox="0 0 16 16" width="16"><path d="m7.775 3.275 1.25-1.25a3.5 3.5 0 1 1 4.95 4.95l-2.5 2.5a3.5 3.5 0 0 1-4.95 0 .751.751 0 0 1 .018-1.042.751.751 0 0 1 1.042-.018 1.998 1.998 0 0 0 2.83 0l2.5-2.5a2.002 2.002 0 0 0-2.83-2.83l-1.25 1.25a.751.751 0 0 1-1.042-.018.751.751 0 0 1-.018-1.042Zm-4.69 9.64a1.998 1.998 0 0 0 2.83 0l1.25-1.25a.751.751 0 0 1 1.042.018.751.751 0 0 1 .018 1.042l-1.25 1.25a3.5 3.5 0 1 1-4.95-4.95l2.5-2.5a3.5 3.5 0 0 1 4.95 0 .751.751 0 0 1-.018 1.042.751.751 0 0 1-1.042.018 1.998 1.998 0 0 0-2.83 0l-2.5 2.5a1.998 1.998 0 0 0 0 2.83Z"></path></svg>](https://github.com/Robotistan/PicoBricks/tree/main/Software/Activities#--blink)
2. [- Action-Reaction](https://github.com/Robotistan/PicoBricks/tree/main/Software/Activities/Action-Reaction "Heading Link")[<svg aria-hidden="true" class="octicon octicon-link" height="16" version="1.1" viewbox="0 0 16 16" width="16"><path d="m7.775 3.275 1.25-1.25a3.5 3.5 0 1 1 4.95 4.95l-2.5 2.5a3.5 3.5 0 0 1-4.95 0 .751.751 0 0 1 .018-1.042.751.751 0 0 1 1.042-.018 1.998 1.998 0 0 0 2.83 0l2.5-2.5a2.002 2.002 0 0 0-2.83-2.83l-1.25 1.25a.751.751 0 0 1-1.042-.018.751.751 0 0 1-.018-1.042Zm-4.69 9.64a1.998 1.998 0 0 0 2.83 0l1.25-1.25a.751.751 0 0 1 1.042.018.751.751 0 0 1 .018 1.042l-1.25 1.25a3.5 3.5 0 1 1-4.95-4.95l2.5-2.5a3.5 3.5 0 0 1 4.95 0 .751.751 0 0 1-.018 1.042.751.751 0 0 1-1.042.018 1.998 1.998 0 0 0-2.83 0l-2.5 2.5a1.998 1.998 0 0 0 0 2.83Z"></path></svg>](https://github.com/Robotistan/PicoBricks/tree/main/Software/Activities#--action-reaction)
3. [- Autonomous Lighting](https://github.com/Robotistan/PicoBricks/tree/main/Software/Activities/Autonomous%20Lighting "Heading Link")[<svg aria-hidden="true" class="octicon octicon-link" height="16" version="1.1" viewbox="0 0 16 16" width="16"><path d="m7.775 3.275 1.25-1.25a3.5 3.5 0 1 1 4.95 4.95l-2.5 2.5a3.5 3.5 0 0 1-4.95 0 .751.751 0 0 1 .018-1.042.751.751 0 0 1 1.042-.018 1.998 1.998 0 0 0 2.83 0l2.5-2.5a2.002 2.002 0 0 0-2.83-2.83l-1.25 1.25a.751.751 0 0 1-1.042-.018.751.751 0 0 1-.018-1.042Zm-4.69 9.64a1.998 1.998 0 0 0 2.83 0l1.25-1.25a.751.751 0 0 1 1.042.018.751.751 0 0 1 .018 1.042l-1.25 1.25a3.5 3.5 0 1 1-4.95-4.95l2.5-2.5a3.5 3.5 0 0 1 4.95 0 .751.751 0 0 1-.018 1.042.751.751 0 0 1-1.042.018 1.998 1.998 0 0 0-2.83 0l-2.5 2.5a1.998 1.998 0 0 0 0 2.83Z"></path></svg>](https://github.com/Robotistan/PicoBricks/tree/main/Software/Activities#--autonomous-lighting)
4. [- Thermometer](https://github.com/Robotistan/PicoBricks/tree/main/Software/Activities/Thermometer "Heading Link")[<svg aria-hidden="true" class="octicon octicon-link" height="16" version="1.1" viewbox="0 0 16 16" width="16"><path d="m7.775 3.275 1.25-1.25a3.5 3.5 0 1 1 4.95 4.95l-2.5 2.5a3.5 3.5 0 0 1-4.95 0 .751.751 0 0 1 .018-1.042.751.751 0 0 1 1.042-.018 1.998 1.998 0 0 0 2.83 0l2.5-2.5a2.002 2.002 0 0 0-2.83-2.83l-1.25 1.25a.751.751 0 0 1-1.042-.018.751.751 0 0 1-.018-1.042Zm-4.69 9.64a1.998 1.998 0 0 0 2.83 0l1.25-1.25a.751.751 0 0 1 1.042.018.751.751 0 0 1 .018 1.042l-1.25 1.25a3.5 3.5 0 1 1-4.95-4.95l2.5-2.5a3.5 3.5 0 0 1 4.95 0 .751.751 0 0 1-.018 1.042.751.751 0 0 1-1.042.018 1.998 1.998 0 0 0-2.83 0l-2.5 2.5a1.998 1.998 0 0 0 0 2.83Z"></path></svg>](https://github.com/Robotistan/PicoBricks/tree/main/Software/Activities#--thermometer)
5. [- Graphic Monitor](https://github.com/Robotistan/PicoBricks/tree/main/Software/Activities/Graphic%20Monitor "Heading Link")[<svg aria-hidden="true" class="octicon octicon-link" height="16" version="1.1" viewbox="0 0 16 16" width="16"><path d="m7.775 3.275 1.25-1.25a3.5 3.5 0 1 1 4.95 4.95l-2.5 2.5a3.5 3.5 0 0 1-4.95 0 .751.751 0 0 1 .018-1.042.751.751 0 0 1 1.042-.018 1.998 1.998 0 0 0 2.83 0l2.5-2.5a2.002 2.002 0 0 0-2.83-2.83l-1.25 1.25a.751.751 0 0 1-1.042-.018.751.751 0 0 1-.018-1.042Zm-4.69 9.64a1.998 1.998 0 0 0 2.83 0l1.25-1.25a.751.751 0 0 1 1.042.018.751.751 0 0 1 .018 1.042l-1.25 1.25a3.5 3.5 0 1 1-4.95-4.95l2.5-2.5a3.5 3.5 0 0 1 4.95 0 .751.751 0 0 1-.018 1.042.751.751 0 0 1-1.042.018 1.998 1.998 0 0 0-2.83 0l-2.5 2.5a1.998 1.998 0 0 0 0 2.83Z"></path></svg>](https://github.com/Robotistan/PicoBricks/tree/main/Software/Activities#--graphic-monitor)
6. [- Dominate the Rhythm](https://github.com/Robotistan/PicoBricks/tree/main/Software/Activities/Dominate%20the%20Rhythm "Heading Link")[<svg aria-hidden="true" class="octicon octicon-link" height="16" version="1.1" viewbox="0 0 16 16" width="16"><path d="m7.775 3.275 1.25-1.25a3.5 3.5 0 1 1 4.95 4.95l-2.5 2.5a3.5 3.5 0 0 1-4.95 0 .751.751 0 0 1 .018-1.042.751.751 0 0 1 1.042-.018 1.998 1.998 0 0 0 2.83 0l2.5-2.5a2.002 2.002 0 0 0-2.83-2.83l-1.25 1.25a.751.751 0 0 1-1.042-.018.751.751 0 0 1-.018-1.042Zm-4.69 9.64a1.998 1.998 0 0 0 2.83 0l1.25-1.25a.751.751 0 0 1 1.042.018.751.751 0 0 1 .018 1.042l-1.25 1.25a3.5 3.5 0 1 1-4.95-4.95l2.5-2.5a3.5 3.5 0 0 1 4.95 0 .751.751 0 0 1-.018 1.042.751.751 0 0 1-1.042.018 1.998 1.998 0 0 0-2.83 0l-2.5 2.5a1.998 1.998 0 0 0 0 2.83Z"></path></svg>](https://github.com/Robotistan/PicoBricks/tree/main/Software/Activities#--dominate-the-rhythm)
7. [- Show Your Reaction](https://github.com/Robotistan/PicoBricks/tree/main/Software/Activities/Show%20Your%20Reaction "Heading Link")[<svg aria-hidden="true" class="octicon octicon-link" height="16" version="1.1" viewbox="0 0 16 16" width="16"><path d="m7.775 3.275 1.25-1.25a3.5 3.5 0 1 1 4.95 4.95l-2.5 2.5a3.5 3.5 0 0 1-4.95 0 .751.751 0 0 1 .018-1.042.751.751 0 0 1 1.042-.018 1.998 1.998 0 0 0 2.83 0l2.5-2.5a2.002 2.002 0 0 0-2.83-2.83l-1.25 1.25a.751.751 0 0 1-1.042-.018.751.751 0 0 1-.018-1.042Zm-4.69 9.64a1.998 1.998 0 0 0 2.83 0l1.25-1.25a.751.751 0 0 1 1.042.018.751.751 0 0 1 .018 1.042l-1.25 1.25a3.5 3.5 0 1 1-4.95-4.95l2.5-2.5a3.5 3.5 0 0 1 4.95 0 .751.751 0 0 1-.018 1.042.751.751 0 0 1-1.042.018 1.998 1.998 0 0 0-2.83 0l-2.5 2.5a1.998 1.998 0 0 0 0 2.83Z"></path></svg>](https://github.com/Robotistan/PicoBricks/tree/main/Software/Activities#--show-your-reaction)
8. [- My Timer](https://github.com/Robotistan/PicoBricks/tree/main/Software/Activities/My%20Timer "Heading Link")[<svg aria-hidden="true" class="octicon octicon-link" height="16" version="1.1" viewbox="0 0 16 16" width="16"><path d="m7.775 3.275 1.25-1.25a3.5 3.5 0 1 1 4.95 4.95l-2.5 2.5a3.5 3.5 0 0 1-4.95 0 .751.751 0 0 1 .018-1.042.751.751 0 0 1 1.042-.018 1.998 1.998 0 0 0 2.83 0l2.5-2.5a2.002 2.002 0 0 0-2.83-2.83l-1.25 1.25a.751.751 0 0 1-1.042-.018.751.751 0 0 1-.018-1.042Zm-4.69 9.64a1.998 1.998 0 0 0 2.83 0l1.25-1.25a.751.751 0 0 1 1.042.018.751.751 0 0 1 .018 1.042l-1.25 1.25a3.5 3.5 0 1 1-4.95-4.95l2.5-2.5a3.5 3.5 0 0 1 4.95 0 .751.751 0 0 1-.018 1.042.751.751 0 0 1-1.042.018 1.998 1.998 0 0 0-2.83 0l-2.5 2.5a1.998 1.998 0 0 0 0 2.83Z"></path></svg>](https://github.com/Robotistan/PicoBricks/tree/main/Software/Activities#--my-timer)
9. [- Alarm Clock](https://github.com/Robotistan/PicoBricks/tree/main/Software/Activities/Alarm%20Clock "Heading Link")[<svg aria-hidden="true" class="octicon octicon-link" height="16" version="1.1" viewbox="0 0 16 16" width="16"><path d="m7.775 3.275 1.25-1.25a3.5 3.5 0 1 1 4.95 4.95l-2.5 2.5a3.5 3.5 0 0 1-4.95 0 .751.751 0 0 1 .018-1.042.751.751 0 0 1 1.042-.018 1.998 1.998 0 0 0 2.83 0l2.5-2.5a2.002 2.002 0 0 0-2.83-2.83l-1.25 1.25a.751.751 0 0 1-1.042-.018.751.751 0 0 1-.018-1.042Zm-4.69 9.64a1.998 1.998 0 0 0 2.83 0l1.25-1.25a.751.751 0 0 1 1.042.018.751.751 0 0 1 .018 1.042l-1.25 1.25a3.5 3.5 0 1 1-4.95-4.95l2.5-2.5a3.5 3.5 0 0 1 4.95 0 .751.751 0 0 1-.018 1.042.751.751 0 0 1-1.042.018 1.998 1.998 0 0 0-2.83 0l-2.5 2.5a1.998 1.998 0 0 0 0 2.83Z"></path></svg>](https://github.com/Robotistan/PicoBricks/tree/main/Software/Activities#--alarm-clock)
10. [- Know Your Color](https://github.com/Robotistan/PicoBricks/tree/main/Software/Activities/Know%20Your%20Color "Heading Link")
11. [Buzz Wire Game](https://github.com/Robotistan/PicoBricks/tree/main/Software/Activities/Buzz%20Wire%20Game)

##### <span style="color: rgb(22, 145, 121);">**Libro Projectbook**</span>

Los tienes en este libro (en inglés) que lo puedes conseguir aquí [https://picobricks.com/pages/projectbook](https://picobricks.com/pages/projectbookNo)

- PROYECTO BLINK ver pag 25
- PROYECTO ACTION-REACTION ver pag 29
- PROYECTO Autonomous Lighting ver pag 35
- PROYECTO Thermometer ver pag 41
- PROYECTO Graphic Monitor ver pag 46
- PROYECTO Dominate the Rhythm ver pag 55
- PROYECTO Show Your Reaction ver pag 63
- PROYECTO My Timer ver pag 71
- PROYECTO Alarm Clock ver pag 81
- PROYECTO Know Your Color ver pag 90
- PROYECTO Buzz Wire Game ver pag 106

<p class="callout warning">A diferencia de Microblocks, no los explica paso a paso, por lo que es mejor copiar y pegar de los repositorios de Github</p>

 <iframe allow="autoplay" height="480" src="https://drive.google.com/file/d/1PDql_GYyxcz68JqmQAGOLs0YE6SXgPCm/preview" width="640"></iframe>

Al no tener licencia CC no los podemos reproducir aquí en este tutorial

# Un proyecto diferente: Encender y apagar led por wifi

En la lista de proyectos que propone PicoBricks sólo hay uno que usa la Wifi [SmartHome](https://github.com/Robotistan/PicoBricks/tree/main/Software/Activities/Smart%20Greenhouse), pero **no utiliza la wifi de Raspberry Pi** sino que utiliza un módulo wifi ESP8266 auxiliar.

Proponemos uno que no use elementos auxiliares

<p class="callout info">**Enunciado**: Encender y apagar el led rojo conectado en GPI7 a través de una página web puesto en el servidor que se instala en la Raspberry</p>

##### <span style="color: rgb(22, 145, 121);">**Solución**</span>

<p class="callout success">La explicación del programa está en [https://peppe8o.com/getting-started-with-wifi-on-raspberry-pi-pico-w-and-micropython/](https://peppe8o.com/getting-started-with-wifi-on-raspberry-pi-pico-w-and-micropython/)  
La fuente del programa en [https://github.com/raspberrypi/pico-micropython-examples/blob/master/wireless/webserver.py](https://github.com/raspberrypi/pico-micropython-examples/blob/master/wireless/webserver.py)</p>

<p class="callout warning">**Recuerda** que tienes que poner los datos de tu wifi en las líneas 35 y 36</p>

```python
import socket
################################33
import network, rp2
import time

def connectWiFi(ssid,password,country):
   rp2.country(country)
   wlan = network.WLAN(network.STA_IF)
   wlan.config(pm = 0xa11140)
   wlan.active(True)
   wlan.connect(ssid, password)
   # Wait for connect or fail
   max_wait = 10
   while max_wait > 0:
      if wlan.status() < 0 or wlan.status() >= 3:
        break
      max_wait -= 1
      print('waiting for connection...')
      time.sleep(1)

   # Handle connection error
   if wlan.status() != 3:
      raise RuntimeError('network connection failed')
   else:
      print('connected')
      status = wlan.ifconfig()
      print( 'ip = ' + status[0] )
   return status
######################################################333
from machine import Pin

led = Pin(7, Pin.OUT)

country = 'ES'
ssid = 'pon aqui el nombre de tu wifi'
password = 'pon aqui el password de tu wifi'

wifi_connection = connectWiFi(ssid,password,country)
#########################################################################33333
html = """
<html>
<head> <title>Pico W</title> </head>
<body> <h1>Pico W</h1>
<p>Current status: %s</p>
<p><a href="http://"""+wifi_connection[0]+"""/light/on">Turn ON</a></p>
<p><a href="http://"""+wifi_connection[0]+"""/light/off">Turn OFF</a></p>
<p>by <a href="https://peppe8o.com">peppe8o.com</a></p>
</body>
</html>
"""
######################################################################


# Open socket
addr = socket.getaddrinfo('0.0.0.0', 80)[0][-1]
s = socket.socket()
s.bind(addr)
s.listen(1)

print('listening on', addr)

# Initialize LED status
led.value(0)
stateis = "LED is OFF"

# Listen for connections
while True:
  try:
    cl, addr = s.accept()
    print('client connected from', addr)
    request = cl.recv(1024)
    print(request)

    request = str(request)[0:50] # The [0:50] avoids getting the url directory from referer 
    led_status = request.find('GET / HTTP')
    led_on = request.find('/light/on')
    led_off = request.find('/light/off')
    print( 'led on = ' + str(led_on))
    print( 'led off = ' + str(led_off))

    if led_status >0:
      print("LED status request") # No LED action

    if led_on >0:
      print("led on")
      led.value(1)
      stateis = "LED is ON"

    if led_off >0:
      print("led off")
      led.value(0)
      stateis = "LED is OFF"

    response = html % stateis

    cl.send('HTTP/1.0 200 OK\r\nContent-type: text/html\r\n\r\n')
    cl.send(response)
    cl.close()

  except OSError as e:
    cl.close()
    s.close()
    print('connection closed')
```

##### <span style="color: rgb(22, 145, 121);">**Ejecución del programa**</span>

Para encender y apagar el led tienes que entrar en la IP de la Raspberry Pi, puedes verlo en la ventana del puerto serie (cónsola) que puedes ver en el programa Thonny:

[![2024-12-28 22_40_50-Thonny  -  C__Users_I5HP_Downloads_wifi.py  @  97 _ 22.png](https://libros.catedu.es/uploads/images/gallery/2024-12/scaled-1680-/2024-12-28-22-40-50-thonny-c-users-i5hp-downloads-wifi-py-at-97-22.png)](https://libros.catedu.es/uploads/images/gallery/2024-12/2024-12-28-22-40-50-thonny-c-users-i5hp-downloads-wifi-py-at-97-22.png)
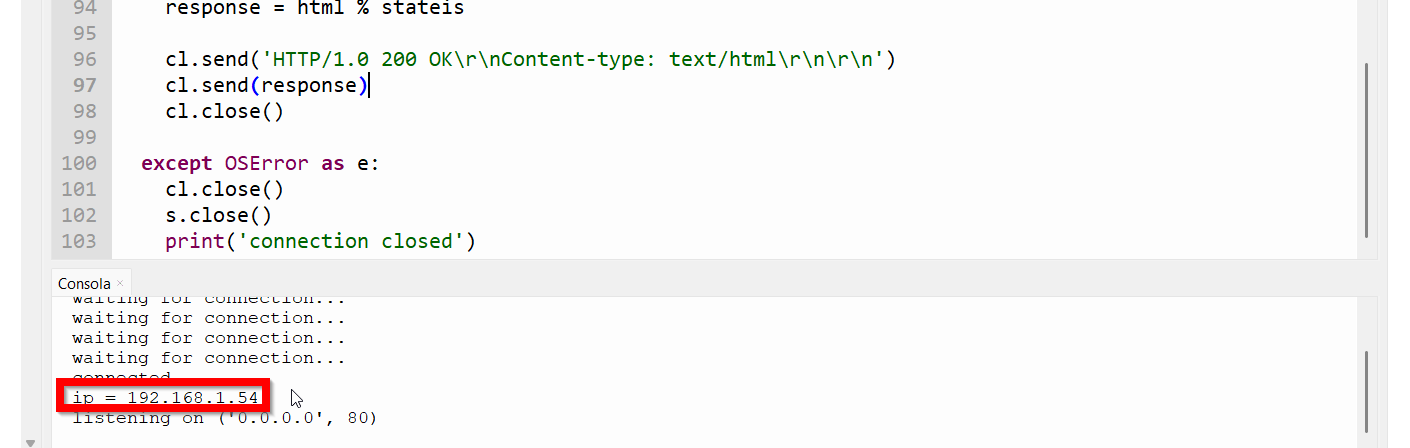
Otro truco es ejecutar un programa de rastreo de IPs como el [Wireless Network Watcher](https://www.nirsoft.net/utils/wireless_network_watcher.html) y ver la IP de la Raspberry. O poner una IP estática ver [aquí](https://randomnerdtutorials.com/raspberry-pi-pico-w-wi-fi-micropython/)  
[![2024-12-28 22_45_08-Wireless Network Watcher.png](https://libros.catedu.es/uploads/images/gallery/2024-12/scaled-1680-/2024-12-28-22-45-08-wireless-network-watcher.png)](https://libros.catedu.es/uploads/images/gallery/2024-12/2024-12-28-22-45-08-wireless-network-watcher.png)
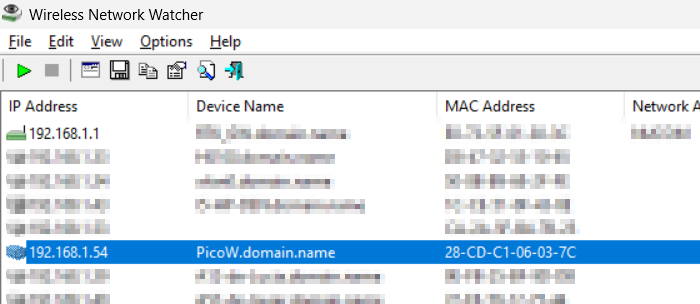
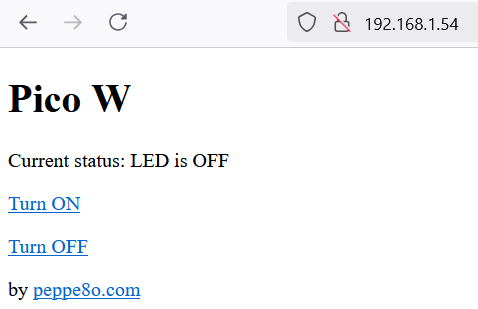
Abrimos un navegador y ponemos la IP de la Raspberry en mi caso 192.168.1.54

[![2024-12-28 22_53_21-Pico W — Mozilla Firefox.png](https://libros.catedu.es/uploads/images/gallery/2024-12/scaled-1680-/2024-12-28-22-53-21-pico-w-mozilla-firefox.png)](https://libros.catedu.es/uploads/images/gallery/2024-12/2024-12-28-22-53-21-pico-w-mozilla-firefox.png)
<iframe allow="accelerometer; autoplay; clipboard-write; encrypted-media; gyroscope; picture-in-picture; web-share" allowfullscreen="allowfullscreen" frameborder="0" height="599" src="https://www.youtube.com/embed/pRtXEg_cCCI" title="encendido apagado led wifi picobricks" width="337"></iframe>

<p class="callout info">Si os sale el error OSError: \[Errno 98\] EADDRINUSE es porque no se ha cerrado bien la conexión, desconectar PicoBrikcs y volverlo a conectar y solucionado</p>

</body></html>

# Envío de mensajes a Telegram

En la anterior página, PicoBricks hacía de servidor, alojaba una página web y desde el exterior, se llamaba a su página web para encender y apagar un led.

¿y al revés? es decir, la llamada de PicoBricks a una web externa, por ejemplo la api de Telegram y así poder enviar temperatura, datos, etc.. de forma muy fácil :

- Primero [creando un bot de Telegram y consiguiendo su Token ](https://libros.catedu.es/books/arduino-alvik/page/crear-bot-en-telegram)
- Segundo [identificar nuestro ID de usuario a donde enviar el mensaje](https://libros.catedu.es/books/arduino-alvik/page/encontrar-tu-id-en-telegram)
- Tercero utilizar la instrucción urequest.get(laurl) de la librería urequests

<p class="callout info">Tienes que poner en la línea 11 los datos de tu wifi</p>

<p class="callout info">Tienes que poner en la url de la línea 16:  
- Donde pone **PONTUBOT** sustitúyelo por el token del bot que has conseguido en [reando un bot de Telegram y consiguiendo su Token ](https://libros.catedu.es/books/arduino-alvik/page/crear-bot-en-telegram)  
- Donde pone **PONTUID** sustitúyelo por el ID de tu usuario a donde hay que enviar el mensaje ver [identificar nuestro ID de usuario a donde enviar el mensaje](https://libros.catedu.es/books/arduino-alvik/page/encontrar-tu-id-en-telegram)</p>

```
## extraido del proyecto action-reaction https://github.com/Robotistan/PicoBricks/tree/main/Software/Activities/Action-Reaction
from machine import Pin#to acces the hardware picobricks 
led = Pin(7,Pin.OUT)                         #### initialize digital pin as an output for led
push_button = Pin(10,Pin.IN,Pin.PULL_DOWN)   ### initialize digital pin 10 as an input
        
##### extraido de página 21 de https://datasheets.raspberrypi.com/picow/connecting-to-the-internet-with-pico-w.pdf
##### Connecttonetwork
import network
wlan = network.WLAN(network.STA_IF)
wlan.active(True)
wlan.connect('PONTUWIFI', 'PONTUCONTRASEÑAWIFI')

# Make GET request
import urequests
def mandarmensaje():
    r = urequests.get("http://api.telegram.org/botPONTUBOT/sendMessage?chat_id=PONTUID&text=APRETADO")
    print(r.status_code) # redirectsto https
    #print(r.content)
    r.close() 

#### while loop #######################################    
while True:  
    logic_state = push_button.value();#button on&off status
    if logic_state == True:#check the button and if it is on
        led.value(1)#turn on the led
        mandarmensaje()
    else:
        led.value(0)#turn off the led
#### end while loop ###################################    

        
```

Hay que dejar apretado unos segundos el botón para que funcione:<iframe allow="accelerometer; autoplay; clipboard-write; encrypted-media; gyroscope; picture-in-picture; web-share" allowfullscreen="allowfullscreen" frameborder="0" height="815" src="https://www.youtube.com/embed/cimDJiuisag" title="envio a telegram con picobricks y python" width="458"></iframe>