# Crowpi2

<p class="callout warning"><span style="color: rgb(0, 0, 0);">ATENCION los tutoriales y lecciones que muestra CrowPi2 están **EN INGLÉS**</span></p>

### **<span style="color: rgb(22, 145, 121);">¿Qué es?</span>**

Crowpi2 es básicamente un ordenador adaptado para robótica pero que el microprocesador es una Raspberry. Es decir, tiene teclado, pantalla, alimentación... y un sinfín de sensores y actuadores para realizar experimentos con la Raspberry Pi

[![CrowPi2sliver-4-_5.webp](https://libros.catedu.es/uploads/images/gallery/2024-12/scaled-1680-/crowpi2sliver-4-5.webp)
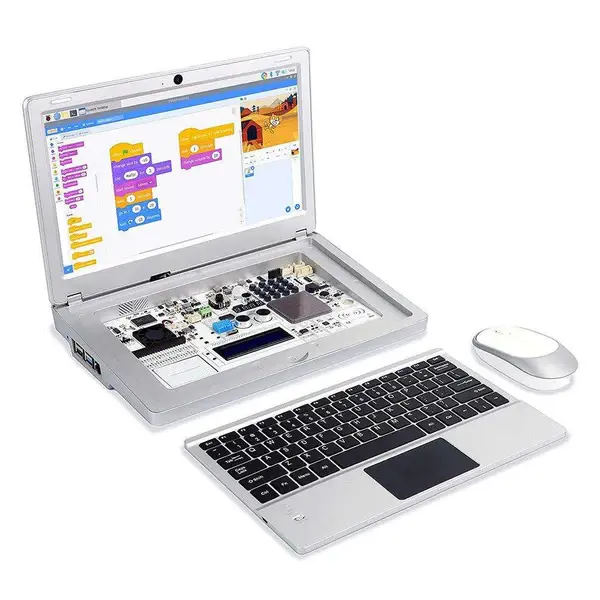
](https://libros.catedu.es/uploads/images/gallery/2024-12/crowpi2sliver-4-5.webp)Fuente [https://www.crowpi.cc/](https://www.crowpi.cc/)

A la hora de comprar hay que tener en cuenta de pedir teclado español y que no suele incluir la Raspbery. Sale por unos [365€](https://robotopia.es/kits-educativos/300-90-crowpi2.html#/52-opciones_crowpi2-con_raspberry_pi_4gb)

Los sensores que lleva integrados son   
[![2024-12-20 19_40_01-CrowPi2_Rasspberry_Pi_Laptop_User_Manual.png](https://libros.catedu.es/uploads/images/gallery/2024-12/scaled-1680-/2024-12-20-19-40-01-crowpi2-rasspberry-pi-laptop-user-manual.png)
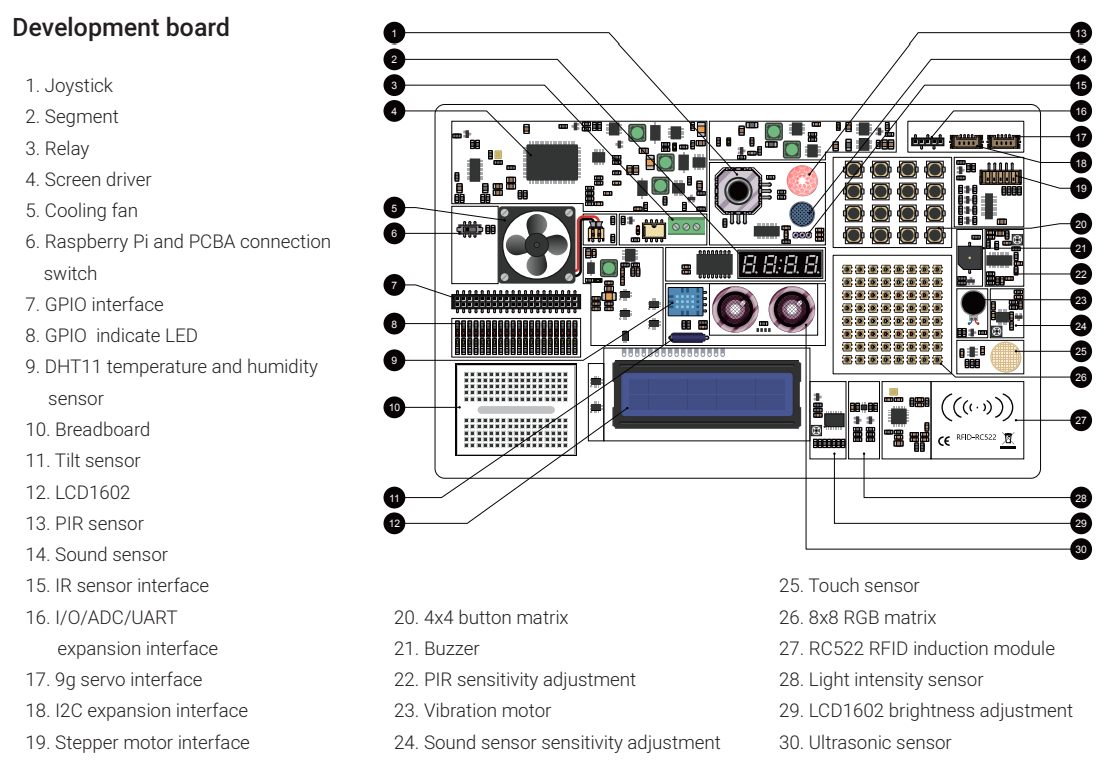
](https://libros.catedu.es/uploads/images/gallery/2024-12/2024-12-20-19-40-01-crowpi2-rasspberry-pi-laptop-user-manual.png)  
Fuente Manual CrowPi2 descargable [aquí](https://www.manualslib.com/download/3143192/Elecrow-Crowpi2.html)

Para ver en qué pin GPIO esta conectado cada sensor y actuador ver [https://github.com/Elecrow-RD/CrowPi2](https://github.com/Elecrow-RD/CrowPi2)

Si se quiere utilizar la placa board (10) con los pines GPIO diréctamente, poner el switch (6) en OFF, en caso contrario dejarlo en ON para poder usar los elementos de Crowpi

### <span style="color: rgb(22, 145, 121);">**Configuración hardware**</span>

<span style="color: rgb(0, 0, 0);">Conectamos nuestra Raspberry Pi en el Crowpi tal y como dicen las instrucciones, sobre todo hay que fijarse en conectar la alimentación, y display. Manual CrowPi2 descargable [aquí](https://www.manualslib.com/download/3143192/Elecrow-Crowpi2.html).</span>

### <span style="color: rgb(22, 145, 121);">**Configuración software**</span>

Tenemos que bajar la imagen oficial, que es un Raspbian con programas educativos, sobre todo el Crowpi2 que hablaremos más adelante. Para descargar la imagen, [aquí tienes la página oficial. ](https://www.crowpi.cc/blogs/news/how-to-update-the-crowpi2-os-image)Para grabarla en una tarjeta SD (recomendable 32G) podemos usar [balenaetcher](https://etcher.balena.io/)

Una vez instalado, arrancar Crowpi2 con la tarjeta, configurar teclado, wifi (1 en la figura) y recomendamos activar SSH y VNC y cámara web (2) para poder manejar Crowpi2 desde otro ordenador.

[![2024-12-20 20_41_31-192.168.1.46 (raspberrypi) - RealVNC Viewer.png](https://libros.catedu.es/uploads/images/gallery/2024-12/scaled-1680-/2024-12-20-20-41-31-192-168-1-46-raspberrypi-realvnc-viewer.png)
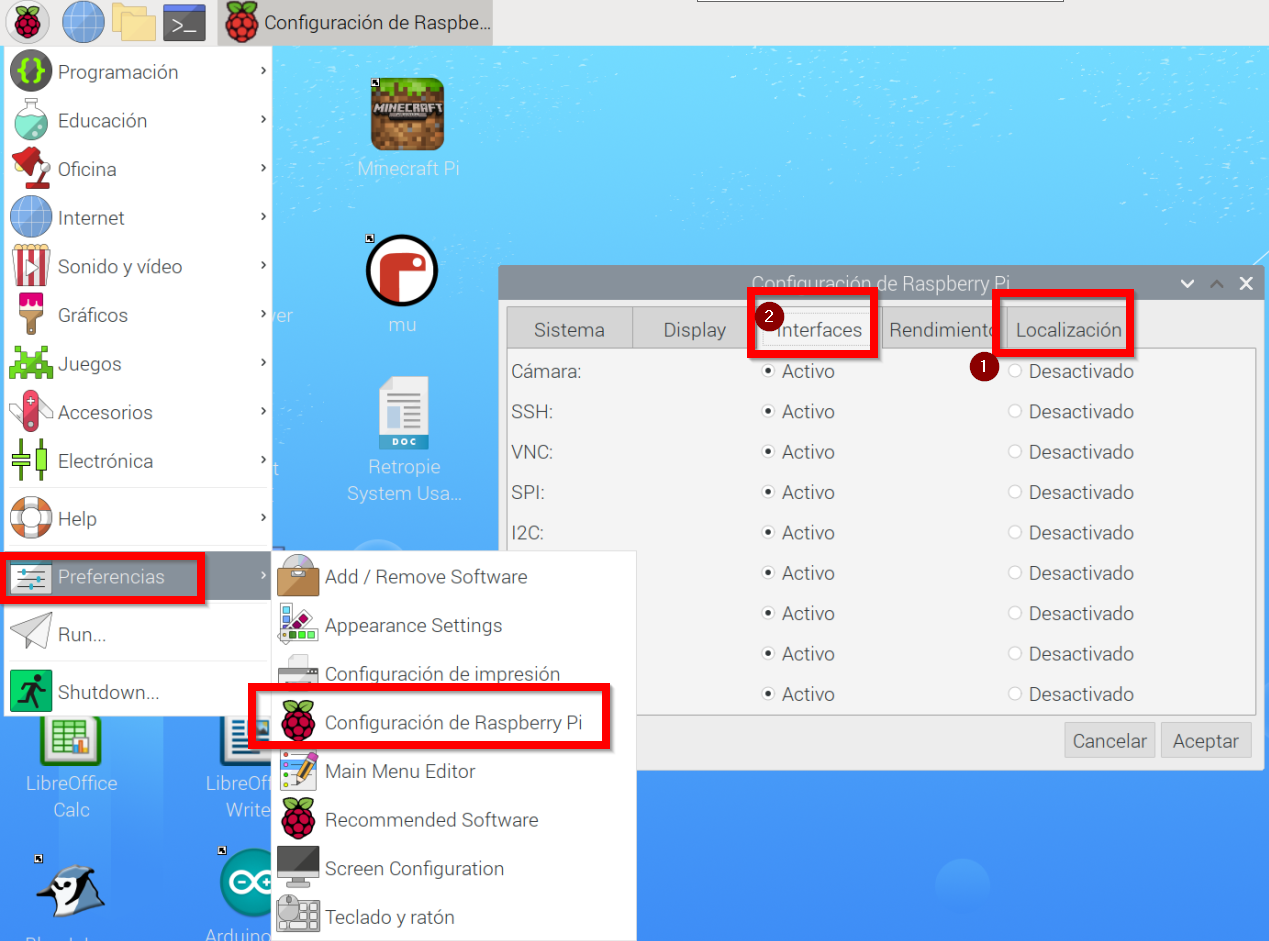
](https://libros.catedu.es/uploads/images/gallery/2024-12/2024-12-20-20-41-31-192-168-1-46-raspberrypi-realvnc-viewer.png)

luego en el terminal, recomendamos actualizar el software con las instrucciones:

```
sudo apt-get update
sudo apt-get dist-upgrade
```

### <span style="color: rgb(22, 145, 121);">**Programa educativo Crowpi**</span>

Está preinstalado en la imagen oficial de Crowpi2 y lo tenemos accesible en estos dos sitios

[![2024-12-20 20_39_16-192.168.1.46 (raspberrypi) - RealVNC Viewer.png](https://libros.catedu.es/uploads/images/gallery/2024-12/scaled-1680-/2024-12-20-20-39-16-192-168-1-46-raspberrypi-realvnc-viewer.png)
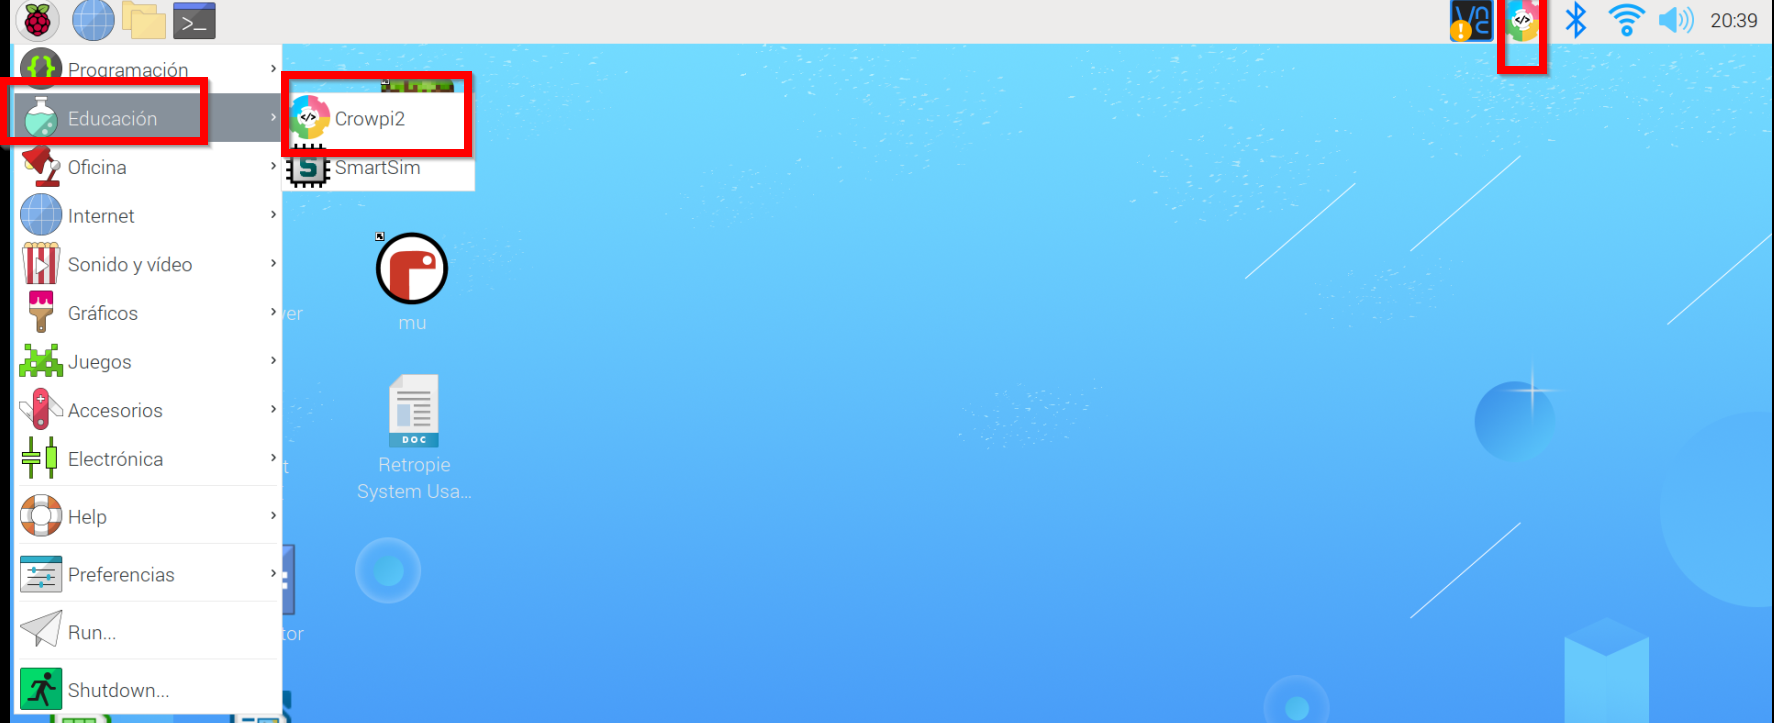
](https://libros.catedu.es/uploads/images/gallery/2024-12/2024-12-20-20-39-16-192-168-1-46-raspberrypi-realvnc-viewer.png)

Al arrancar sale esta ventana

[![2024-12-20 21_06_47-192.168.1.46 (raspberrypi) - RealVNC Viewer.png](https://libros.catedu.es/uploads/images/gallery/2024-12/scaled-1680-/2024-12-20-21-06-47-192-168-1-46-raspberrypi-realvnc-viewer.png)](https://libros.catedu.es/uploads/images/gallery/2024-12/2024-12-20-21-06-47-192-168-1-46-raspberrypi-realvnc-viewer.png)

### <span style="color: rgb(22, 145, 121);">**Programa educativo Crowpi Learning**</span>

En el momento de arrancar este programa nos encontramos con un diálogo de logueo. Se puede crear usuarios sin necesidad de cofirmación ni Internet (email, etc..) perfecto para alumnos menores de edad.

<p class="callout success">Esto es excelente pues nos permite usar el mismo Crowpi2 para distintos alumnos y cada uno va a su ritmo pues graba las lecciones que se han logrado</p>

[![2024-12-20 21_03_22-192.168.1.46 (raspberrypi) - RealVNC Viewer.png](https://libros.catedu.es/uploads/images/gallery/2024-12/scaled-1680-/2024-12-20-21-03-22-192-168-1-46-raspberrypi-realvnc-viewer.png)](https://libros.catedu.es/uploads/images/gallery/2024-12/2024-12-20-21-03-22-192-168-1-46-raspberrypi-realvnc-viewer.png)

Al loguearse nos pregunta qué tipo de programación deseamo

[![2024-12-20 21_14_31-192.168.1.46 (raspberrypi) - RealVNC Viewer.png](https://libros.catedu.es/uploads/images/gallery/2024-12/scaled-1680-/2024-12-20-21-14-31-192-168-1-46-raspberrypi-realvnc-viewer.png)](https://libros.catedu.es/uploads/images/gallery/2024-12/2024-12-20-21-14-31-192-168-1-46-raspberrypi-realvnc-viewer.png)

### <span style="color: rgb(22, 145, 121);">**Programa educativo Crowpi Learning Scratch**</span>

<span style="color: rgb(0, 0, 0);">Nos enseña 16 lecciones, qué lecciones son las que hemos hecho (1), por cual vamos (2) y cuales nos quedan por hacer. Hasta que no se completa una lección no permite pasar a la siguiente.</span>

<span style="color: rgb(0, 0, 0);">[![2024-12-20 21_16_29-192.168.1.46 (raspberrypi) - RealVNC Viewer.png](https://libros.catedu.es/uploads/images/gallery/2024-12/scaled-1680-/2024-12-20-21-16-29-192-168-1-46-raspberrypi-realvnc-viewer.png)
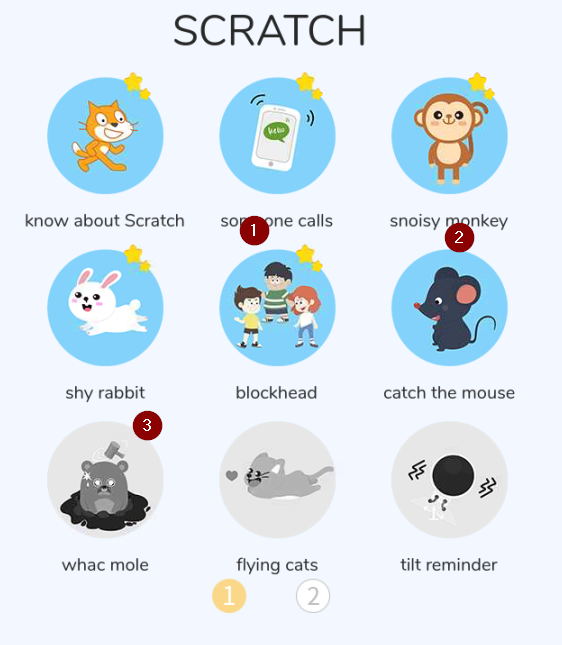
](https://libros.catedu.es/uploads/images/gallery/2024-12/2024-12-20-21-16-29-192-168-1-46-raspberrypi-realvnc-viewer.png)</span>

<span style="color: rgb(0, 0, 0);">Las lecciones enseñan paso a paso las instrucciones con vídeos para poder hacer los programas y el editor Scratch para ir realizándolo :</span>

<span style="color: rgb(0, 0, 0);">[![2024-12-20 21_22_21-192.168.1.46 (raspberrypi) - RealVNC Viewer.png](https://libros.catedu.es/uploads/images/gallery/2024-12/scaled-1680-/2024-12-20-21-22-21-192-168-1-46-raspberrypi-realvnc-viewer.png)
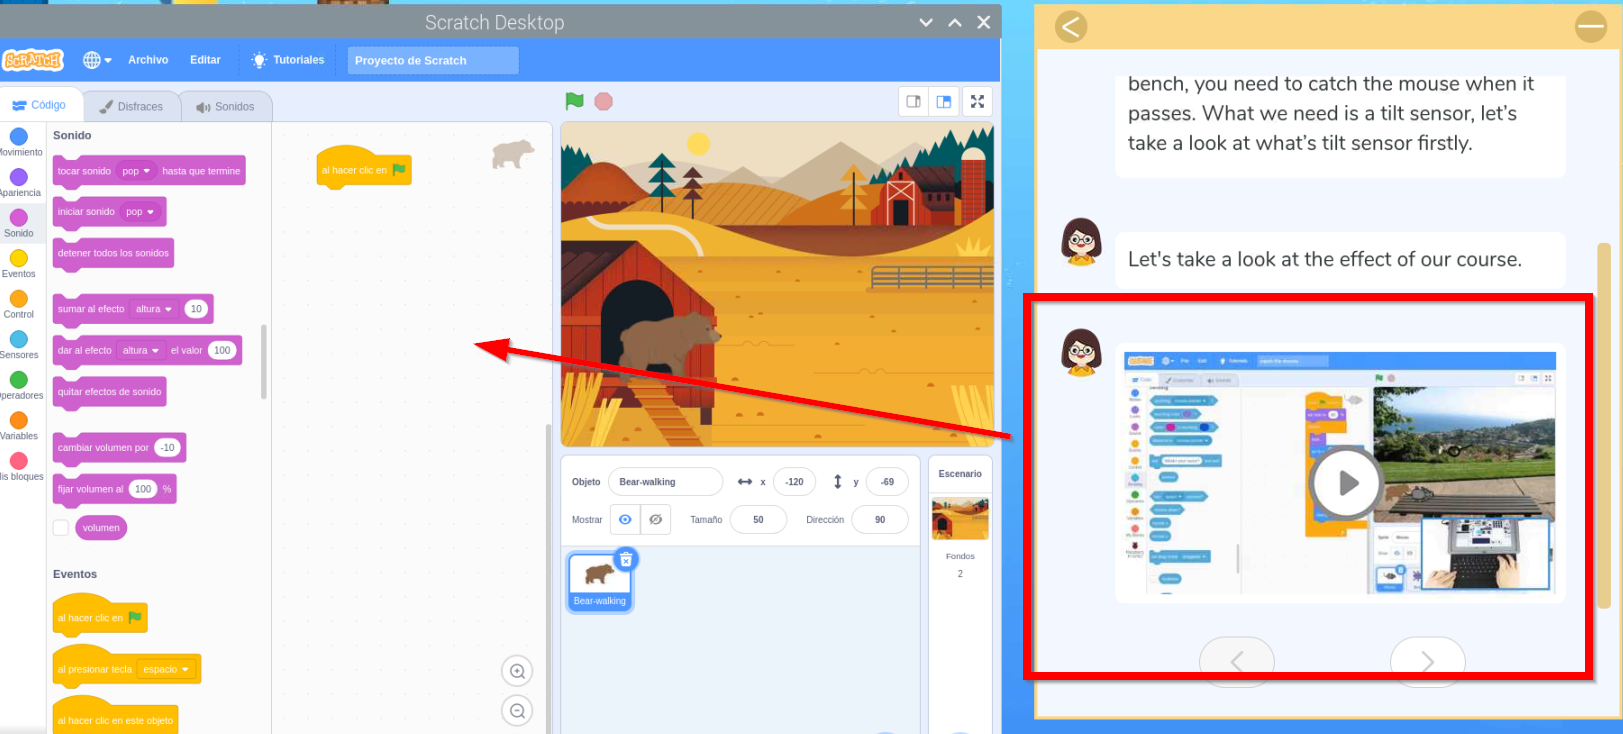
](https://libros.catedu.es/uploads/images/gallery/2024-12/2024-12-20-21-22-21-192-168-1-46-raspberrypi-realvnc-viewer.png)</span>

### <span style="color: rgb(22, 145, 121);">**Programa educativo Crowpi Learning Python**</span>

<span style="color: rgb(22, 145, 121);"><span style="color: rgb(0, 0, 0);">Nos enseña 32 lecciones, qué lecciones son las que hemos hecho (1), por cual vamos (2) y cuales nos quedan por hacer. Hasta que no se completa una lección no permite pasar a la siguiente.</span></span>

<span style="color: rgb(22, 145, 121);"><span style="color: rgb(0, 0, 0);">[![2024-12-20 21_24_16-192.168.1.46 (raspberrypi) - RealVNC Viewer.png](https://libros.catedu.es/uploads/images/gallery/2024-12/scaled-1680-/2024-12-20-21-24-16-192-168-1-46-raspberrypi-realvnc-viewer.png)](https://libros.catedu.es/uploads/images/gallery/2024-12/2024-12-20-21-24-16-192-168-1-46-raspberrypi-realvnc-viewer.png)</span></span>

<span style="color: rgb(22, 145, 121);"><span style="color: rgb(0, 0, 0);">En las lecciones (1) se explica paso a paso el código a realizar (2) junto con explicaciones de los sensores (3) y al lado el editor Thomy (4) para ir realizando el programa y poder ejecutarlo (5)</span></span>

<span style="color: rgb(22, 145, 121);"><span style="color: rgb(0, 0, 0);">[![2024-12-20 21_26_50-192.168.1.46 (raspberrypi) - RealVNC Viewer.png](https://libros.catedu.es/uploads/images/gallery/2024-12/scaled-1680-/2024-12-20-21-26-50-192-168-1-46-raspberrypi-realvnc-viewer.png)
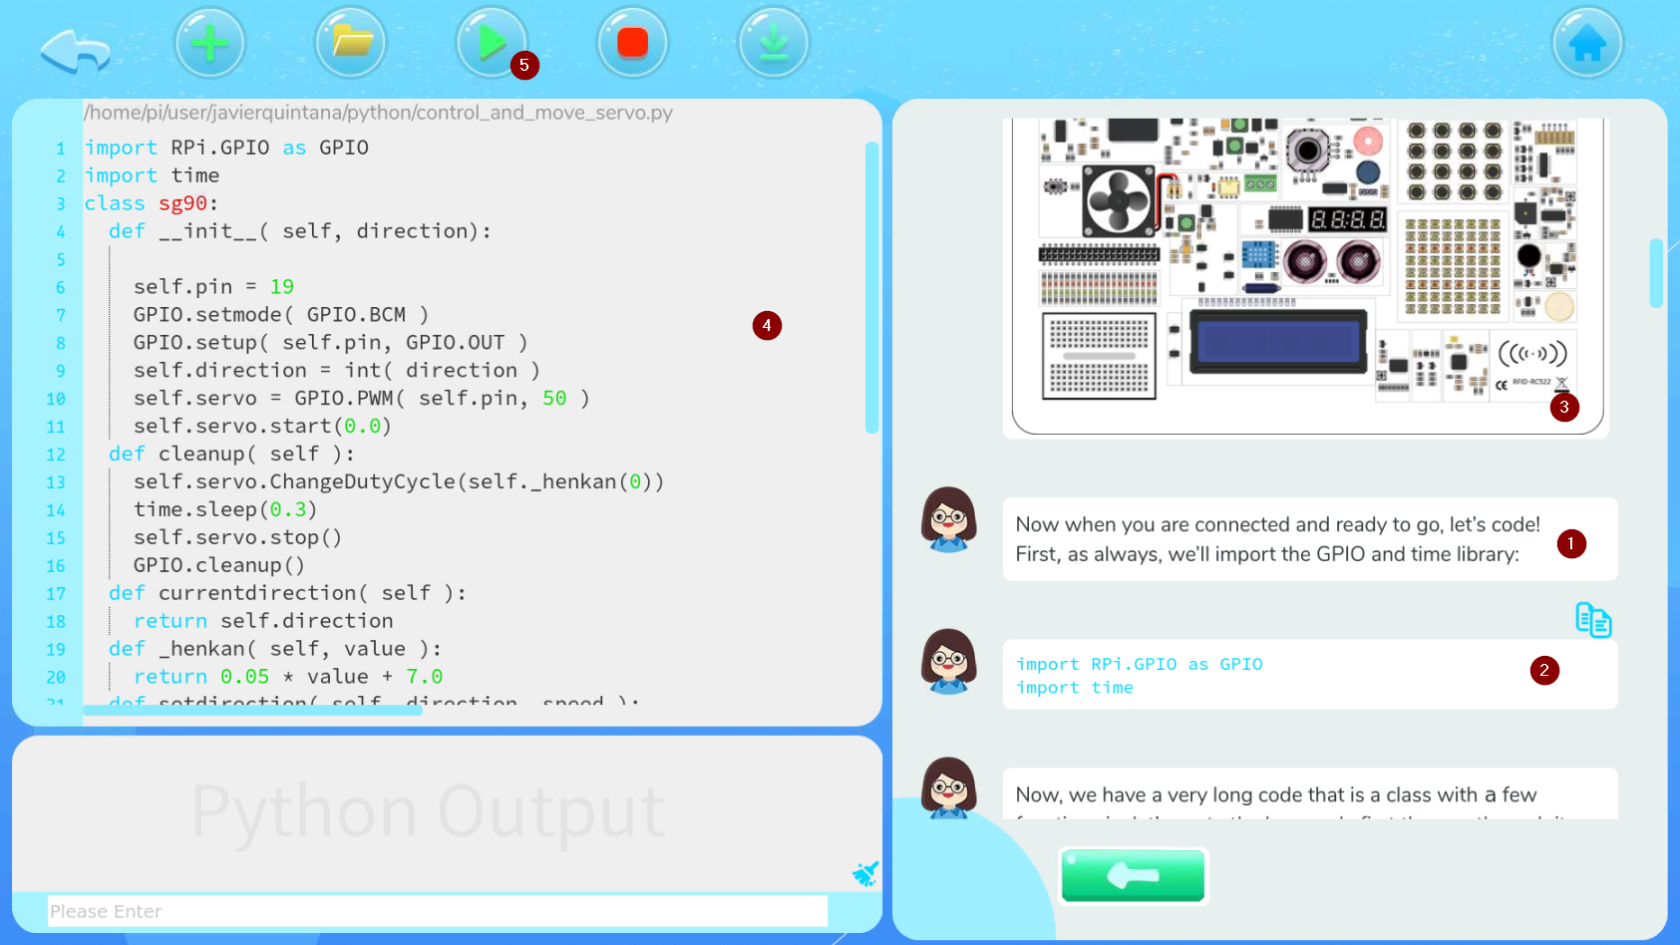
](https://libros.catedu.es/uploads/images/gallery/2024-12/2024-12-20-21-26-50-192-168-1-46-raspberrypi-realvnc-viewer.png)</span></span>

<p class="callout warning"><span style="color: rgb(22, 145, 121);"><span style="color: rgb(0, 0, 0);">Para el manejo del 8x8 RGB LED Matriz de necesita esta librería y da error  
from rpi\_ws281x import PixelStrip, Color  
si sabes cómo solucionar este problema, ponte en contacto con Catedu [www.catedu.es](https://www.catedu.es) - información</span></span></p>

### <span style="color: rgb(22, 145, 121);">**Programa educativo Crowpi AI**</span>

<span style="color: rgb(22, 145, 121);">**[![2024-12-21 09_10_47-192.168.1.46 (raspberrypi) - RealVNC Viewer.png](https://libros.catedu.es/uploads/images/gallery/2024-12/scaled-1680-/2024-12-21-09-10-47-192-168-1-46-raspberrypi-realvnc-viewer.png) ](https://libros.catedu.es/uploads/images/gallery/2024-12/2024-12-21-09-10-47-192-168-1-46-raspberrypi-realvnc-viewer.png)[![2024-12-21 09_11_35-192.168.1.46 (raspberrypi) - RealVNC Viewer.png](https://libros.catedu.es/uploads/images/gallery/2024-12/scaled-1680-/2024-12-21-09-11-35-192-168-1-46-raspberrypi-realvnc-viewer.png)
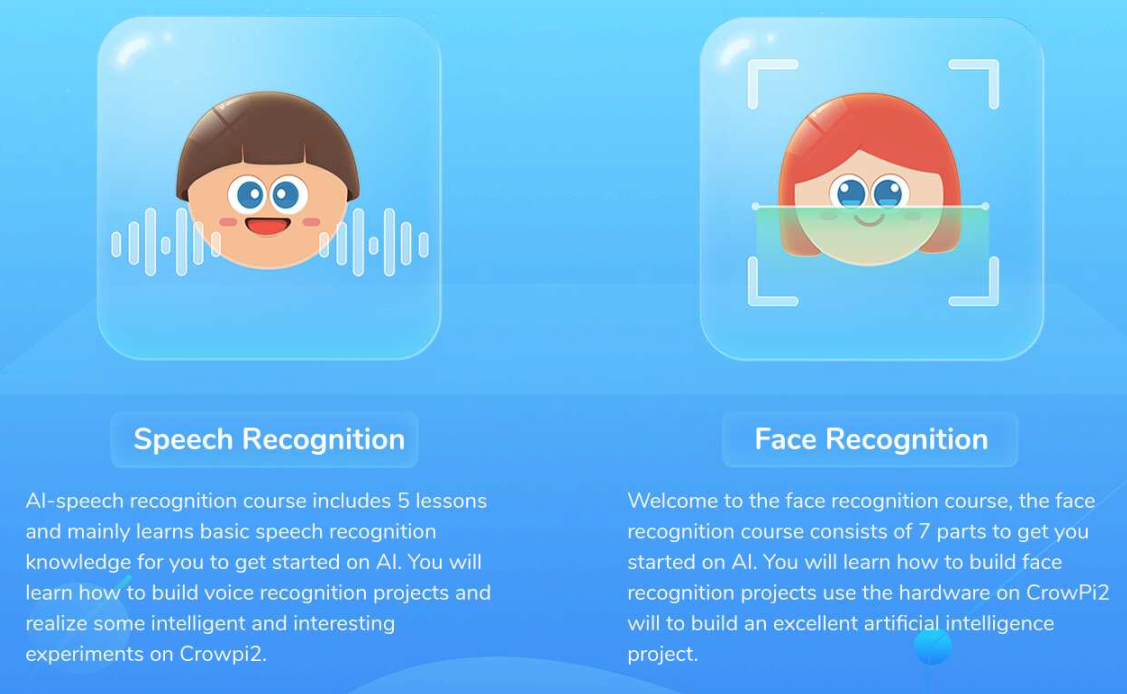
](https://libros.catedu.es/uploads/images/gallery/2024-12/2024-12-21-09-11-35-192-168-1-46-raspberrypi-realvnc-viewer.png)**</span>

##### <span style="color: rgb(22, 145, 121);">**Programa educativo Crowpi AI Speech Recognition**</span>

<span style="color: rgb(0, 0, 0);">Se basa en el software y máquina de entrenar [https://snowboy.kitt.ai/](https://snowboy.kitt.ai/) pero como puedes ver está ya sin mantenimiento luego las lecciones que enseña Crowpi Learning no sirven.</span>

##### **<span style="color: rgb(22, 145, 121);">Programa educativo Crowpi AI- Face Recognition- instalación Open CV3</span>**

<span style="color: rgb(0, 0, 0);">Para utilizar el reconocimiento de imagen, tenemos que utilizar el software OpenCV3 **no utilizar la guía que muestra Install Open CV3, está obsoleta** simplemente en un terminal ejecutar la instrucción</span>

```
sudo apt install python3-opencv
```

##### **<span style="color: rgb(22, 145, 121);">Programa educativo Crowpi AI- Face Recognition- Test de la cámara</span>**

<span style="color: rgb(22, 145, 121);"><span style="color: rgb(0, 0, 0);">Vamos a probarlo con este programa que visualiza capturas en gris y en color</span></span>

```
import numpy as np
import cv2

cap = cv2.VideoCapture(0)
cap.set(3,640)
cap.set(4,480)

while(True):
    ret, frame = cap.read()
    gray = cv2.cvtColor(frame, cv2.COLOR_BGR2GRAY)
    
    cv2.imshow('frame', frame)
    cv2.imshow('gray', gray)
    
    k=cv2.waitKey(30) & 0xff
    if k == 27:
        break
    
cap.release()
cv2.destroyAllWindows()
```

Extraído de [https://peppe8o.com/crowpi2-reviewing-the-famous-all-in-one-stem-solution/](https://peppe8o.com/crowpi2-reviewing-the-famous-all-in-one-stem-solution/)

El resultado

<span style="color: rgb(22, 145, 121);">[![2024-12-21 09_18_26-.png](https://libros.catedu.es/uploads/images/gallery/2024-12/scaled-1680-/2024-12-21-09-18-26.png)](https://libros.catedu.es/uploads/images/gallery/2024-12/2024-12-21-09-18-26.png)</span>

Un programa más elaborado lo tienes pinchando en el primer tutorial

[![2024-12-22 08_57_57-192.168.1.46 (raspberrypi) - RealVNC Viewer.png](https://libros.catedu.es/uploads/images/gallery/2024-12/scaled-1680-/2024-12-22-08-57-57-192-168-1-46-raspberrypi-realvnc-viewer.png)](https://libros.catedu.es/uploads/images/gallery/2024-12/2024-12-22-08-57-57-192-168-1-46-raspberrypi-realvnc-viewer.png)  
<span style="color: rgb(0, 0, 0);">Fuente: Tutorial Learning Crowpi2</span>

Al abrir, nos encontramos la ruta del programa **SimpleCamTest.py** (1) lo abrimos (2) y nos fijamos en la explicaciones del código del tutorial (3)

[![2024-12-22 08_58_58-192.168.1.46 (raspberrypi) - RealVNC Viewer.png](https://libros.catedu.es/uploads/images/gallery/2024-12/scaled-1680-/2024-12-22-08-58-58-192-168-1-46-raspberrypi-realvnc-viewer.png)
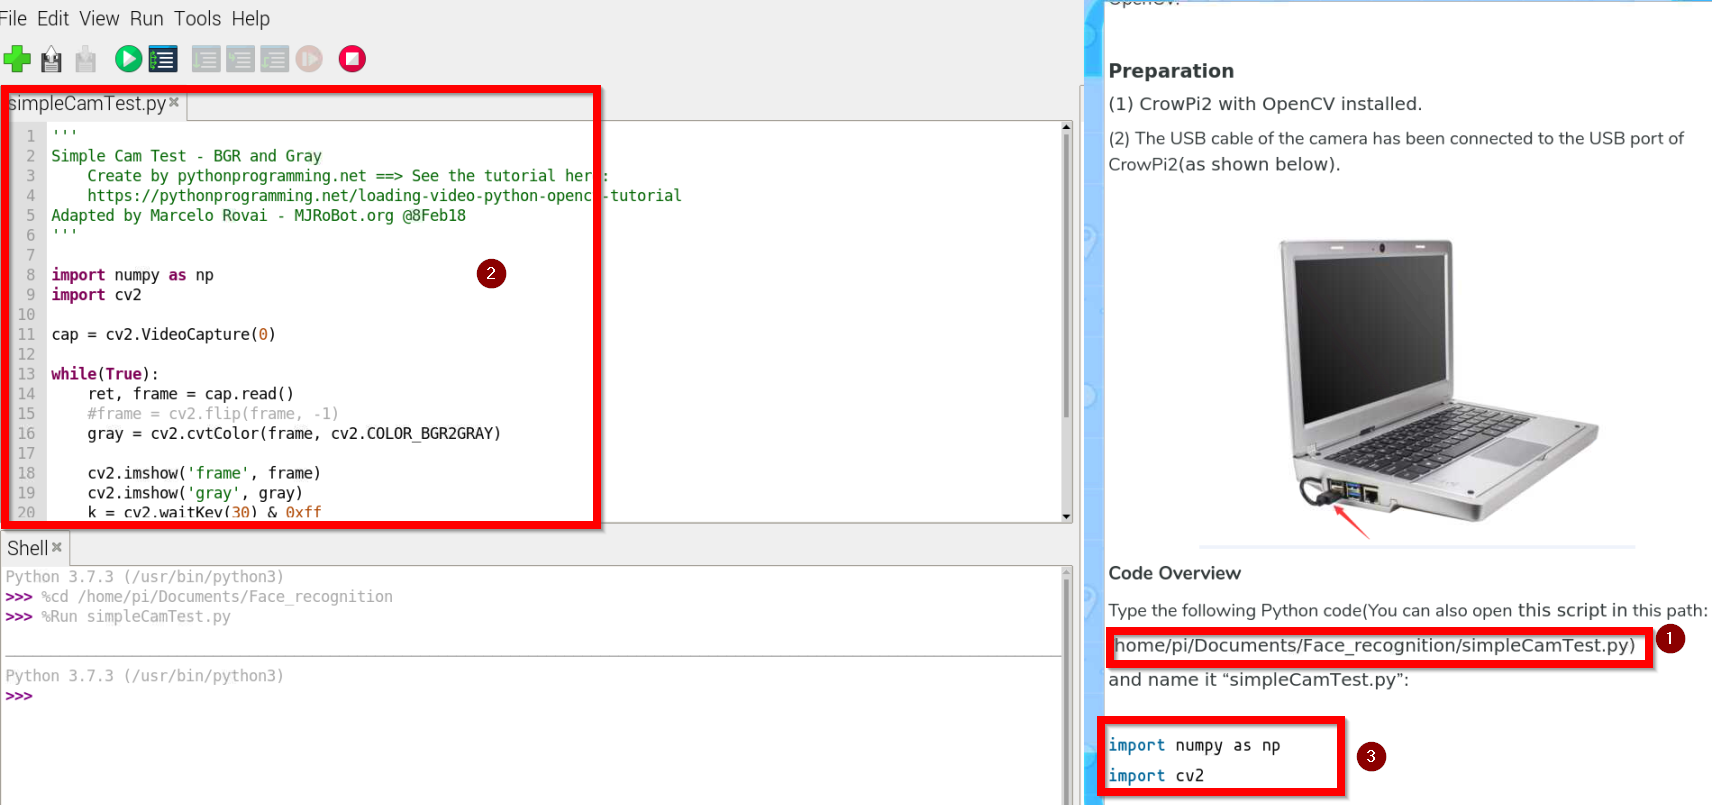
](https://libros.catedu.es/uploads/images/gallery/2024-12/2024-12-22-08-58-58-192-168-1-46-raspberrypi-realvnc-viewer.png)

El resultado es el mismo pero el programa es más elaborado con la ventaja de que está explicado paso a paso en el tutorial.

##### **<span style="color: rgb(22, 145, 121);">Programa educativo Crowpi AI- Face Recognition- Reconocimiento facial</span>**

<span style="color: rgb(0, 0, 0);">Un programa sencillo sería</span>

```
import numpy as np
import cv2

faceCascade=cv2.CascadeClassifier('/home/pi/Documents/Face_recognition/Cascades/haarcascade_frontalface_default.xml')

cap = cv2.VideoCapture(0)
cap.set(3,640)
cap.set(4,480)

while(True):
    ret, img = cap.read()
    gray = cv2.cvtColor(img, cv2.COLOR_BGR2GRAY)
    faces=faceCascade.detectMultiScale(
        gray,
        scaleFactor=1.2,
        minNeighbors=5,
        minSize=(20,20)
    )
    
    for (x,y,w,h) in faces:
        cv2.rectangle(img,(x,y),(x+w,y+h),(255,0,0),2)
        roi_gray=gray[y:y+h, x:x+w]
        roi_color=img[y:y+h, x:x+w]
    
    
    cv2.imshow('video', img)
    
    k=cv2.waitKey(30) & 0xff
    if k == 27:
        break
    
cap.release()
cv2.destroyAllWindows()
```

Extraído de [https://peppe8o.com/crowpi2-reviewing-the-famous-all-in-one-stem-solution/](https://peppe8o.com/crowpi2-reviewing-the-famous-all-in-one-stem-solution/)

El resultado  
[![2024-12-21 09_25_31-192.168.1.46 (raspberrypi) - RealVNC Viewer.png](https://libros.catedu.es/uploads/images/gallery/2024-12/scaled-1680-/2024-12-21-09-25-31-192-168-1-46-raspberrypi-realvnc-viewer.png)
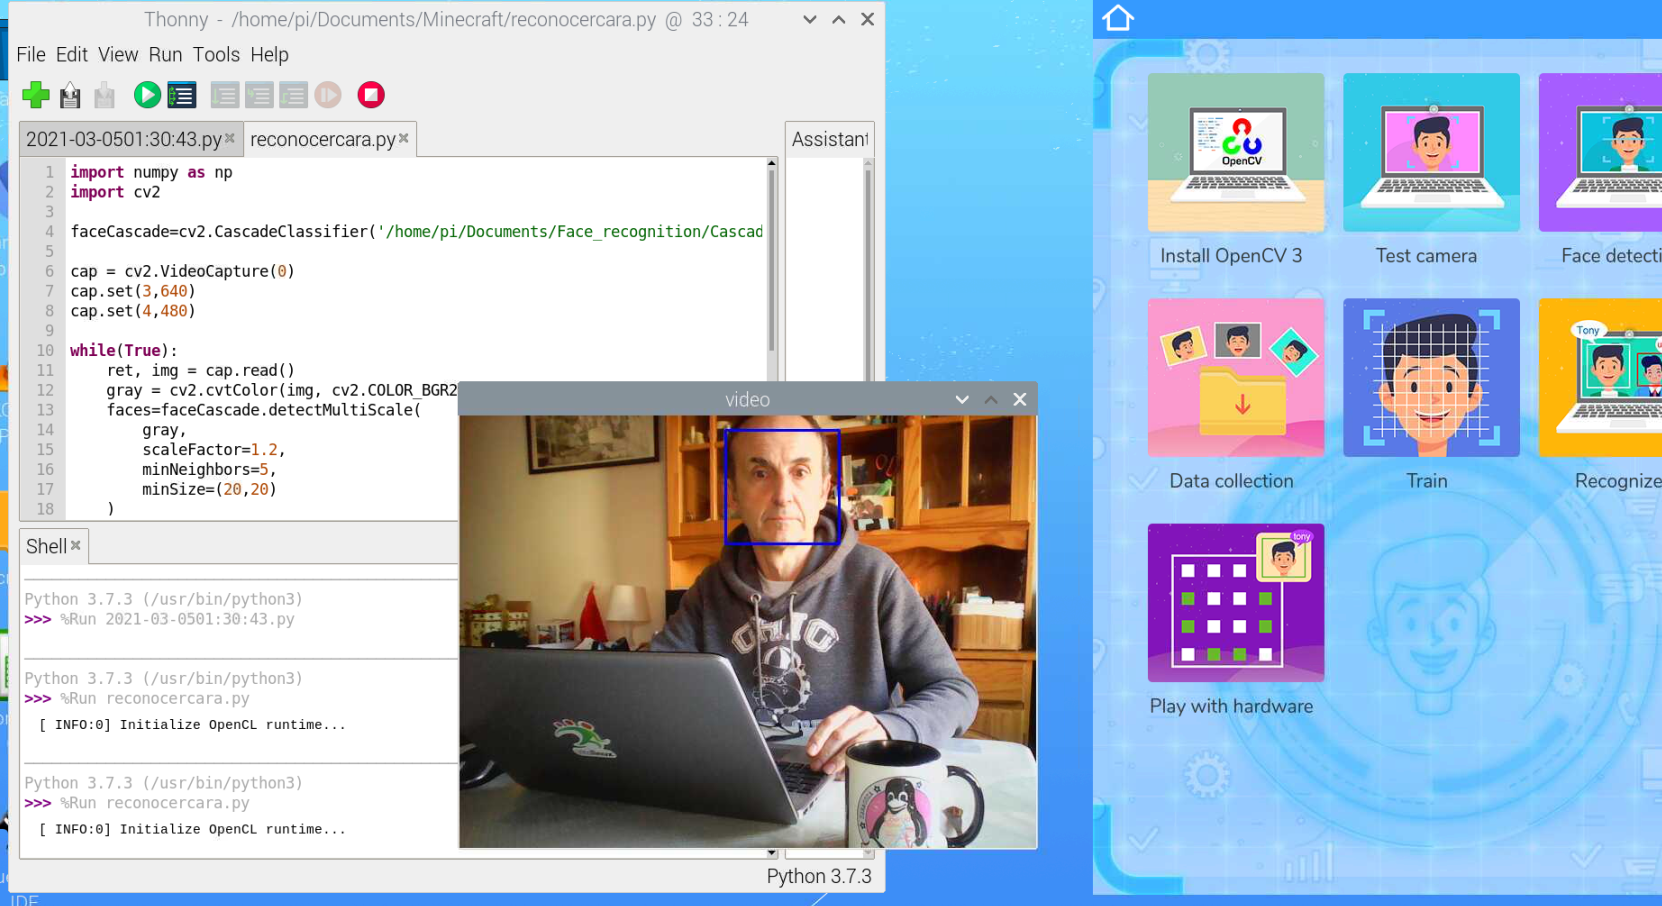
](https://libros.catedu.es/uploads/images/gallery/2024-12/2024-12-21-09-25-31-192-168-1-46-raspberrypi-realvnc-viewer.png)

Un programa más elaborado es el que sale en su tutorial en este botón:

[![2024-12-22 10_04_32-192.168.1.46 (raspberrypi) - RealVNC Viewer.png](https://libros.catedu.es/uploads/images/gallery/2024-12/scaled-1680-/2024-12-22-10-04-32-192-168-1-46-raspberrypi-realvnc-viewer.png)](https://libros.catedu.es/uploads/images/gallery/2024-12/2024-12-22-10-04-32-192-168-1-46-raspberrypi-realvnc-viewer.png)  
<span style="color: rgb(0, 0, 0);">Fuente: Tutorial Learning Crowpi2</span>

El programa **faceDection.py** esta en este directorio

[![2024-12-22 10_05_38-192.168.1.46 (raspberrypi) - RealVNC Viewer.png](https://libros.catedu.es/uploads/images/gallery/2024-12/scaled-1680-/2024-12-22-10-05-38-192-168-1-46-raspberrypi-realvnc-viewer.png)](https://libros.catedu.es/uploads/images/gallery/2024-12/2024-12-22-10-05-38-192-168-1-46-raspberrypi-realvnc-viewer.png)

Es importante que esté en el mismo sitio que la carpeta **Cascades** tal y como explica en (1)

**Cascades** es una carpeta que contendrá los patrones de las caras. Como dice su tutorial (2) puedes descargarlos desde [https://github.com/opencv/opencv/tree/master/data/haarcascades](https://github.com/opencv/opencv/tree/master/data/haarcascades) y ponerlos en la carpeta Cascades. El programa se explica paso a paso en el tutorial (3)

[![2024-12-22 10_09_00-192.168.1.46 (raspberrypi) - RealVNC Viewer.png](https://libros.catedu.es/uploads/images/gallery/2024-12/scaled-1680-/2024-12-22-10-09-00-192-168-1-46-raspberrypi-realvnc-viewer.png)
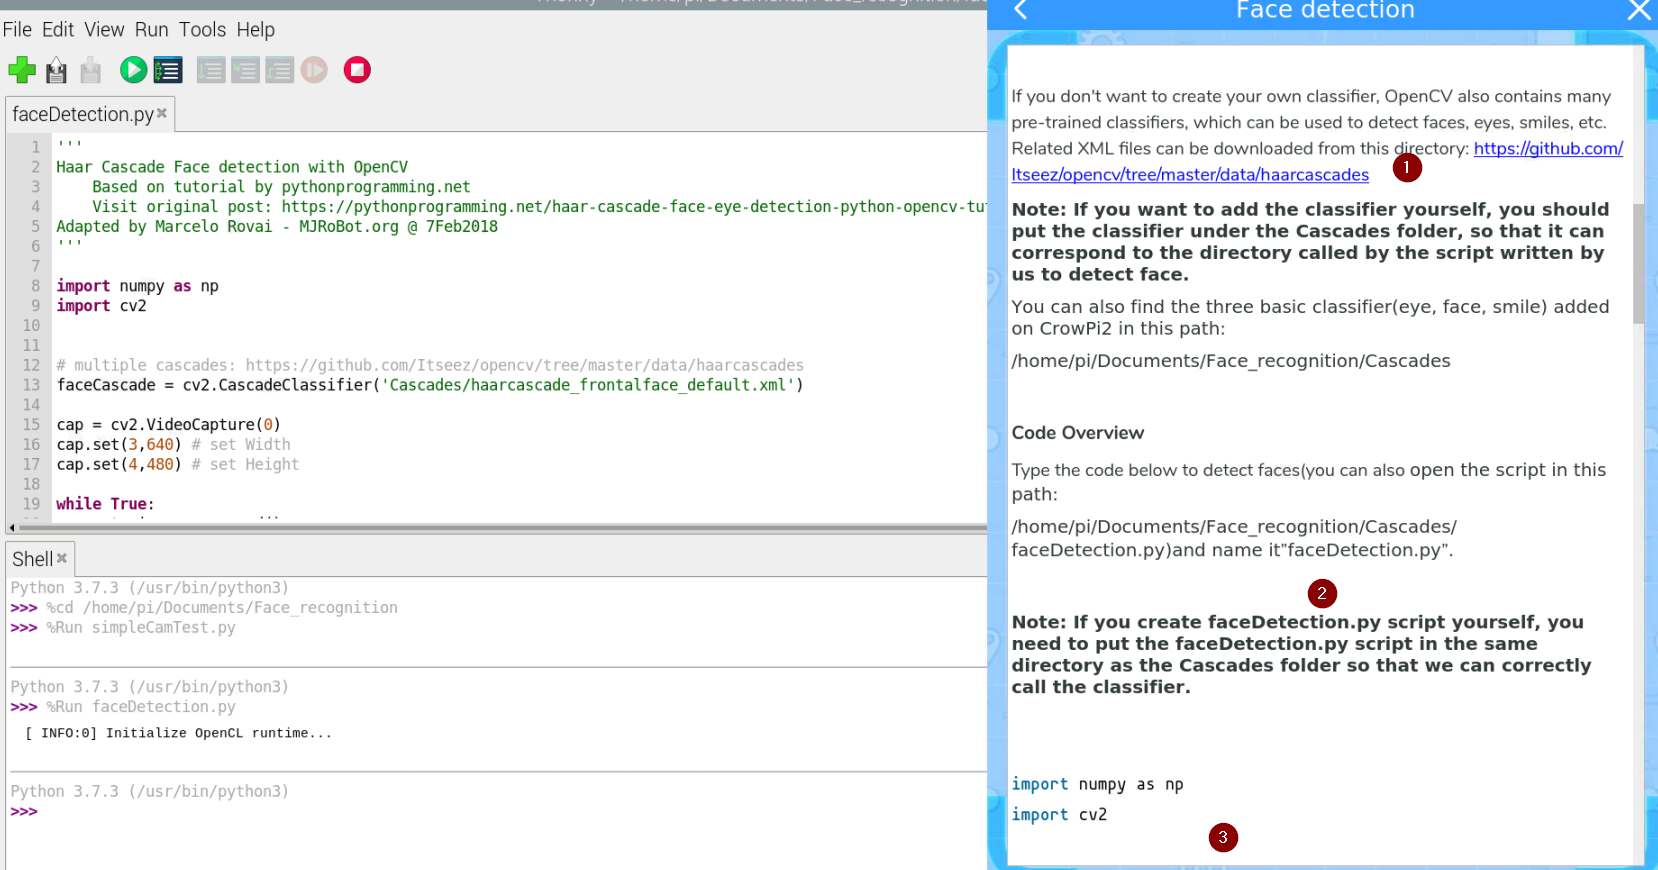
](https://libros.catedu.es/uploads/images/gallery/2024-12/2024-12-22-10-09-00-192-168-1-46-raspberrypi-realvnc-viewer.png)

##### **<span style="color: rgb(22, 145, 121);">Programa educativo Crowpi AI- Face Recognition- 01-Data collection</span>**

<span style="color: rgb(0, 0, 0);">Entramos en el siguiente tutorial</span>

**[![2024-12-22 10_24_49-192.168.1.46 (raspberrypi) - RealVNC Viewer.png](https://libros.catedu.es/uploads/images/gallery/2024-12/scaled-1680-/2024-12-22-10-24-49-192-168-1-46-raspberrypi-realvnc-viewer.png)](https://libros.catedu.es/uploads/images/gallery/2024-12/2024-12-22-10-24-49-192-168-1-46-raspberrypi-realvnc-viewer.png)** <span style="color: rgb(0, 0, 0);">Fuente: Tutorial Learning Crowpi2</span>

En el mismo directorio que antes encontramos **FacialRecognitionProyect**, nos encontramos el siguiente programa <span style="background-color: rgb(251, 238, 184);">**01\_face\_dataset.py**</span>

```
''''
Capture multiple Faces from multiple users to be stored on a DataBase (dataset directory)
    ==> Faces will be stored on a directory: dataset/ (if does not exist, pls create one)
    ==> Each face will have a unique numeric integer ID as 1, 2, 3, etc                       

Based on original code by Anirban Kar: https://github.com/thecodacus/Face-Recognition    

Developed by Marcelo Rovai - MJRoBot.org @ 21Feb18    

'''

import cv2
import os

cam = cv2.VideoCapture(0)
cam.set(3, 640) # set video width
cam.set(4, 480) # set video height

face_detector = cv2.CascadeClassifier('haarcascade_frontalface_default.xml')

# For each person, enter one numeric face id
face_id = input('\n enter user id end press <return> ==>  ')

print("\n [INFO] Initializing face capture. Look the camera and wait ...")
# Initialize individual sampling face count
count = 0

while(True):

    ret, img = cam.read()
    #img = cv2.flip(img, -1) # flip video image vertically
    gray = cv2.cvtColor(img, cv2.COLOR_BGR2GRAY)
    faces = face_detector.detectMultiScale(gray, 1.3, 5)

    for (x,y,w,h) in faces:

        cv2.rectangle(img, (x,y), (x+w,y+h), (255,0,0), 2)     
        count += 1

        # Save the captured image into the datasets folder
        cv2.imwrite("dataset/User." + str(face_id) + '.' + str(count) + ".jpg", gray[y:y+h,x:x+w])

        cv2.imshow('image', img)

    k = cv2.waitKey(100) & 0xff # Press 'ESC' for exiting video
    if k == 27:
        break
    elif count >= 30: # Take 30 face sample and stop video
         break

# Do a bit of cleanup
print("\n [INFO] Exiting Program and cleanup stuff")
cam.release()
cv2.destroyAllWindows()
```

El archivo de datos de captura de la cara esta en [https://github.com/Mjrovai/OpenCV-Face-Recognition/blob/master/FacialRecognition/haarcascade\_frontalface\_default.xml](https://github.com/Mjrovai/OpenCV-Face-Recognition/blob/master/FacialRecognition/haarcascade_frontalface_default.xml)[,](https://github.com/Mjrovai/OpenCV-Face-Recognition/blob/master/FacialRecognition/haarcascade_frontalface_default.xml) **no hace falta que te la descargues** ya lo tienes en la carpeta **dataset**

Si ejecutamos el programa, nos pide un identificador **ID** que tiene que ser un entero&gt;0 si ponemos 1, se abre la webcam y nos hace 30 fotos y los graba como 1.1.jpg hasta 1.30.jpg y si ponemos 2 nos hace otros 30 y los almacena en la carpeta **dataset**. Podemos poner tantos ID como queramos.  
Aquí he experimentado con mi cara y con George Cloneey, no hace falta decir cual quien es quien el ID 1 y el 2 😊

[![2024-12-22 10_21_22-192.168.1.46 (raspberrypi) - RealVNC Viewer.png](https://libros.catedu.es/uploads/images/gallery/2024-12/scaled-1680-/2024-12-22-10-21-22-192-168-1-46-raspberrypi-realvnc-viewer.png)](https://libros.catedu.es/uploads/images/gallery/2024-12/2024-12-22-10-21-22-192-168-1-46-raspberrypi-realvnc-viewer.png)

##### **<span style="color: rgb(22, 145, 121);">Programa educativo Crowpi AI- Face Recognition- 02-Train</span>**

<span style="color: rgb(0, 0, 0);">En el siguiente tutorial</span>

<span style="color: rgb(0, 0, 0);">[![2024-12-22 10_32_04-192.168.1.46 (raspberrypi) - RealVNC Viewer.png](https://libros.catedu.es/uploads/images/gallery/2024-12/scaled-1680-/2024-12-22-10-32-04-192-168-1-46-raspberrypi-realvnc-viewer.png)](https://libros.catedu.es/uploads/images/gallery/2024-12/2024-12-22-10-32-04-192-168-1-46-raspberrypi-realvnc-viewer.png)  
Fuente: Tutorial Learning Crowpi2  
</span>

<span style="color: rgb(0, 0, 0);">Y ahora con las imágenes que hemos almacenado con los identificadores, en mi caso 1 y 2 con mi cara y con George Clooney, luego hay que entrenar a la máquina virtual y lo almacena en el fichero **<span style="background-color: rgb(251, 238, 184);">trainer.yml</span>**</span>

<span style="color: rgb(0, 0, 0);">[![2024-12-22 10_39_07-192.168.1.46 (raspberrypi) - RealVNC Viewer.png](https://libros.catedu.es/uploads/images/gallery/2024-12/scaled-1680-/2024-12-22-10-39-07-192-168-1-46-raspberrypi-realvnc-viewer.png)](https://libros.catedu.es/uploads/images/gallery/2024-12/2024-12-22-10-39-07-192-168-1-46-raspberrypi-realvnc-viewer.png)</span>

<span style="color: rgb(0, 0, 0);">Fuente: Tutorial Learning Crowpi2</span>

<span style="color: #000000;">El tutorial lo explica muy bien el proceso (1) y al ejecutarlo, nos dice si face trained (2) o no :</span>

[![2024-12-22 10_38_12-192.168.1.46 (raspberrypi) - RealVNC Viewer.png](https://libros.catedu.es/uploads/images/gallery/2024-12/scaled-1680-/2024-12-22-10-38-12-192-168-1-46-raspberrypi-realvnc-viewer.png)](https://libros.catedu.es/uploads/images/gallery/2024-12/2024-12-22-10-38-12-192-168-1-46-raspberrypi-realvnc-viewer.png)

El programa se llama <span style="background-color: rgb(251, 238, 184);">**02-face-training.py**</span>

```
''''
Training Multiple Faces stored on a DataBase:
	==> Each face should have a unique numeric integer ID as 1, 2, 3, etc                       
	==> LBPH computed model will be saved on trainer/ directory. (if it does not exist, pls create one)
	==> for using PIL, install pillow library with "pip install pillow"

Based on original code by Anirban Kar: https://github.com/thecodacus/Face-Recognition    

Developed by Marcelo Rovai - MJRoBot.org @ 21Feb18   

'''

import cv2
import numpy as np
from PIL import Image
import os

# Path for face image database
path = 'dataset'

recognizer = cv2.face.LBPHFaceRecognizer_create()
detector = cv2.CascadeClassifier("haarcascade_frontalface_default.xml");

# function to get the images and label data
def getImagesAndLabels(path):

    imagePaths = [os.path.join(path,f) for f in os.listdir(path)]     
    faceSamples=[]
    ids = []

    for imagePath in imagePaths:

        PIL_img = Image.open(imagePath).convert('L') # convert it to grayscale
        img_numpy = np.array(PIL_img,'uint8')

        id = int(os.path.split(imagePath)[-1].split(".")[1])
        faces = detector.detectMultiScale(img_numpy)

        for (x,y,w,h) in faces:
            faceSamples.append(img_numpy[y:y+h,x:x+w])
            ids.append(id)

    return faceSamples,ids

print ("\n [INFO] Training faces. It will take a few seconds. Wait ...")
faces,ids = getImagesAndLabels(path)
recognizer.train(faces, np.array(ids))

# Save the model into trainer/trainer.yml
recognizer.write('trainer/trainer.yml') # recognizer.save() worked on Mac, but not on Pi

# Print the numer of faces trained and end program
print("\n [INFO] {0} faces trained. Exiting Program".format(len(np.unique(ids))))
```

##### **<span style="color: rgb(22, 145, 121);">Programa educativo Crowpi AI- Face Recognition- Recognizer</span>**

<span style="color: rgb(0, 0, 0);">Entramos en el siguiente tutorial:</span>

<span style="color: rgb(0, 0, 0);">[![2024-12-22 11_03_37-192.168.1.46 (raspberrypi) - RealVNC Viewer.png](https://libros.catedu.es/uploads/images/gallery/2024-12/scaled-1680-/2024-12-22-11-03-37-192-168-1-46-raspberrypi-realvnc-viewer.png)](https://libros.catedu.es/uploads/images/gallery/2024-12/2024-12-22-11-03-37-192-168-1-46-raspberrypi-realvnc-viewer.png)  
Fuente: Tutorial Learning Crowpi2  
</span>

<span style="color: rgb(0, 0, 0);">Y ahora utilizará el entrenamiento almacenado en **trainer.yml** que hemos creado anteriormente para reconocer las imágenes</span>

<span style="color: rgb(0, 0, 0);">[![2024-12-22 11_03_21-192.168.1.46 (raspberrypi) - RealVNC Viewer.png](https://libros.catedu.es/uploads/images/gallery/2024-12/scaled-1680-/2024-12-22-11-03-21-192-168-1-46-raspberrypi-realvnc-viewer.png)](https://libros.catedu.es/uploads/images/gallery/2024-12/2024-12-22-11-03-21-192-168-1-46-raspberrypi-realvnc-viewer.png)  
Fuente: Tutorial Learning Crowpi2</span>

<span style="color: rgb(0, 0, 0);">El fichero <span style="background-color: rgb(251, 238, 184);">**03\_face\_recognition.py**</span></span>

```
''''
Real Time Face Recogition
    ==> Each face stored on dataset/ dir, should have a unique numeric integer ID as 1, 2, 3, etc                       
    ==> LBPH computed model (trained faces) should be on trainer/ dir
Based on original code by Anirban Kar: https://github.com/thecodacus/Face-Recognition    

Developed by Marcelo Rovai - MJRoBot.org @ 21Feb18  

'''

import cv2
import numpy as np
import os 

recognizer = cv2.face.LBPHFaceRecognizer_create()
recognizer.read('trainer/trainer.yml')
cascadePath = "haarcascade_frontalface_default.xml"
faceCascade = cv2.CascadeClassifier(cascadePath);

font = cv2.FONT_HERSHEY_SIMPLEX

#iniciate id counter
id = 1

# names related to ids: example ==> Marcelo: id=1,  etc
names = ['None', 'George Clooney', 'Javier Quintana', 'Javier', 'Z', 'W'] 

# Initialize and start realtime video capture
cam = cv2.VideoCapture(0)
cam.set(3, 640) # set video widht
cam.set(4, 480) # set video height

# Define min window size to be recognized as a face
minW = 0.1*cam.get(3)
minH = 0.1*cam.get(4)

while True:

    ret, img =cam.read()
    #img = cv2.flip(img, -1) # Flip vertically

    gray = cv2.cvtColor(img,cv2.COLOR_BGR2GRAY)

    faces = faceCascade.detectMultiScale( 
        gray,
        scaleFactor = 1.2,
        minNeighbors = 5,
        minSize = (int(minW), int(minH)),
       )

    for(x,y,w,h) in faces:

        cv2.rectangle(img, (x,y), (x+w,y+h), (0,255,0), 2)

        id, confidence = recognizer.predict(gray[y:y+h,x:x+w])

        # Check if confidence is less them 100 ==> "0" is perfect match 
        if (confidence < 70):
            id = names[id]
            confidence = "  {0}%".format(round(100 - confidence))
        else:
            id = "unknown"
            confidence = "  {0}%".format(round(100 - confidence))
        
        cv2.putText(img, str(id), (x+5,y-5), font, 1, (255,255,255), 2)
#        cv2.putText(img, str(confidence), (x+5,y+h-5), font, 1, (255,255,0), 1)  
    
    cv2.imshow('camera',img) 

    k = cv2.waitKey(10) & 0xff # Press 'ESC' for exiting video
    if k == 27:
        break

# Do a bit of cleanup
print("\n [INFO] Exiting Program and cleanup stuff")
cam.release()
cv2.destroyAllWindows()
```

<span style="color: rgb(0, 0, 0);">Como veis, funciona perfectamente: </span>

<span style="color: rgb(0, 0, 0);">[![2024-12-22 11_21_35-192.168.1.46 (raspberrypi) - RealVNC Viewer.png](https://libros.catedu.es/uploads/images/gallery/2024-12/scaled-1680-/2024-12-22-11-21-35-192-168-1-46-raspberrypi-realvnc-viewer.png) ](https://libros.catedu.es/uploads/images/gallery/2024-12/2024-12-22-11-21-35-192-168-1-46-raspberrypi-realvnc-viewer.png)[![2024-12-22 11_19_47-192.168.1.46 (raspberrypi) - RealVNC Viewer.png](https://libros.catedu.es/uploads/images/gallery/2024-12/scaled-1680-/2024-12-22-11-19-47-192-168-1-46-raspberrypi-realvnc-viewer.png)](https://libros.catedu.es/uploads/images/gallery/2024-12/2024-12-22-11-19-47-192-168-1-46-raspberrypi-realvnc-viewer.png)</span>

<span style="color: rgb(0, 0, 0);">Es broooomaaa 😁😁 le he cambiado el orden en la instrucción de la línea 26 :</span>

```
names = ['None', 'George Clooney', 'Javier Quintana', 'Tony', 'Z', 'W'] 
```

##### **<span style="color: rgb(22, 145, 121);">Programa educativo Crowpi AI- Face Recognition- Play with hardware</span>**

[![2024-12-22 11_26_32-192.168.1.46 (raspberrypi) - RealVNC Viewer.png](https://libros.catedu.es/uploads/images/gallery/2024-12/scaled-1680-/2024-12-22-11-26-32-192-168-1-46-raspberrypi-realvnc-viewer.png)](https://libros.catedu.es/uploads/images/gallery/2024-12/2024-12-22-11-26-32-192-168-1-46-raspberrypi-realvnc-viewer.png)

<p class="callout danger">El programa siguiente es 03\_face\_recognition\_RGB.py **NO FUNCIONA**</p>

<p class="callout danger">El programa visualiza por la matriz 8x8 RGB LED la cara alegre o triste pero se necesita esta librería y da error  
from rpi\_ws281x import PixelStrip, Color  
si sabes cómo solucionar este problema, ponte en contacto con Catedu www.catedu.es - información</p>

<details id="bkmrk-03_face_recognition_"><summary>03\_face\_recognition\_RGB</summary>

<div>''''</div><div>03_face_recognition_RGB.py</div><div>  
</div><div>Real Time Face Recogition</div><div> ==&gt; Each face stored on dataset/ dir, should have a unique numeric integer ID as 1, 2, 3, etc </div><div> ==&gt; LBPH computed model (trained faces) should be on trainer/ dir</div><div>Based on original code by Anirban Kar: https://github.com/thecodacus/Face-Recognition </div><div>  
</div><div>Developed by Marcelo Rovai - MJRoBot.org @ 21Feb18 </div><div>  
</div><div>'''</div><div>  
</div><div>import cv2</div><div>import numpy as np</div><div>import os</div><div>import threading</div><div>import time</div><div>from rpi_ws281x import PixelStrip, Color</div><div>import RPi.GPIO as GPIO</div><div>  
</div><div>count = 0</div><div>class RGB_Matrix:</div><div>  
</div><div> def __init__(self):</div><div>  
</div><div> # LED strip configuration:</div><div> self.LED_COUNT = 64 # Number of LED pixels.</div><div> self.LED_PIN = 12 # GPIO pin connected to the pixels (18 uses PWM!).</div><div> self.LED_FREQ_HZ = 800000 # LED signal frequency in hertz (usually 800khz)</div><div> self.LED_DMA = 10 # DMA channel to use for generating signal (try 10)</div><div> self.LED_BRIGHTNESS = 10 # Set to 0 for darkest and 255 for brightest</div><div> self.LED_INVERT = False # True to invert the signal (when using NPN transistor level shift)</div><div> self.LED_CHANNEL = 0 # set to '1' for GPIOs 13, 19, 41, 45 or 53</div><div>  
</div><div> self.RIGHT_BORDER = [7,15,23,31,39,47,55,63]</div><div> self.LEFT_BORDER = [0,8,16,24,32,40,48,56]</div><div>  
</div><div> # Define functions which animate LEDs in various ways.</div><div> def clean(self,strip):</div><div> # wipe all the LED's at once</div><div> for i in range(strip.numPixels()):</div><div> strip.setPixelColor(i, Color(0, 0, 0))</div><div> strip.show()</div><div> def clean_up(self,strip):</div><div> clean = []</div><div> for pixel in clean:</div><div> strip.setPixelColor(pixel, Color(0,0,0))</div><div> strip.show()</div><div> def run_clean(self):</div><div> # Create NeoPixel object with appropriate configuration.</div><div> strip = PixelStrip(self.LED_COUNT, self.LED_PIN, self.LED_FREQ_HZ, self.LED_DMA, self.LED_INVERT, self.LED_BRIGHTNESS, self.LED_CHANNEL)</div><div> # Intialize the library (must be called once before other functions).</div><div> strip.begin()</div><div> # do stuff</div><div> try:</div><div> print('test animations.')</div><div> self.clean_up(strip)</div><div> except KeyboardInterrupt:</div><div> # clean the matrix LED before interruption</div><div> self.clean(strip)</div><div>  
</div><div>  
</div><div>  
</div><div> def demo_happy(self,strip):</div><div>  
</div><div> happy_smiley = [2,3,4,5,9,14,16,18,21,23,24,31,32,34,37,39,40,42,43,44,45,47,49,54,58,59,60,61]</div><div>  
</div><div>\# show the happy smiley on the RGB screen</div><div> for pixel in happy_smiley:</div><div> strip.setPixelColor(pixel, Color(0,255,0))</div><div>  
</div><div> strip.show()</div><div>  
</div><div>  
</div><div>  
</div><div>  
</div><div> def demo_sad(self,strip):</div><div>  
</div><div> sad_smiley = [2,3,4,5,9,14,16,18,21,23,24,31,32,34,35,36,37,39,40,42,45,47,49,54,58,59,60,61]</div><div>  
</div><div>  
</div><div>  
</div><div> # show the sad smiley on the RGB screen</div><div> for pixel in sad_smiley:</div><div> strip.setPixelColor(pixel, Color(255,0,0))</div><div>  
</div><div> strip.show()</div><div>  
</div><div>  
</div><div> def run_happy(self):</div><div> # Create NeoPixel object with appropriate configuration.</div><div> strip = PixelStrip(self.LED_COUNT, self.LED_PIN, self.LED_FREQ_HZ, self.LED_DMA, self.LED_INVERT, self.LED_BRIGHTNESS, self.LED_CHANNEL)</div><div> # Intialize the library (must be called once before other functions).</div><div> strip.begin()</div><div> # do stuff</div><div> try:</div><div> print('test animations.')</div><div> self.demo_happy(strip)</div><div> except KeyboardInterrupt:</div><div> # clean the matrix LED before interruption</div><div> self.clean(strip)</div><div> def run_sad(self):</div><div> # Create NeoPixel object with appropriate configuration.</div><div> strip = PixelStrip(self.LED_COUNT, self.LED_PIN, self.LED_FREQ_HZ, self.LED_DMA, self.LED_INVERT, self.LED_BRIGHTNESS, self.LED_CHANNEL)</div><div> # Intialize the library (must be called once before other functions).</div><div> strip.begin()</div><div> # do stuff</div><div> try:</div><div> print('test animations.')</div><div> self.demo_sad(strip)</div><div> except KeyboardInterrupt:</div><div> # clean the matrix LED before interruption</div><div> self.clean(strip)</div><div>  
</div><div>  
</div><div>matrix = RGB_Matrix()</div><div>  
</div><div>recognizer = cv2.face.LBPHFaceRecognizer_create()</div><div>recognizer.read('trainer/trainer.yml')</div><div>cascadePath = "haarcascade_frontalface_default.xml"</div><div>faceCascade = cv2.CascadeClassifier(cascadePath);</div><div>  
</div><div>font = cv2.FONT_HERSHEY_SIMPLEX</div><div>\#font = cv2.</div><div>  
</div><div>\#iniciate id counter</div><div>id = 1</div><div>  
</div><div>\# names related to ids: example ==&gt; Marcelo: id=1, etc</div><div>names = ['None', 'Javier Quintana', 'George Clooney', 'Tony', 'Z', 'W'] </div><div>  
</div><div>\# Initialize and start realtime video capture</div><div>cam = cv2.VideoCapture(0)</div><div>cam.set(3, 1000) # set video widht</div><div>cam.set(4, 750) # set video height</div><div>  
</div><div>  
</div><div>\# Define min window size to be recognized as a face</div><div>minW = 0.1*cam.get(3)</div><div>\#3</div><div>minH = 0.1*cam.get(4)</div><div>\#4</div><div>try:</div><div> while True:</div><div> </div><div> ret, img =cam.read()</div><div> #img = cv2.flip(img, -1) # Flip vertically</div><div> gray = cv2.cvtColor(img,cv2.COLOR_BGR2GRAY)</div><div>  
</div><div> faces = faceCascade.detectMultiScale( </div><div> gray,</div><div> scaleFactor = 1.2,</div><div> minNeighbors = 5,</div><div> minSize = (int(minW), int(minH)),</div><div> )</div><div>  
</div><div> for(x,y,w,h) in faces:</div><div>  
</div><div> cv2.rectangle(img, (x,y), (x+w,y+h), (0,255,0), 2)</div><div>  
</div><div>  
</div><div> id, confidence = recognizer.predict(gray[y:y+h,x:x+w])</div><div> # Check if confidence is less them 100 ==&gt; "0" is perfect match </div><div> if (confidence &lt; 60):</div><div> t3 = threading.Thread(target = matrix.run_clean)</div><div> t3.start()</div><div> cv2.rectangle(img, (x,y), (x+w,y+h), (0,255,0), 2)</div><div> id = names[id]</div><div> confidence = " {0}%".format(round(100 - confidence))</div><div> cv2.putText(img, str(id), (x+5,y-5), font, 1, (0,255,0), 2)</div><div> print("\n Successful")</div><div> count = count + 1</div><div> if count &gt; 20:</div><div> cam.release()</div><div> cv2.destroyAllWindows()</div><div> os.system("/home/pi/Documents/Face_recognition/gif/AI-succeed-gif")</div><div> t1 = threading.Thread(target = matrix.run_happy)</div><div> t1.start()</div><div> #GPIO.cleanup()</div><div> time.sleep(3)</div><div> matrix.run_clean()</div><div>  
</div><div> else:</div><div> count = 0</div><div> t2 = threading.Thread(target = matrix.run_sad)</div><div> t2.start()</div><div> cv2.rectangle(img, (x,y), (x+w,y+h), (0,0,255), 2)</div><div> id = "unknown"</div><div> confidence = " {0}%".format(round(100 - confidence))</div><div> cv2.putText(img, str(id), (x+5,y-5), font, 1, (0,0,255), 2)</div><div> </div><div> </div><div> cv2.moveWindow("camera",500,250)</div><div> cv2.imshow('camera',img) </div><div>  
</div><div> k = cv2.waitKey(10) &amp; 0xff # Press 'ESC' for exiting video</div><div> if k == 27:</div><div> break</div><div>  
</div><div> # Do a bit of cleanup</div><div> print("\n [INFO] Exiting Program and cleanup stuff")</div><div> cam.release()</div><div> cv2.destroyAllWindows()</div><div>except KeyboardInterrupt:</div><div> GPIO.cleanup()</div><div> matrix.run_clean()</div></details><p class="callout danger">**El programa anterior 03\_face\_recognition\_RGB.py NO FUNCIONA** cuando detecta una cara nos da el siguiente error  
si sabes cómo solucionar este problema, ponte en contacto con Catedu www.catedu.es - información  
</p>

```
Exception in thread Thread-431:
Traceback (most recent call last):
  File "/usr/lib/python3.7/threading.py", line 917, in _bootstrap_inner
    self.run()
 etc..
```

**La solución es no utilizarlo y utilizar el fichero 03\_face\_recognition.py** que sí que funciona.

**¿Cómo?** En las líneas 58-59-60 meter qué queremos que haga el hardware del Crowpi cuando detecte una cara:

```
if (confidence < 70):
            id = names[id]
            confidence = "  {0}%".format(round(100 - confidence))
```

Para ello creamos una función, por ejemplo lo he llamado **Hardware(id)** que haga lo que queremos que haga cuando detecte la cara id, por ejemplo si detecta la cara id=3 que suene el vibrador

```
import RPi.GPIO as GPIO
import time

# define vibration pin
vibration_pin = 27
# Set board mode to GPIO.BCM
GPIO.setmode(GPIO.BCM)
# Setup vibration pin to OUTPUT
GPIO.setup(vibration_pin, GPIO.OUT)

def Hardware(id):
    nombre=names[id]
    if (id==3):
        # turn on vibration
        GPIO.output(vibration_pin, GPIO.HIGH)
        # wait half a second
        time.sleep(0.5)
        # turn off vibration
        GPIO.output(vibration_pin, GPIO.LOW)
```

Por lo tanto en el fichero 03\_face\_recognition.py y en las líneas 58-59-60 metemos Hardware(id)

```
 if (confidence < 70):
            # aquí pongo qué quiero que haga cuando detecta una cara conocida
            Hardware(id)
            # fin
            id = names[id]
            confidence = "  {0}%".format(round(100 - confidence))
```

El resultado es:

<iframe allow="accelerometer; autoplay; clipboard-write; encrypted-media; gyroscope; picture-in-picture; web-share" allowfullscreen="allowfullscreen" frameborder="0" height="599" src="https://www.youtube.com/embed/VBcv-qqY1xU" title="CROWPI2 detección de cara con IA OpenCV3" width="337"></iframe>

El fichero modificado es

```
''''
Real Time Face Recogition
    ==> Each face stored on dataset/ dir, should have a unique numeric integer ID as 1, 2, 3, etc                       
    ==> LBPH computed model (trained faces) should be on trainer/ dir
Based on original code by Anirban Kar: https://github.com/thecodacus/Face-Recognition    

Developed by Marcelo Rovai - MJRoBot.org @ 21Feb18  

'''

import cv2
import numpy as np
import os

#MIO LIBRERIAS Y CONFIGURACIóN VIBRADOR
import RPi.GPIO as GPIO
import time
# define vibration pin
vibration_pin = 27
# Set board mode to GPIO.BCM
GPIO.setmode(GPIO.BCM)
# Setup vibration pin to OUTPUT
GPIO.setup(vibration_pin, GPIO.OUT)
################################################
           

recognizer = cv2.face.LBPHFaceRecognizer_create()
recognizer.read('trainer/trainer.yml')
cascadePath = "haarcascade_frontalface_default.xml"
faceCascade = cv2.CascadeClassifier(cascadePath);

font = cv2.FONT_HERSHEY_SIMPLEX

#iniciate id counter
id = 1

# names related to ids: example ==> Marcelo: id=1,  etc
names = ['None', 'George Clooney', 'Javier Quintana', 'Javier', 'Z', 'W'] 

# Initialize and start realtime video capture
cam = cv2.VideoCapture(0)
cam.set(3, 640) # set video widht
cam.set(4, 480) # set video height

# Define min window size to be recognized as a face
minW = 0.1*cam.get(3)
minH = 0.1*cam.get(4)

#MIO mi función cuando detecta una cara
def Hardware(id):
    nombre=names[id]
    if (id==3):
        # turn on vibration
        GPIO.output(vibration_pin, GPIO.HIGH)
        # wait half a second
        time.sleep(0.5)
        # turn off vibration
        GPIO.output(vibration_pin, GPIO.LOW)


while True:

    ret, img =cam.read()
    #img = cv2.flip(img, -1) # Flip vertically

    gray = cv2.cvtColor(img,cv2.COLOR_BGR2GRAY)

    faces = faceCascade.detectMultiScale( 
        gray,
        scaleFactor = 1.2,
        minNeighbors = 5,
        minSize = (int(minW), int(minH)),
       )

    for(x,y,w,h) in faces:

        cv2.rectangle(img, (x,y), (x+w,y+h), (0,255,0), 2)

        id, confidence = recognizer.predict(gray[y:y+h,x:x+w])

        # Check if confidence is less them 100 ==> "0" is perfect match 
        if (confidence < 70):
            #MIO aquí pongo qué quiero que haga cuando detecta una cara conocida
            Hardware(id)
            # fin
            id = names[id]
            confidence = "  {0}%".format(round(100 - confidence))
            
        else:
            id = "unknown"
            confidence = "  {0}%".format(round(100 - confidence))
        
        cv2.putText(img, str(id), (x+5,y-5), font, 1, (255,255,255), 2)
#        cv2.putText(img, str(confidence), (x+5,y+h-5), font, 1, (255,255,0), 1)  
    
    cv2.imshow('camera',img) 

    k = cv2.waitKey(10) & 0xff # Press 'ESC' for exiting video
    if k == 27:
        break

# Do a bit of cleanup

print("\n [INFO] Exiting Program and cleanup stuff")
cam.release()
cv2.destroyAllWindows()
# MIO
#cleaup GPIO
GPIO.cleanup()

```