Un proyecto diferente: Encender y apagar led por wifi
En la lista de proyectos que propone PicoBricks sólo hay uno que usa la Wifi SmartHome, pero no utiliza la wifi de Raspberry Pi sino que utiliza un módulo wifi ESP8266 auxiliar.
Proponemos uno que no use elementos auxiliares
Enunciado: Encender y apagar el led rojo conectado en GPI7 a través de una página web puesto en el servidor que se instala en la Raspberry
Solución
La explicación del programa está en https://peppe8o.com/getting-started-with-wifi-on-raspberry-pi-pico-w-and-micropython/
La fuente del programa en https://github.com/raspberrypi/pico-micropython-examples/blob/master/wireless/webserver.py
Recuerda que tienes que poner los datos de tu wifi en las líneas 35 y 36
import socket
################################33
import network, rp2
import time

def connectWiFi(ssid,password,country):
   rp2.country(country)
   wlan = network.WLAN(network.STA_IF)
   wlan.config(pm = 0xa11140)
   wlan.active(True)
   wlan.connect(ssid, password)
   # Wait for connect or fail
   max_wait = 10
   while max_wait > 0:
      if wlan.status() < 0 or wlan.status() >= 3:
        break
      max_wait -= 1
      print('waiting for connection...')
      time.sleep(1)

   # Handle connection error
   if wlan.status() != 3:
      raise RuntimeError('network connection failed')
   else:
      print('connected')
      status = wlan.ifconfig()
      print( 'ip = ' + status[0] )
   return status
######################################################333
from machine import Pin

led = Pin(7, Pin.OUT)

country = 'ES'
ssid = 'pon aqui el nombre de tu wifi'
password = 'pon aqui el password de tu wifi'

wifi_connection = connectWiFi(ssid,password,country)
#########################################################################33333
html = """<!DOCTYPE html>
<html>
<head> <title>Pico W</title> </head>
<body> <h1>Pico W</h1>
<p>Current status: %s</p>
<p><a href="http://"""+wifi_connection[0]+"""/light/on">Turn ON</a></p>
<p><a href="http://"""+wifi_connection[0]+"""/light/off">Turn OFF</a></p>
<p>by <a href="https://peppe8o.com">peppe8o.com</a></p>
</body>
</html>
"""
######################################################################


# Open socket
addr = socket.getaddrinfo('0.0.0.0', 80)[0][-1]
s = socket.socket()
s.bind(addr)
s.listen(1)

print('listening on', addr)

# Initialize LED status
led.value(0)
stateis = "LED is OFF"

# Listen for connections
while True:
  try:
    cl, addr = s.accept()
    print('client connected from', addr)
    request = cl.recv(1024)
    print(request)

    request = str(request)[0:50] # The [0:50] avoids getting the url directory from referer
    led_status = request.find('GET / HTTP')
    led_on = request.find('/light/on')
    led_off = request.find('/light/off')
    print( 'led on = ' + str(led_on))
    print( 'led off = ' + str(led_off))

    if led_status >0:
      print("LED status request") # No LED action

    if led_on >0:
      print("led on")
      led.value(1)
      stateis = "LED is ON"

    if led_off >0:
      print("led off")
      led.value(0)
      stateis = "LED is OFF"

    response = html % stateis

    cl.send('HTTP/1.0 200 OK\r\nContent-type: text/html\r\n\r\n')
    cl.send(response)
    cl.close()

  except OSError as e:
    cl.close()
    s.close()
    print('connection closed')
Ejecución del programa
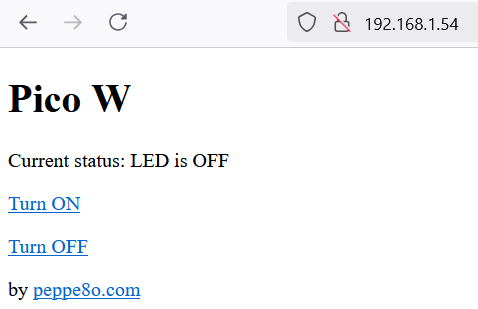
Para encender y apagar el led tienes que entrar en la IP de la Raspberry Pi, puedes verlo en la ventana del puerto serie (cónsola) que puedes ver en el programa Thonny:
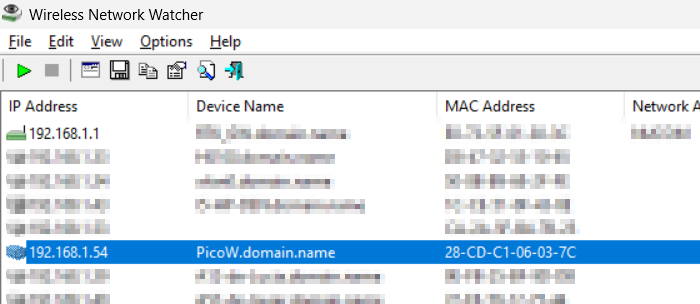
Otro truco es ejecutar un programa de rastreo de IPs como el Wireless Network Watcher y ver la IP de la Raspberry. O poner una IP estática ver aquí
Si os sale el error OSError: [Errno 98] EADDRINUSE es porque no se ha cerrado bien la conexión, desconectar PicoBrikcs y volverlo a conectar y solucionado


No comments to display
No comments to display