Crowpi2
ATENCION los tutoriales y lecciones que muestra CrowPi2 están EN INGLÉS
¿Qué es?
Crowpi2 es básicamente un ordenador adaptado para robótica pero que el microprocesador es una Raspberry. Es decir, tiene teclado, pantalla, alimentación... y un sinfín de sensores y actuadores para realizar experimentos con la Raspberry Pi
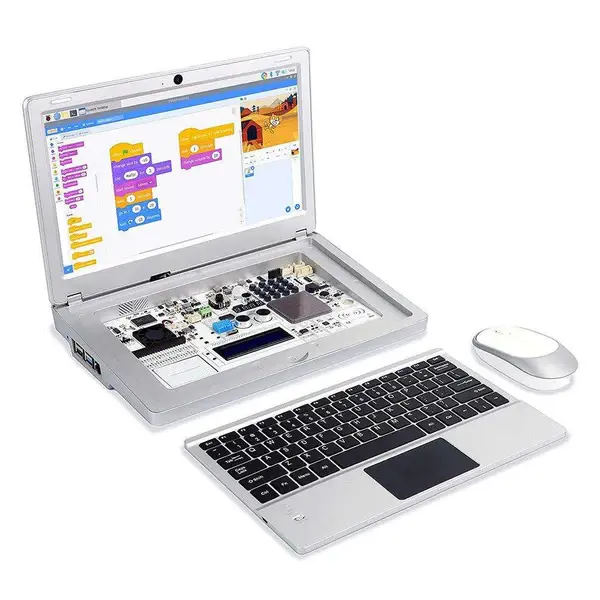 Fuente https://www.crowpi.cc/
A la hora de comprar hay que tener en cuenta de pedir teclado español y que no suele incluir la Raspbery. Sale por unos 365€
Los sensores que lleva integrados son 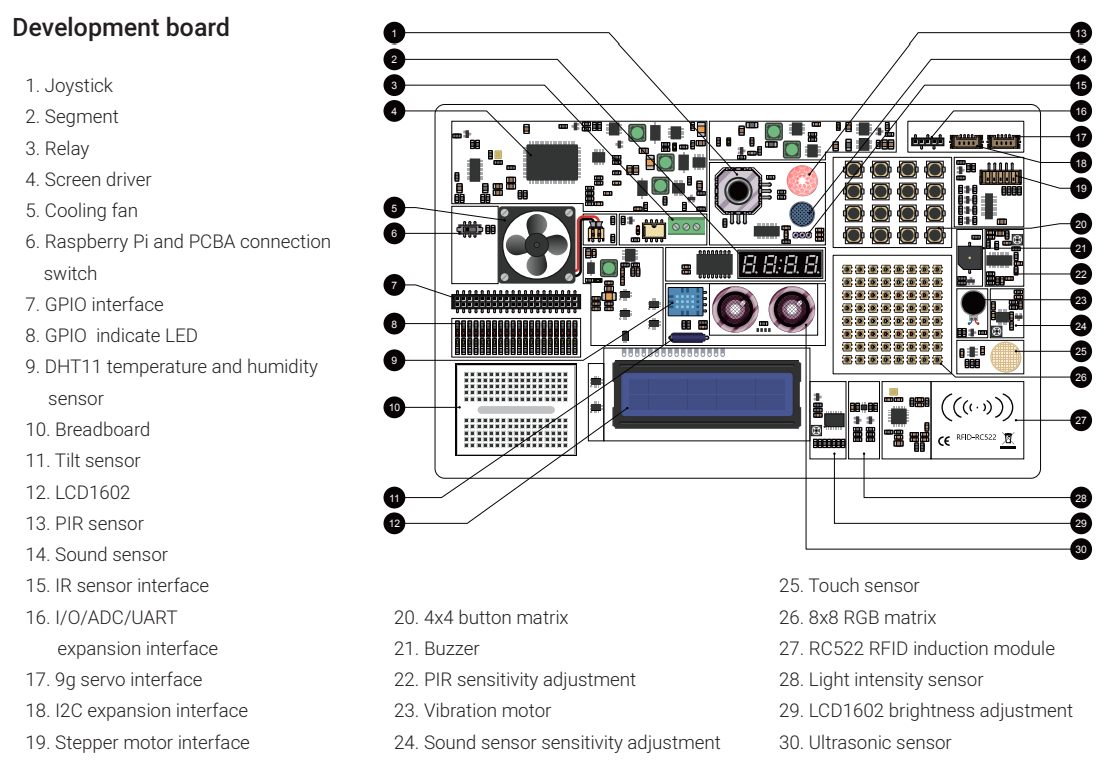
Fuente Manual CrowPi2 descargable aquí
Para ver en qué pin GPIO esta conectado cada sensor y actuador ver https://github.com/Elecrow-RD/CrowPi2
Si se quiere utilizar la placa board (10) con los pines GPIO diréctamente, poner el switch (6) en OFF, en caso contrario dejarlo en ON para poder usar los elementos de Crowpi
Configuración hardware
Conectamos nuestra Raspberry Pi en el Crowpi tal y como dicen las instrucciones, sobre todo hay que fijarse en conectar la alimentación, y display. Manual CrowPi2 descargable aquí.
Configuración software
Tenemos que bajar la imagen oficial, que es un Raspbian con programas educativos, sobre todo el Crowpi2 que hablaremos más adelante. Para descargar la imagen, aquí tienes la página oficial. Para grabarla en una tarjeta SD (recomendable 32G) podemos usar balenaetcher
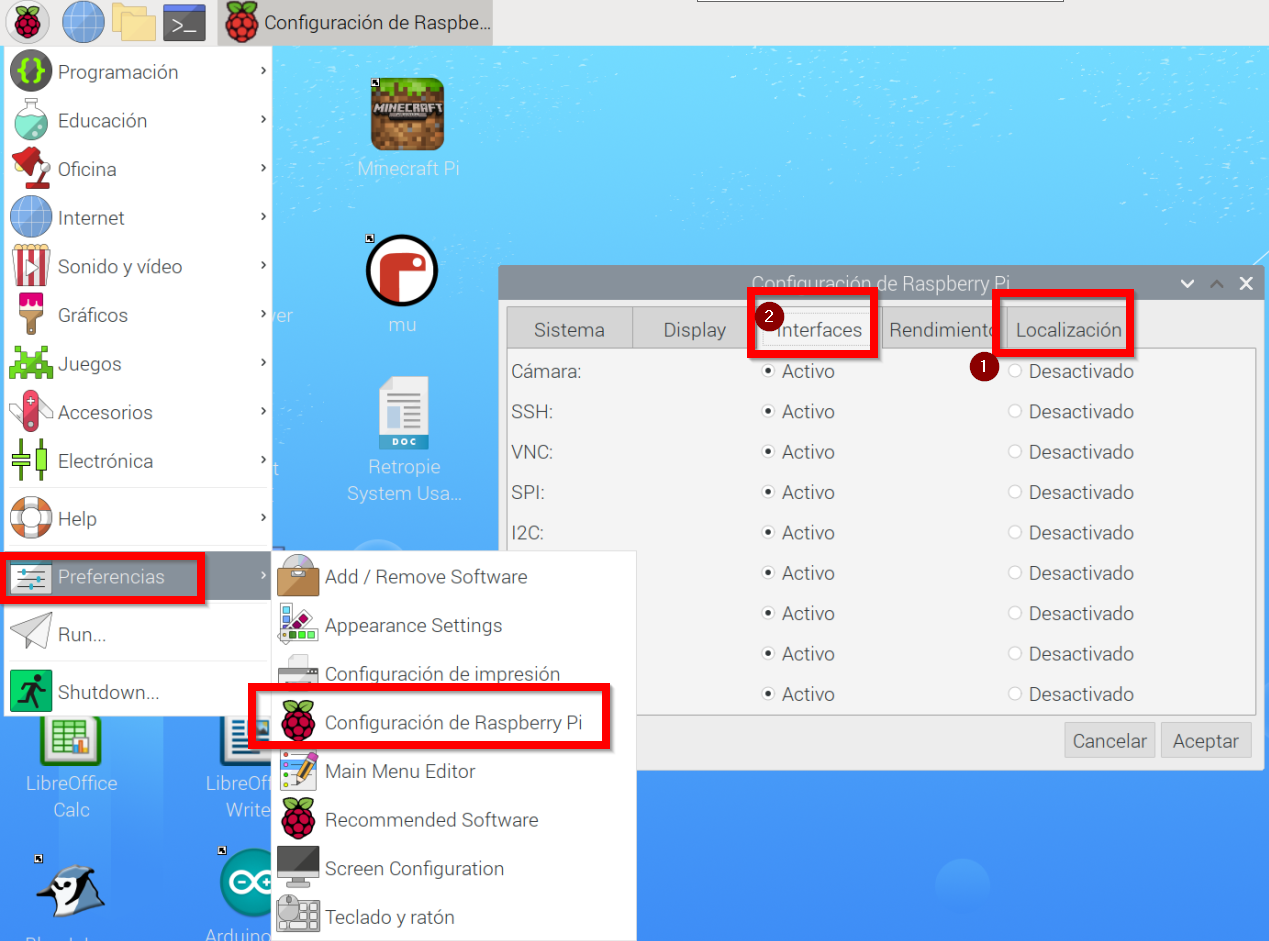
Una vez instalado, arrancar Crowpi2 con la tarjeta, configurar teclado, wifi (1 en la figura) y recomendamos activar SSH y VNC y cámara web (2) para poder manejar Crowpi2 desde otro ordenador.
luego en el terminal, recomendamos actualizar el software con las instrucciones:
sudo apt-get update
sudo apt-get dist-upgrade
Programa educativo Crowpi
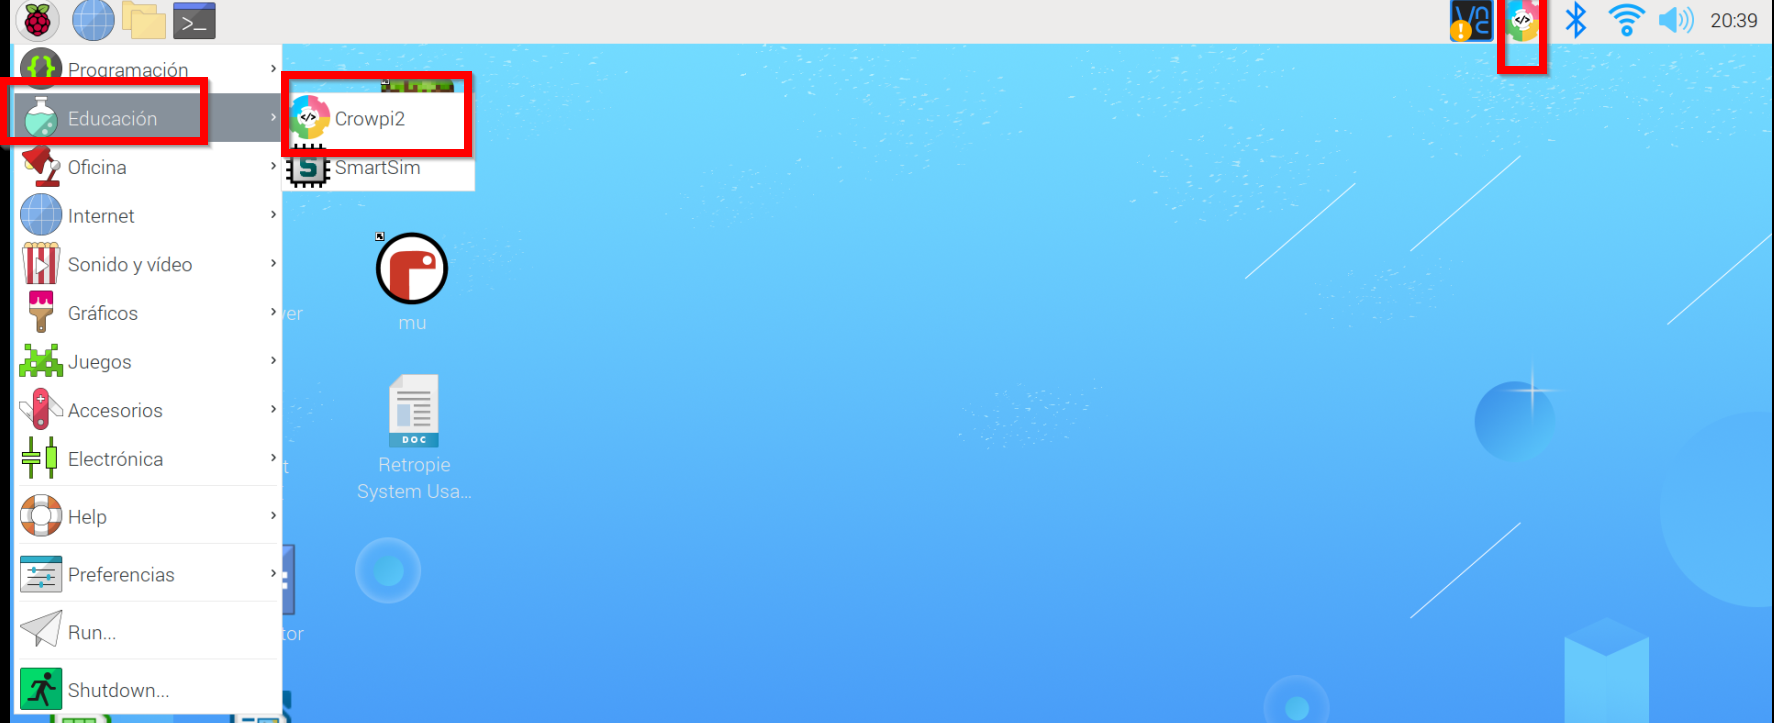
Está preinstalado en la imagen oficial de Crowpi2 y lo tenemos accesible en estos dos sitios
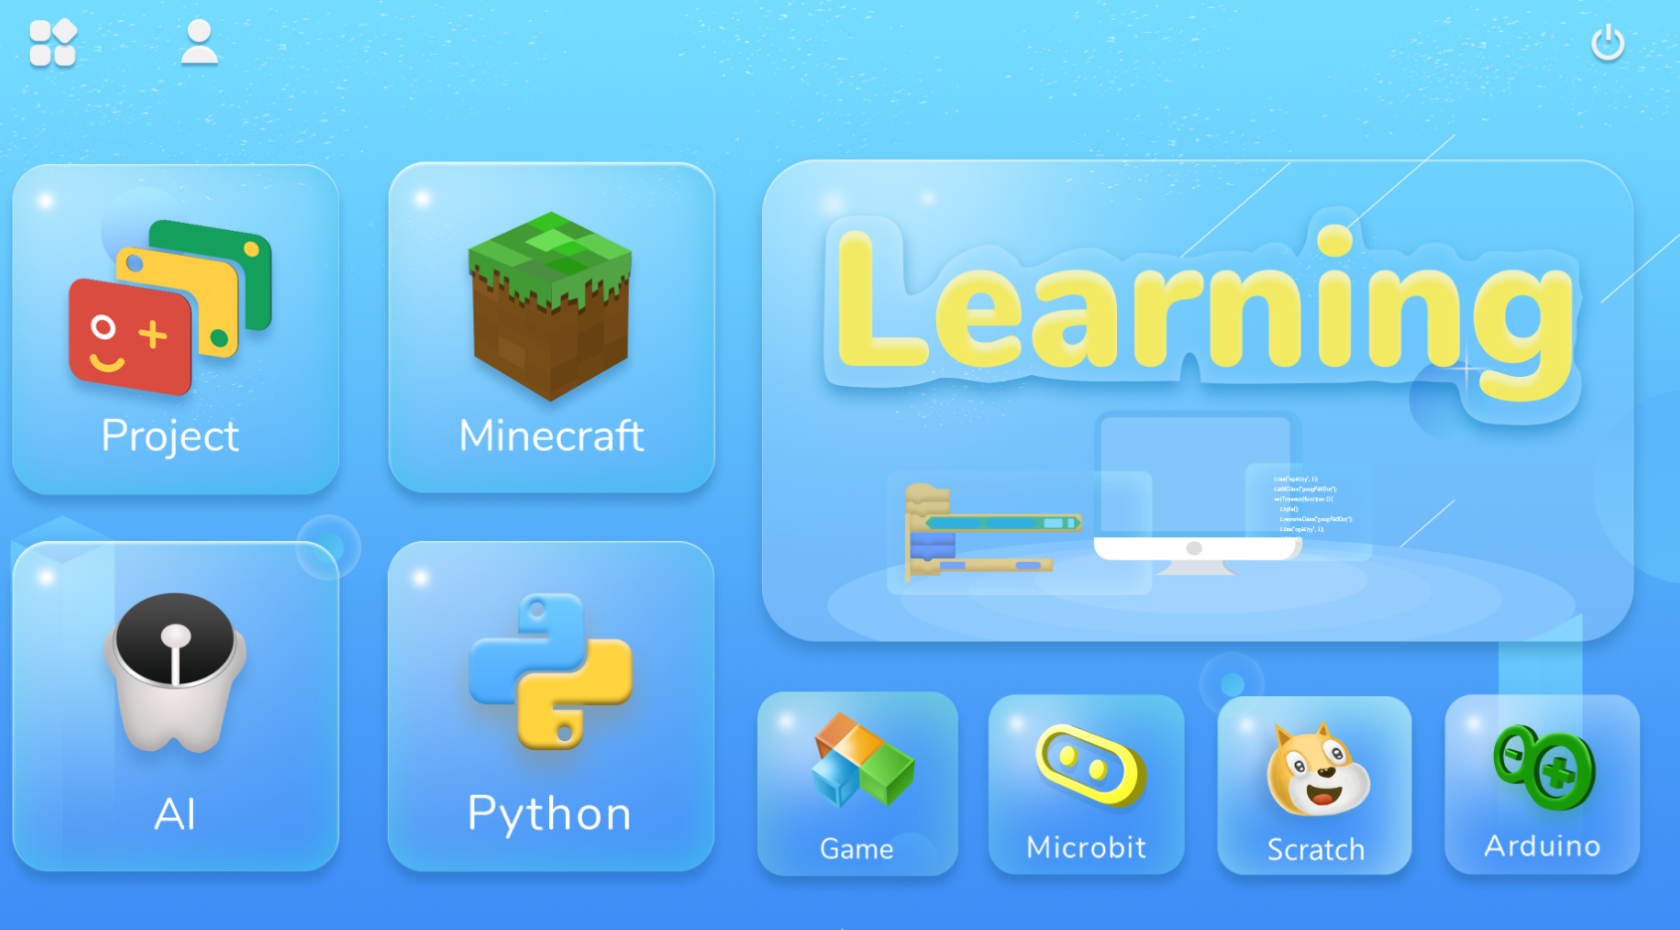
Al arrancar sale esta ventana
Programa educativo Crowpi Learning
En el momento de arrancar este programa nos encontramos con un diálogo de logueo. Se puede crear usuarios sin necesidad de cofirmación ni Internet (email, etc..) perfecto para alumnos menores de edad.
Esto es excelente pues nos permite usar el mismo Crowpi2 para distintos alumnos y cada uno va a su ritmo pues graba las lecciones que se han logrado
Al loguearse nos pregunta qué tipo de programación deseamo
Programa educativo Crowpi Learning Scratch
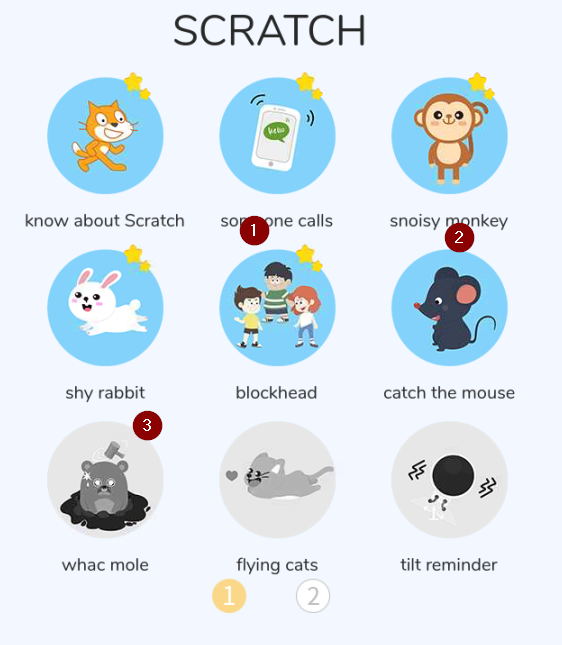
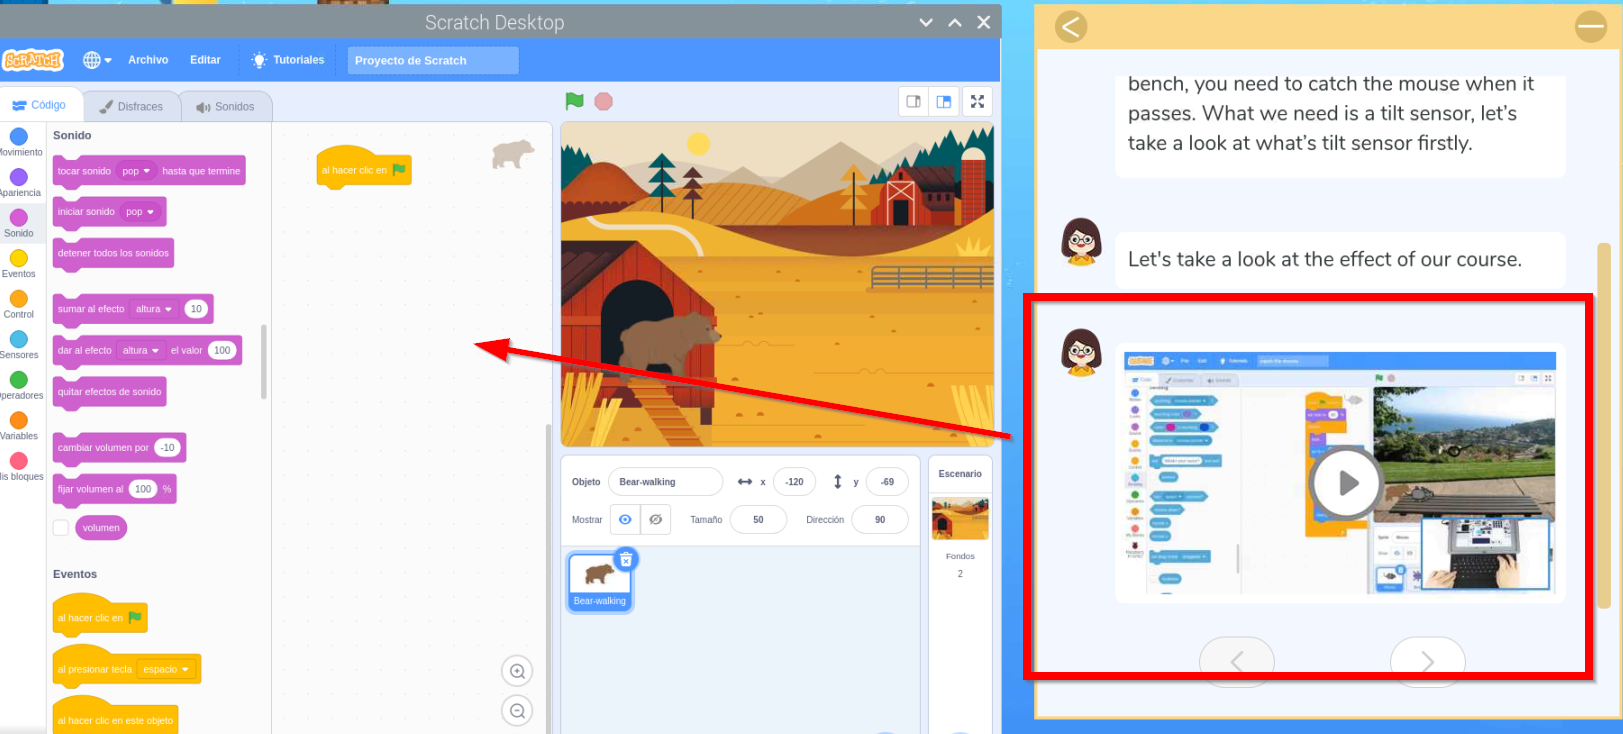
Nos enseña 16 lecciones, qué lecciones son las que hemos hecho (1), por cual vamos (2) y cuales nos quedan por hacer. Hasta que no se completa una lección no permite pasar a la siguiente.
Las lecciones enseñan paso a paso las instrucciones con vídeos para poder hacer los programas y el editor Scratch para ir realizándolo :
Programa educativo Crowpi Learning Python
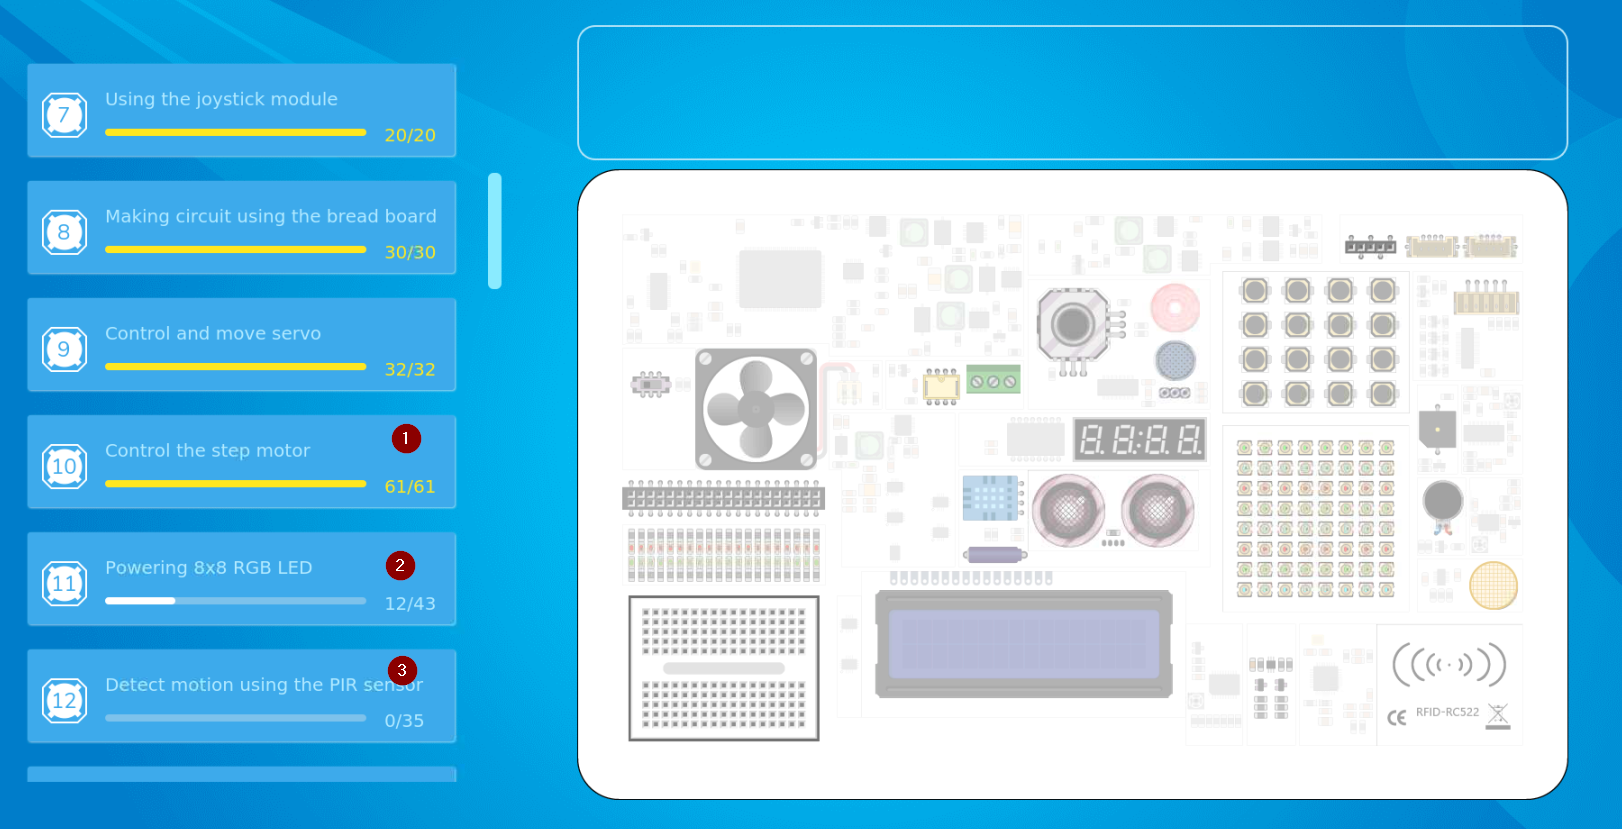
Nos enseña 32 lecciones, qué lecciones son las que hemos hecho (1), por cual vamos (2) y cuales nos quedan por hacer. Hasta que no se completa una lección no permite pasar a la siguiente.
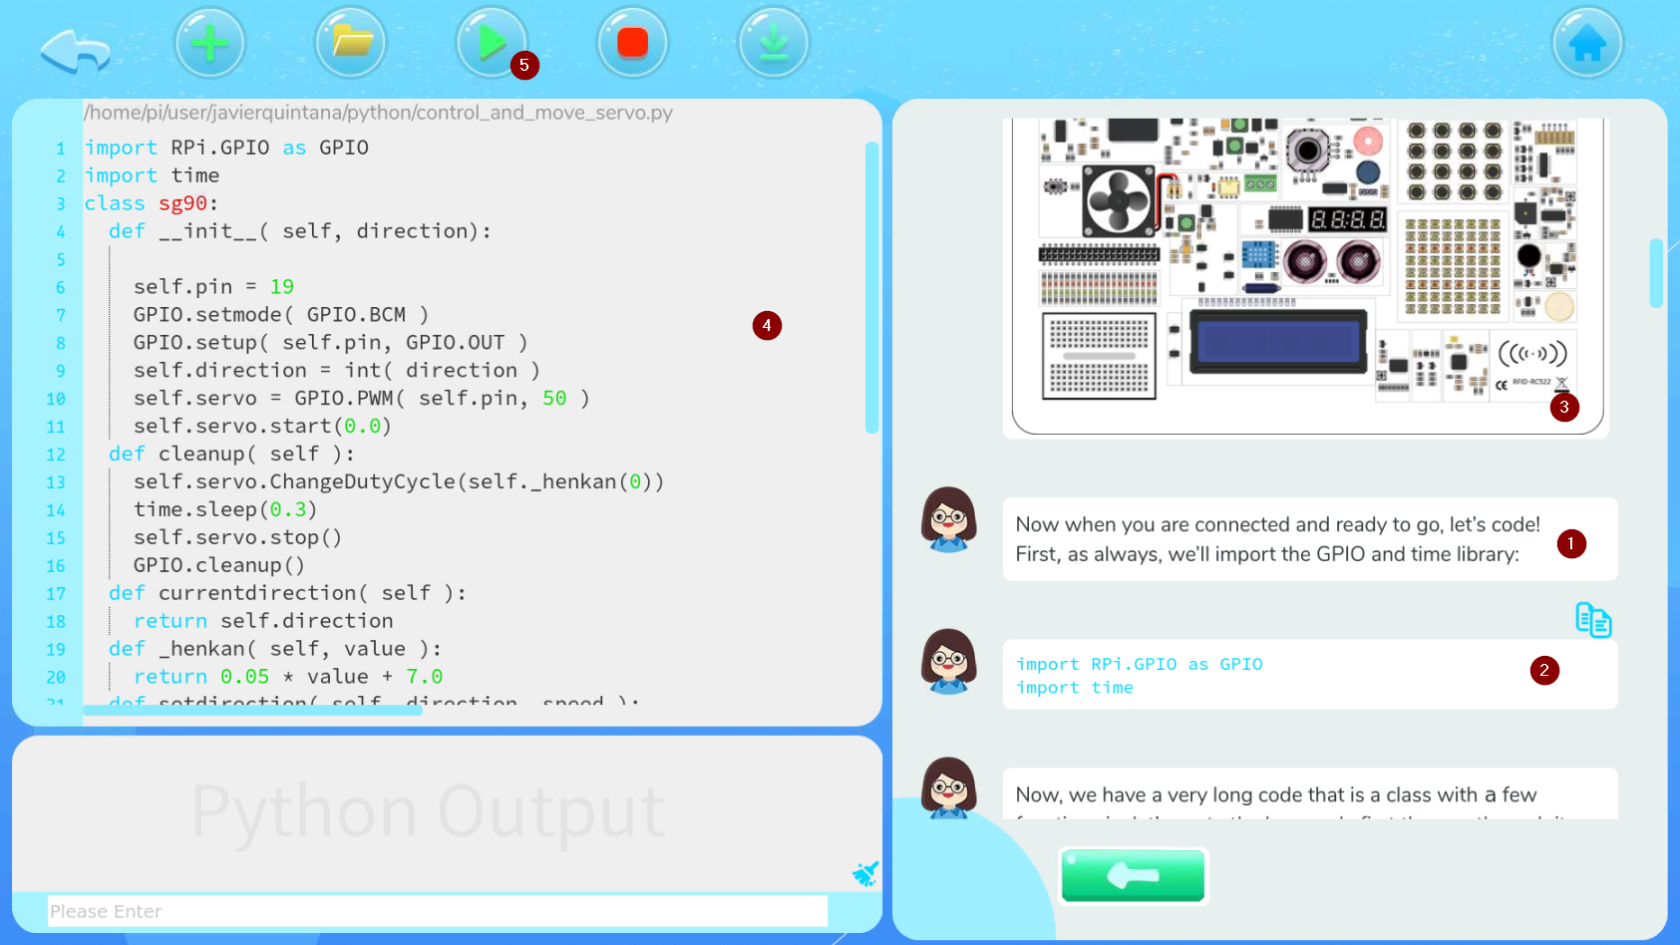
En las lecciones (1) se explica paso a paso el código a realizar (2) junto con explicaciones de los sensores (3) y al lado el editor Thomy (4) para ir realizando el programa y poder ejecutarlo (5)
Para el manejo del 8x8 RGB LED Matriz de necesita esta librería y da error
from rpi_ws281x import PixelStrip, Color
si sabes cómo solucionar este problema, ponte en contacto con Catedu www.catedu.es - información
Programa educativo Crowpi AI
Programa educativo Crowpi AI Speech Recognition
Se basa en el software y máquina de entrenar https://snowboy.kitt.ai/ pero como puedes ver está ya sin mantenimiento luego las lecciones que enseña Crowpi Learning no sirven.
Programa educativo Crowpi AI- Face Recognition- instalación Open CV3
Para utilizar el reconocimiento de imagen, tenemos que utilizar el software OpenCV3 no utilizar la guía que muestra Install Open CV3, está obsoleta simplemente en un terminal ejecutar la instrucción
sudo apt install python3-opencvPrograma educativo Crowpi AI- Face Recognition- Test de la cámara
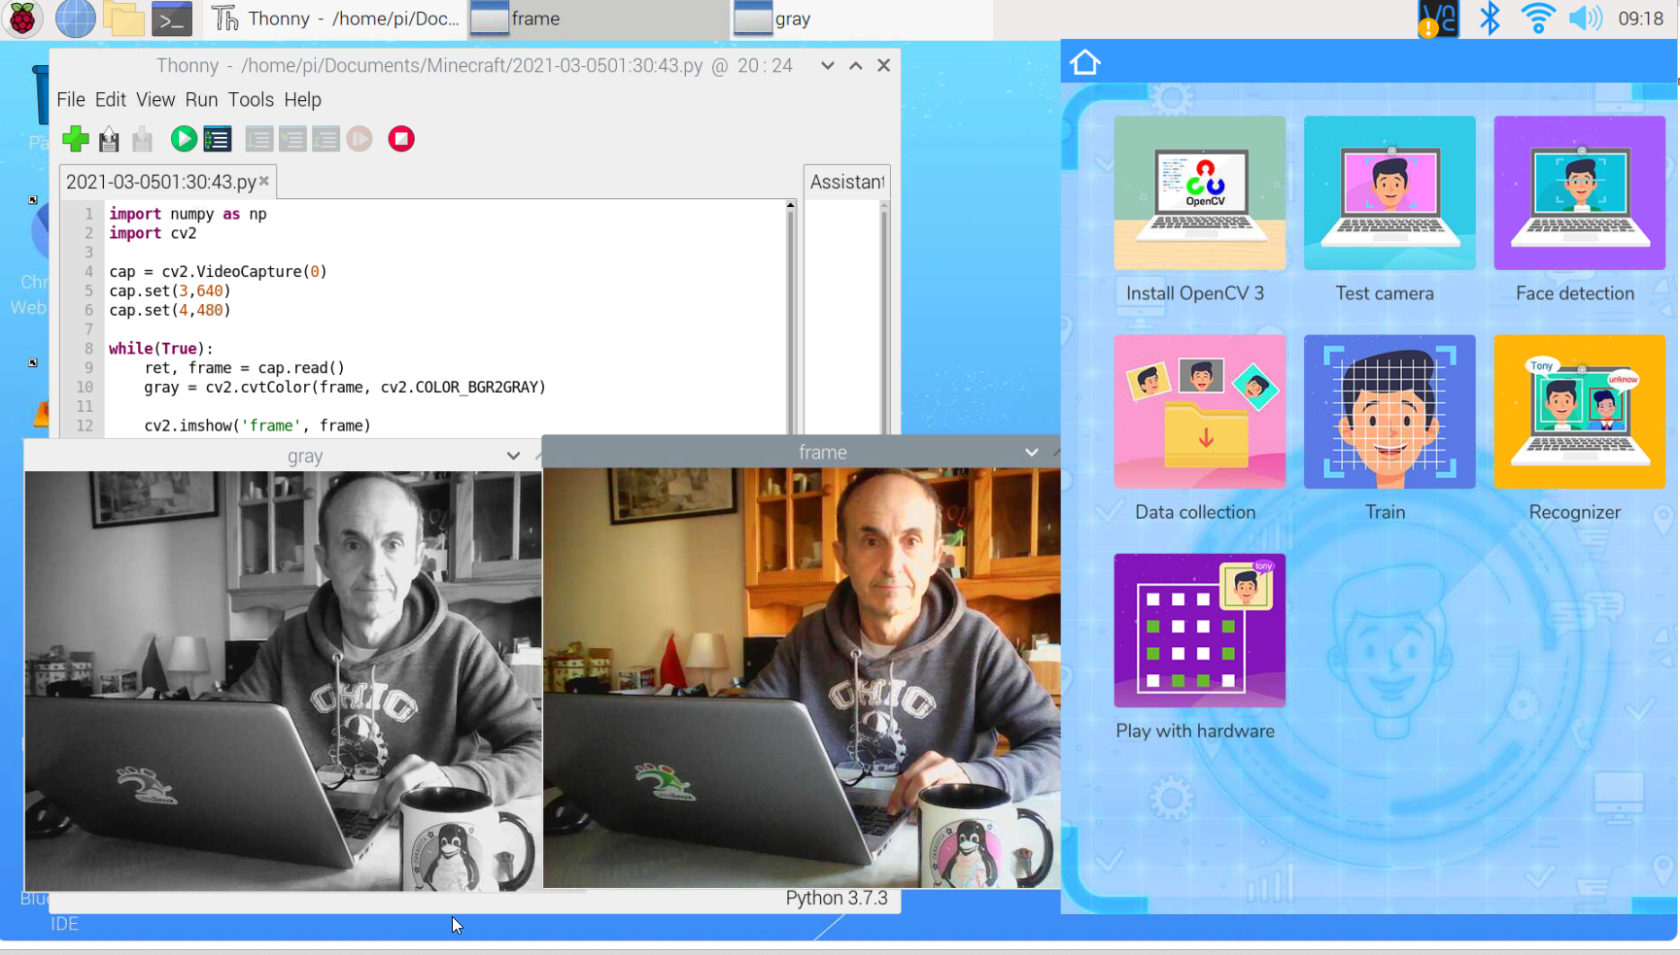
Vamos a probarlo con este programa que visualiza capturas en gris y en color
import numpy as np
import cv2

cap = cv2.VideoCapture(0)
cap.set(3,640)
cap.set(4,480)

while(True):
    ret, frame = cap.read()
    gray = cv2.cvtColor(frame, cv2.COLOR_BGR2GRAY)

    cv2.imshow('frame', frame)
    cv2.imshow('gray', gray)

    k=cv2.waitKey(30) & 0xff
    if k == 27:
        break

cap.release()
cv2.destroyAllWindows()
Extraído de https://peppe8o.com/crowpi2-reviewing-the-famous-all-in-one-stem-solution/
El resultado
Un programa más elaborado lo tienes pinchando en el primer tutorial
Fuente: Tutorial Learning Crowpi2
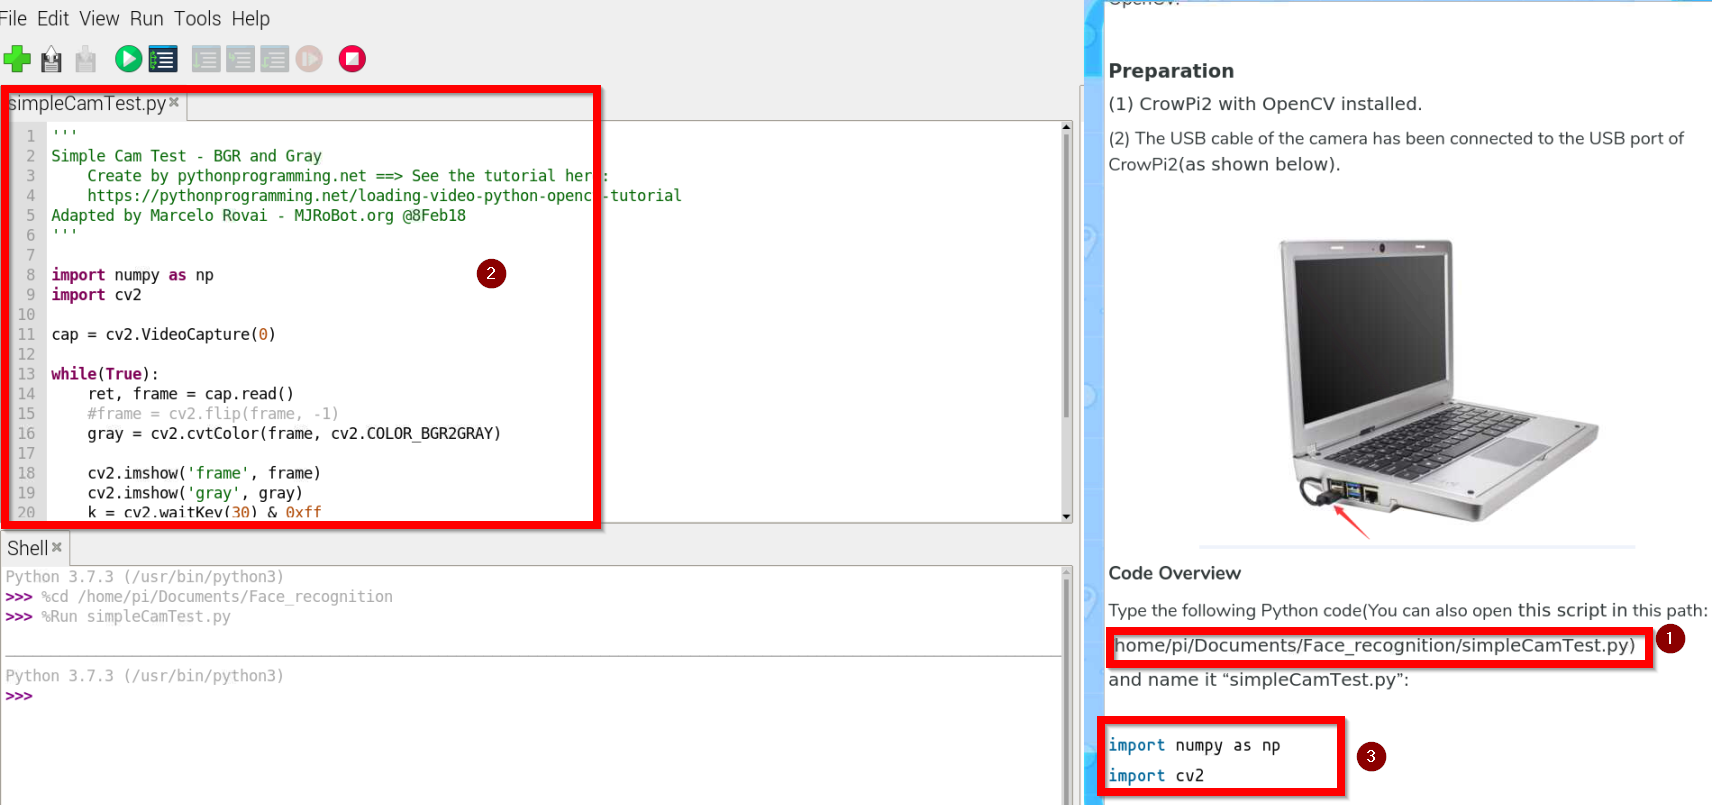
Al abrir, nos encontramos la ruta del programa SimpleCamTest.py (1) lo abrimos (2) y nos fijamos en la explicaciones del código del tutorial (3)
El resultado es el mismo pero el programa es más elaborado con la ventaja de que está explicado paso a paso en el tutorial.
Programa educativo Crowpi AI- Face Recognition- Reconocimiento facial
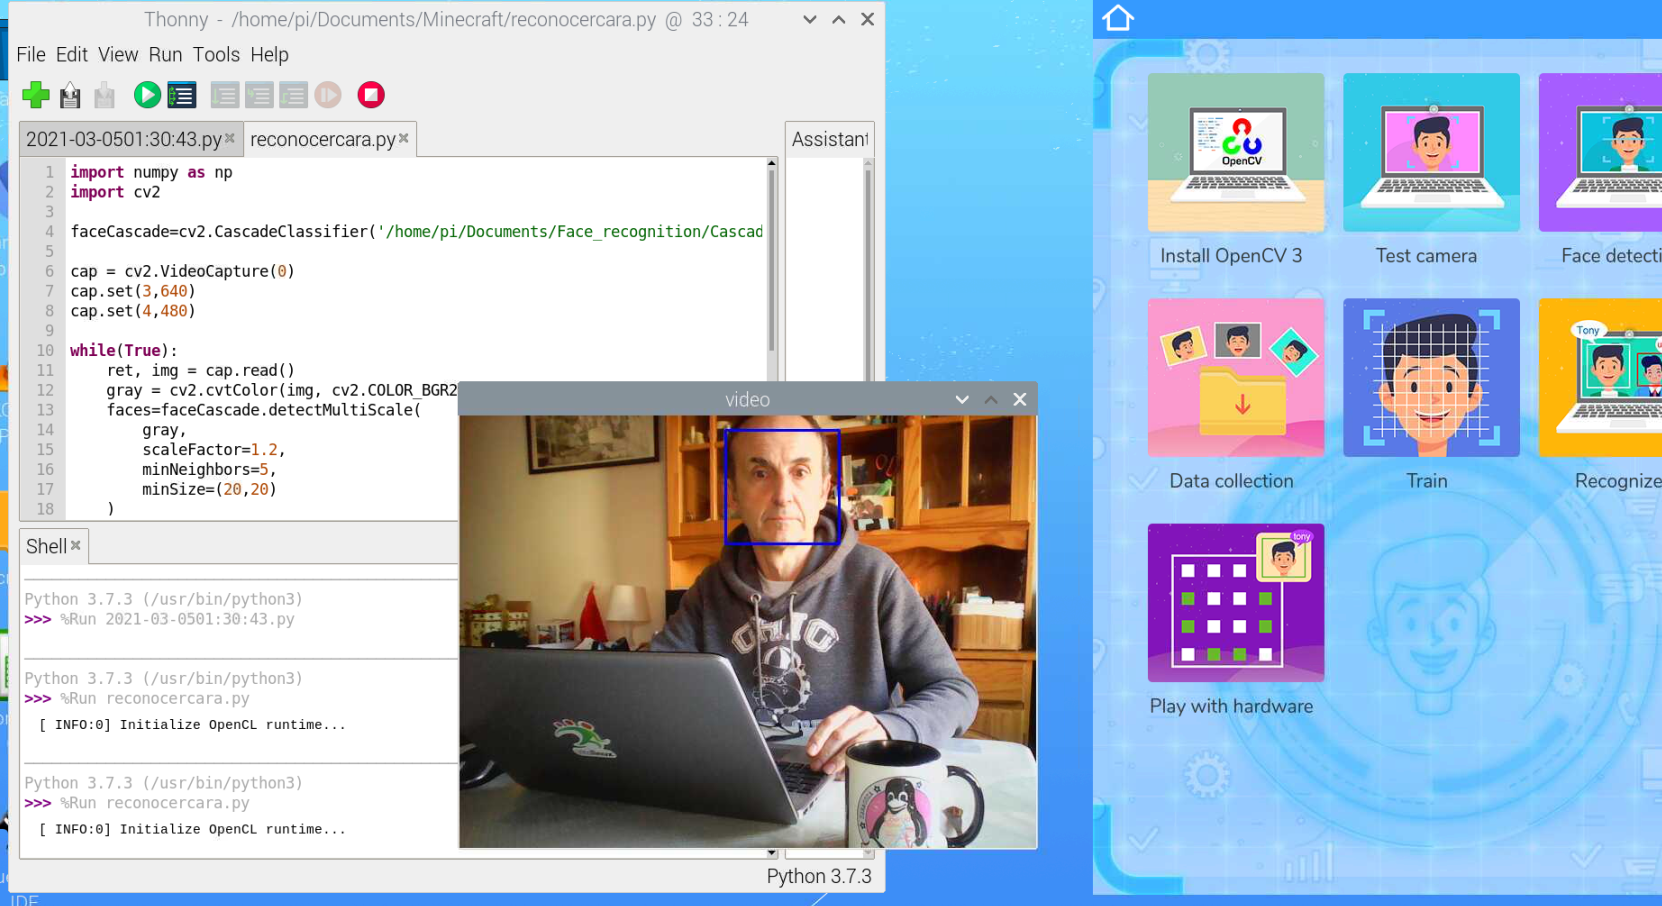
Un programa sencillo sería
import numpy as np
import cv2

faceCascade=cv2.CascadeClassifier('/home/pi/Documents/Face_recognition/Cascades/haarcascade_frontalface_default.xml')

cap = cv2.VideoCapture(0)
cap.set(3,640)
cap.set(4,480)

while(True):
    ret, img = cap.read()
    gray = cv2.cvtColor(img, cv2.COLOR_BGR2GRAY)
    faces=faceCascade.detectMultiScale(
        gray,
        scaleFactor=1.2,
        minNeighbors=5,
        minSize=(20,20)
    )

    for (x,y,w,h) in faces:
        cv2.rectangle(img,(x,y),(x+w,y+h),(255,0,0),2)
        roi_gray=gray[y:y+h, x:x+w]
        roi_color=img[y:y+h, x:x+w]


    cv2.imshow('video', img)

    k=cv2.waitKey(30) & 0xff
    if k == 27:
        break

cap.release()
cv2.destroyAllWindows()
Extraído de https://peppe8o.com/crowpi2-reviewing-the-famous-all-in-one-stem-solution/
Un programa más elaborado es el que sale en su tutorial en este botón:
Fuente: Tutorial Learning Crowpi2
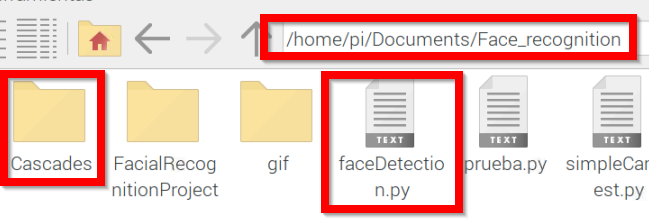
El programa faceDection.py esta en este directorio
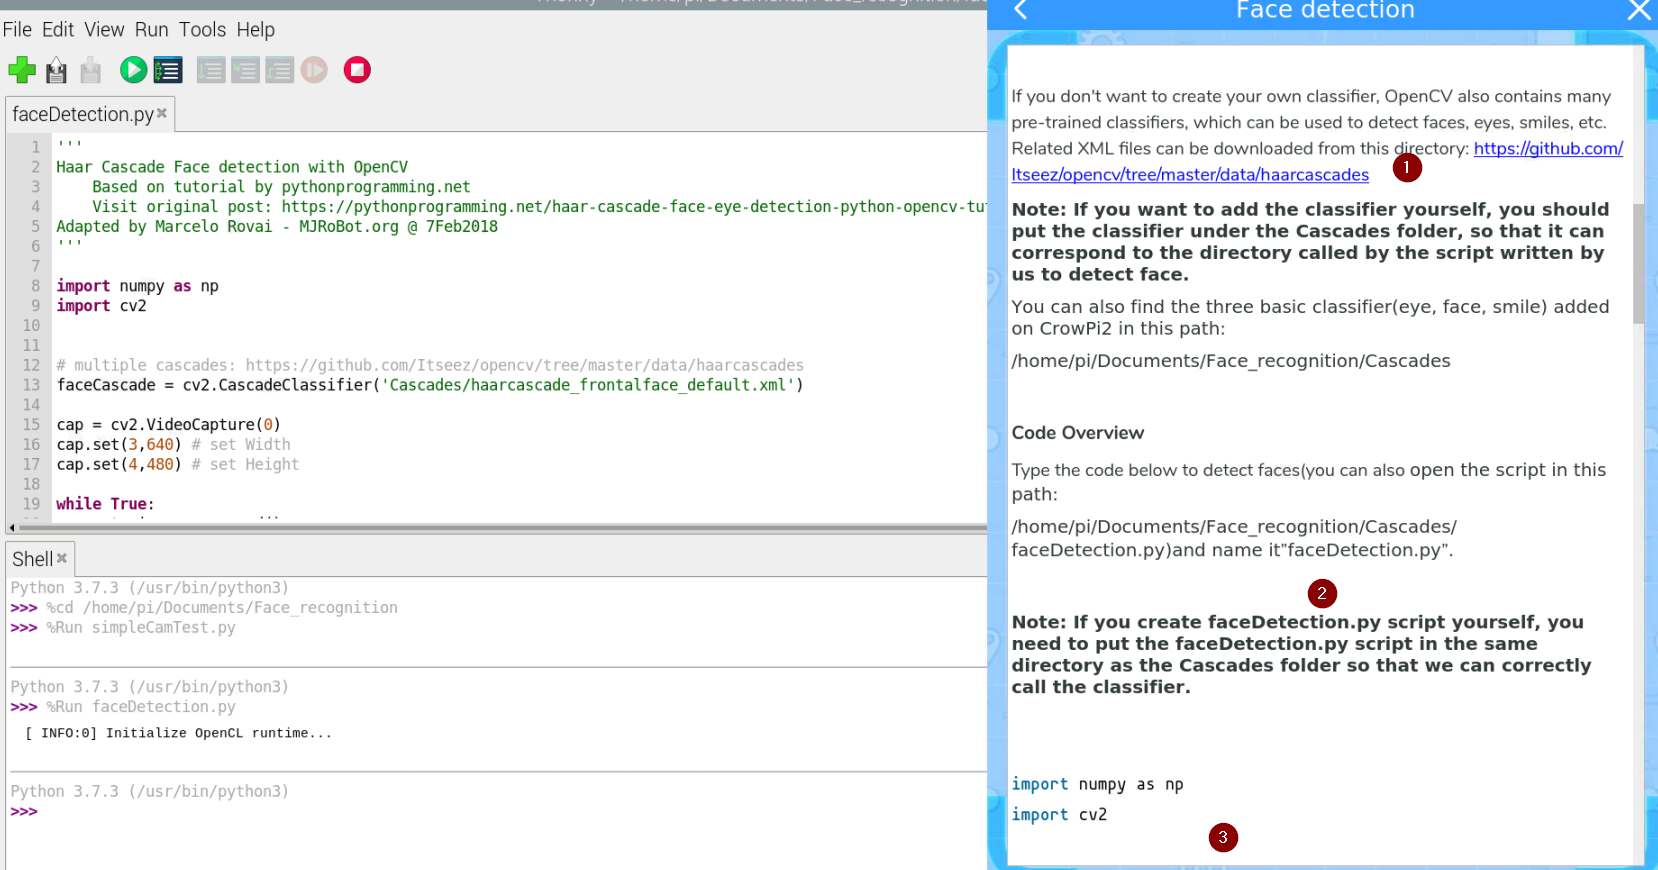
Es importante que esté en el mismo sitio que la carpeta Cascades tal y como explica en (1)
Cascades es una carpeta que contendrá los patrones de las caras. Como dice su tutorial (2) puedes descargarlos desde https://github.com/opencv/opencv/tree/master/data/haarcascades y ponerlos en la carpeta Cascades. El programa se explica paso a paso en el tutorial (3)
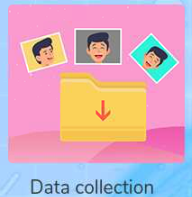
Programa educativo Crowpi AI- Face Recognition- 01-Data collection
Entramos en el siguiente tutorial
Fuente: Tutorial Learning Crowpi2
En el mismo directorio que antes encontramos FacialRecognitionProyect, nos encontramos el siguiente programa 01_face_dataset.py
''''
Capture multiple Faces from multiple users to be stored on a DataBase (dataset directory)
    ==> Faces will be stored on a directory: dataset/ (if does not exist, pls create one)
    ==> Each face will have a unique numeric integer ID as 1, 2, 3, etc

Based on original code by Anirban Kar: https://github.com/thecodacus/Face-Recognition

Developed by Marcelo Rovai - MJRoBot.org @ 21Feb18

'''

import cv2
import os

cam = cv2.VideoCapture(0)
cam.set(3, 640) # set video width
cam.set(4, 480) # set video height

face_detector = cv2.CascadeClassifier('haarcascade_frontalface_default.xml')

# For each person, enter one numeric face id
face_id = input('\n enter user id end press <return> ==>  ')

print("\n [INFO] Initializing face capture. Look the camera and wait ...")
# Initialize individual sampling face count
count = 0

while(True):

    ret, img = cam.read()
    #img = cv2.flip(img, -1) # flip video image vertically
    gray = cv2.cvtColor(img, cv2.COLOR_BGR2GRAY)
    faces = face_detector.detectMultiScale(gray, 1.3, 5)

    for (x,y,w,h) in faces:

        cv2.rectangle(img, (x,y), (x+w,y+h), (255,0,0), 2)
        count += 1

        # Save the captured image into the datasets folder
        cv2.imwrite("dataset/User." + str(face_id) + '.' + str(count) + ".jpg", gray[y:y+h,x:x+w])

        cv2.imshow('image', img)

    k = cv2.waitKey(100) & 0xff # Press 'ESC' for exiting video
    if k == 27:
        break
    elif count >= 30: # Take 30 face sample and stop video
         break

# Do a bit of cleanup
print("\n [INFO] Exiting Program and cleanup stuff")
cam.release()
cv2.destroyAllWindows()
El archivo de datos de captura de la cara esta en https://github.com/Mjrovai/OpenCV-Face-Recognition/blob/master/FacialRecognition/haarcascade_frontalface_default.xml, no hace falta que te la descargues ya lo tienes en la carpeta dataset
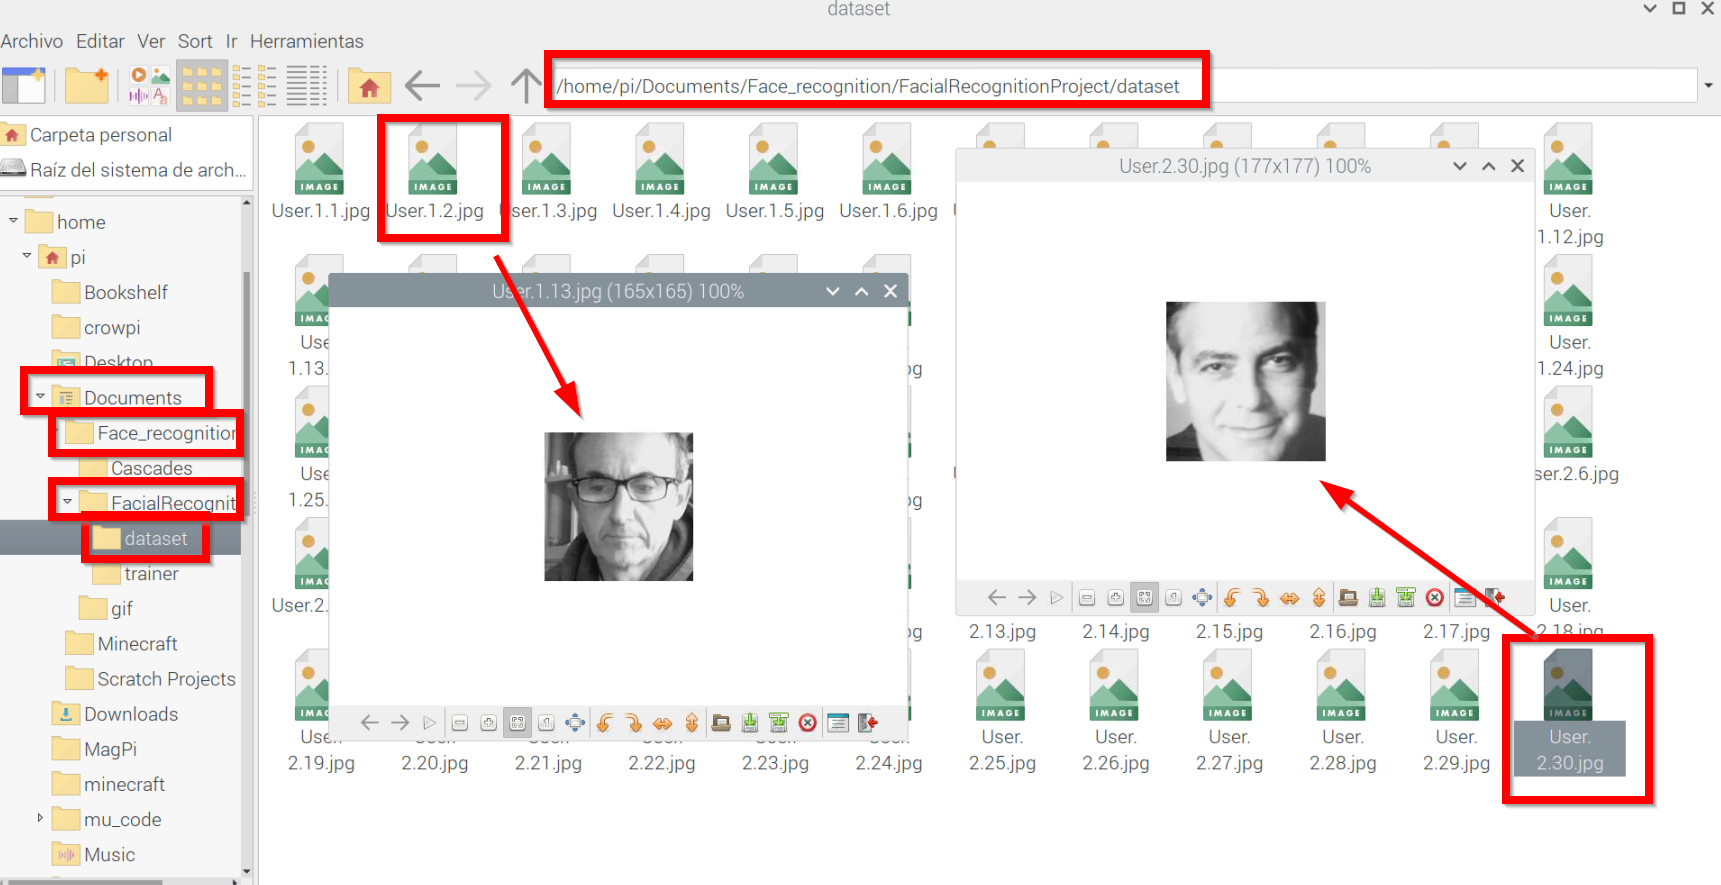
Si ejecutamos el programa, nos pide un identificador ID que tiene que ser un entero>0 si ponemos 1, se abre la webcam y nos hace 30 fotos y los graba como 1.1.jpg hasta 1.30.jpg y si ponemos 2 nos hace otros 30 y los almacena en la carpeta dataset. Podemos poner tantos ID como queramos.
Aquí he experimentado con mi cara y con George Cloneey, no hace falta decir cual quien es quien el ID 1 y el 2 😊
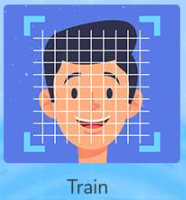
Programa educativo Crowpi AI- Face Recognition- 02-Train
En el siguiente tutorial
Fuente: Tutorial Learning Crowpi2
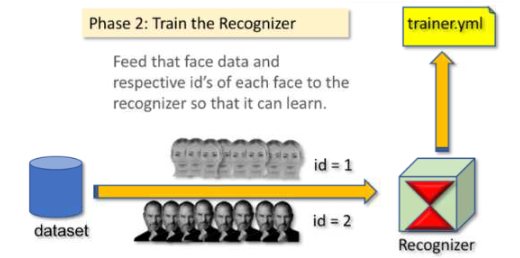
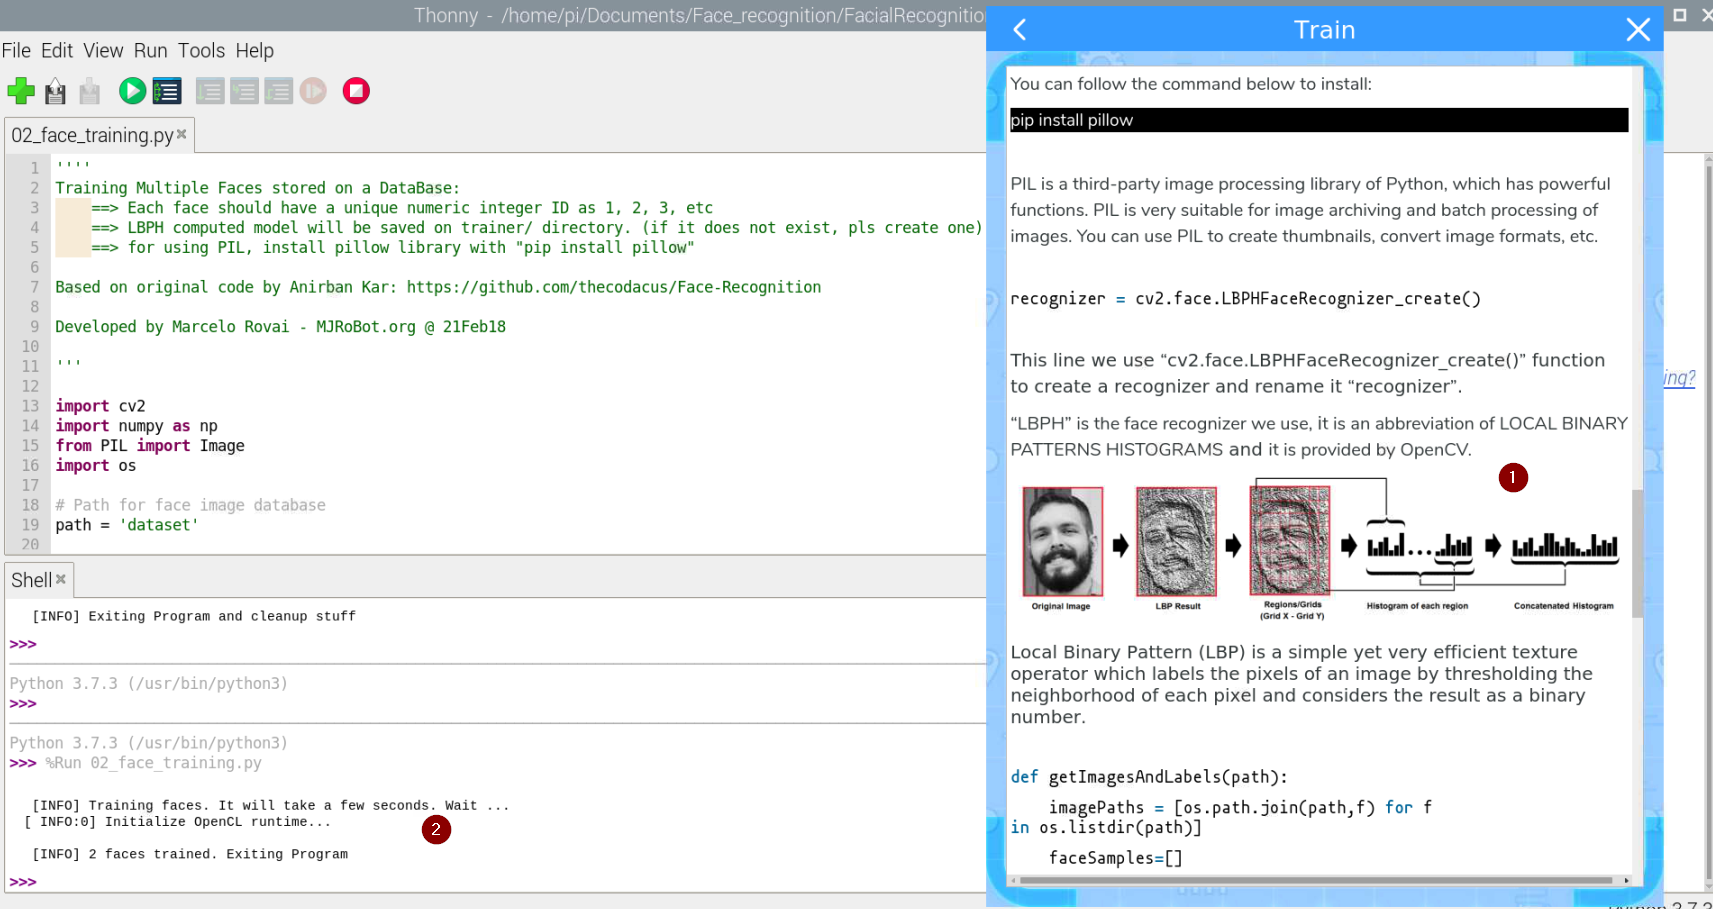
Y ahora con las imágenes que hemos almacenado con los identificadores, en mi caso 1 y 2 con mi cara y con George Clooney, luego hay que entrenar a la máquina virtual y lo almacena en el fichero trainer.yml
Fuente: Tutorial Learning Crowpi2
El tutorial lo explica muy bien el proceso (1) y al ejecutarlo, nos dice si face trained (2) o no :
El programa se llama 02-face-training.py
''''
Training Multiple Faces stored on a DataBase:
	==> Each face should have a unique numeric integer ID as 1, 2, 3, etc
	==> LBPH computed model will be saved on trainer/ directory. (if it does not exist, pls create one)
	==> for using PIL, install pillow library with "pip install pillow"

Based on original code by Anirban Kar: https://github.com/thecodacus/Face-Recognition

Developed by Marcelo Rovai - MJRoBot.org @ 21Feb18

'''

import cv2
import numpy as np
from PIL import Image
import os

# Path for face image database
path = 'dataset'

recognizer = cv2.face.LBPHFaceRecognizer_create()
detector = cv2.CascadeClassifier("haarcascade_frontalface_default.xml");

# function to get the images and label data
def getImagesAndLabels(path):

    imagePaths = [os.path.join(path,f) for f in os.listdir(path)]
    faceSamples=[]
    ids = []

    for imagePath in imagePaths:

        PIL_img = Image.open(imagePath).convert('L') # convert it to grayscale
        img_numpy = np.array(PIL_img,'uint8')

        id = int(os.path.split(imagePath)[-1].split(".")[1])
        faces = detector.detectMultiScale(img_numpy)

        for (x,y,w,h) in faces:
            faceSamples.append(img_numpy[y:y+h,x:x+w])
            ids.append(id)

    return faceSamples,ids

print ("\n [INFO] Training faces. It will take a few seconds. Wait ...")
faces,ids = getImagesAndLabels(path)
recognizer.train(faces, np.array(ids))

# Save the model into trainer/trainer.yml
recognizer.write('trainer/trainer.yml') # recognizer.save() worked on Mac, but not on Pi

# Print the numer of faces trained and end program
print("\n [INFO] {0} faces trained. Exiting Program".format(len(np.unique(ids))))
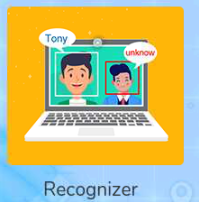
Programa educativo Crowpi AI- Face Recognition- Recognizer
Entramos en el siguiente tutorial:
Fuente: Tutorial Learning Crowpi2
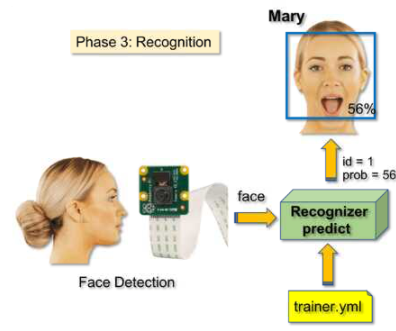
Y ahora utilizará el entrenamiento almacenado en trainer.yml que hemos creado anteriormente para reconocer las imágenes
Fuente: Tutorial Learning Crowpi2
El fichero 03_face_recognition.py
''''
Real Time Face Recogition
    ==> Each face stored on dataset/ dir, should have a unique numeric integer ID as 1, 2, 3, etc
    ==> LBPH computed model (trained faces) should be on trainer/ dir
Based on original code by Anirban Kar: https://github.com/thecodacus/Face-Recognition

Developed by Marcelo Rovai - MJRoBot.org @ 21Feb18

'''

import cv2
import numpy as np
import os

recognizer = cv2.face.LBPHFaceRecognizer_create()
recognizer.read('trainer/trainer.yml')
cascadePath = "haarcascade_frontalface_default.xml"
faceCascade = cv2.CascadeClassifier(cascadePath);

font = cv2.FONT_HERSHEY_SIMPLEX

#iniciate id counter
id = 1

# names related to ids: example ==> Marcelo: id=1,  etc
names = ['None', 'George Clooney', 'Javier Quintana', 'Javier', 'Z', 'W']

# Initialize and start realtime video capture
cam = cv2.VideoCapture(0)
cam.set(3, 640) # set video widht
cam.set(4, 480) # set video height

# Define min window size to be recognized as a face
minW = 0.1*cam.get(3)
minH = 0.1*cam.get(4)

while True:

    ret, img =cam.read()
    #img = cv2.flip(img, -1) # Flip vertically

    gray = cv2.cvtColor(img,cv2.COLOR_BGR2GRAY)

    faces = faceCascade.detectMultiScale(
        gray,
        scaleFactor = 1.2,
        minNeighbors = 5,
        minSize = (int(minW), int(minH)),
       )

    for(x,y,w,h) in faces:

        cv2.rectangle(img, (x,y), (x+w,y+h), (0,255,0), 2)

        id, confidence = recognizer.predict(gray[y:y+h,x:x+w])

        # Check if confidence is less them 100 ==> "0" is perfect match
        if (confidence < 70):
            id = names[id]
            confidence = "  {0}%".format(round(100 - confidence))
        else:
            id = "unknown"
            confidence = "  {0}%".format(round(100 - confidence))

        cv2.putText(img, str(id), (x+5,y-5), font, 1, (255,255,255), 2)
#        cv2.putText(img, str(confidence), (x+5,y+h-5), font, 1, (255,255,0), 1)

    cv2.imshow('camera',img)

    k = cv2.waitKey(10) & 0xff # Press 'ESC' for exiting video
    if k == 27:
        break

# Do a bit of cleanup
print("\n [INFO] Exiting Program and cleanup stuff")
cam.release()
cv2.destroyAllWindows()
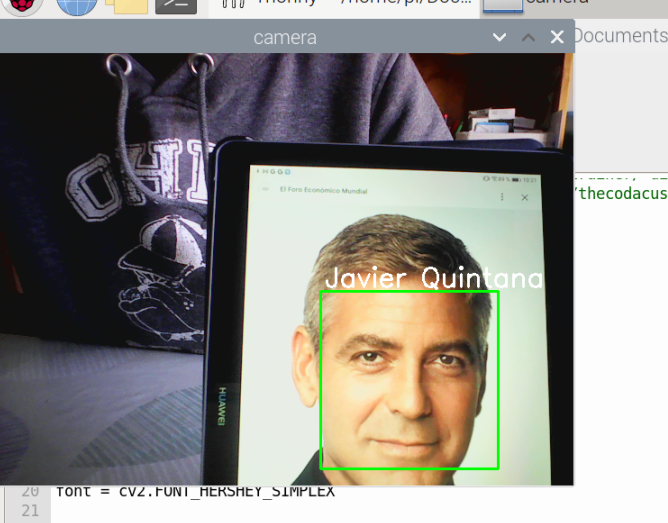
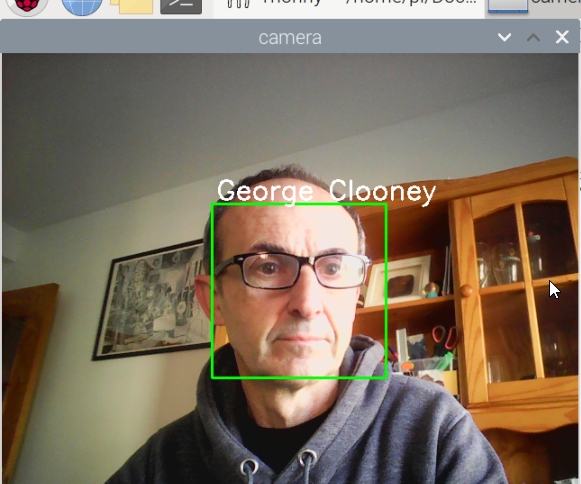
Como veis, funciona perfectamente:
Es broooomaaa 😁😁 le he cambiado el orden en la instrucción de la línea 26 :
names = ['None', 'George Clooney', 'Javier Quintana', 'Tony', 'Z', 'W'] Programa educativo Crowpi AI- Face Recognition- Play with hardware
El programa siguiente es 03_face_recognition_RGB.py NO FUNCIONA
El programa visualiza por la matriz 8x8 RGB LED la cara alegre o triste pero se necesita esta librería y da error
from rpi_ws281x import PixelStrip, Color
si sabes cómo solucionar este problema, ponte en contacto con Catedu www.catedu.es - información
03_face_recognition_RGB
El programa anterior 03_face_recognition_RGB.py NO FUNCIONA cuando detecta una cara nos da el siguiente error
si sabes cómo solucionar este problema, ponte en contacto con Catedu www.catedu.es - información
Exception in thread Thread-431:
Traceback (most recent call last):
  File "/usr/lib/python3.7/threading.py", line 917, in _bootstrap_inner
    self.run()
 etc..
La solución es no utilizarlo y utilizar el fichero 03_face_recognition.py que sí que funciona.
¿Cómo? En las líneas 58-59-60 meter qué queremos que haga el hardware del Crowpi cuando detecte una cara:
if (confidence < 70):
            id = names[id]
            confidence = "  {0}%".format(round(100 - confidence))
Para ello creamos una función, por ejemplo lo he llamado Hardware(id) que haga lo que queremos que haga cuando detecte la cara id, por ejemplo si detecta la cara id=3 que suene el vibrador
import RPi.GPIO as GPIO
import time

# define vibration pin
vibration_pin = 27
# Set board mode to GPIO.BCM
GPIO.setmode(GPIO.BCM)
# Setup vibration pin to OUTPUT
GPIO.setup(vibration_pin, GPIO.OUT)

def Hardware(id):
    nombre=names[id]
    if (id==3):
        # turn on vibration
        GPIO.output(vibration_pin, GPIO.HIGH)
        # wait half a second
        time.sleep(0.5)
        # turn off vibration
        GPIO.output(vibration_pin, GPIO.LOW)
Por lo tanto en el fichero 03_face_recognition.py y en las líneas 58-59-60 metemos Hardware(id)
 if (confidence < 70):
            # aquí pongo qué quiero que haga cuando detecta una cara conocida
            Hardware(id)
            # fin
            id = names[id]
            confidence = "  {0}%".format(round(100 - confidence))
El resultado es:
El fichero modificado es
''''
Real Time Face Recogition
    ==> Each face stored on dataset/ dir, should have a unique numeric integer ID as 1, 2, 3, etc
    ==> LBPH computed model (trained faces) should be on trainer/ dir
Based on original code by Anirban Kar: https://github.com/thecodacus/Face-Recognition

Developed by Marcelo Rovai - MJRoBot.org @ 21Feb18

'''

import cv2
import numpy as np
import os

#MIO LIBRERIAS Y CONFIGURACIóN VIBRADOR
import RPi.GPIO as GPIO
import time
# define vibration pin
vibration_pin = 27
# Set board mode to GPIO.BCM
GPIO.setmode(GPIO.BCM)
# Setup vibration pin to OUTPUT
GPIO.setup(vibration_pin, GPIO.OUT)
################################################


recognizer = cv2.face.LBPHFaceRecognizer_create()
recognizer.read('trainer/trainer.yml')
cascadePath = "haarcascade_frontalface_default.xml"
faceCascade = cv2.CascadeClassifier(cascadePath);

font = cv2.FONT_HERSHEY_SIMPLEX

#iniciate id counter
id = 1

# names related to ids: example ==> Marcelo: id=1,  etc
names = ['None', 'George Clooney', 'Javier Quintana', 'Javier', 'Z', 'W']

# Initialize and start realtime video capture
cam = cv2.VideoCapture(0)
cam.set(3, 640) # set video widht
cam.set(4, 480) # set video height

# Define min window size to be recognized as a face
minW = 0.1*cam.get(3)
minH = 0.1*cam.get(4)

#MIO mi función cuando detecta una cara
def Hardware(id):
    nombre=names[id]
    if (id==3):
        # turn on vibration
        GPIO.output(vibration_pin, GPIO.HIGH)
        # wait half a second
        time.sleep(0.5)
        # turn off vibration
        GPIO.output(vibration_pin, GPIO.LOW)


while True:

    ret, img =cam.read()
    #img = cv2.flip(img, -1) # Flip vertically

    gray = cv2.cvtColor(img,cv2.COLOR_BGR2GRAY)

    faces = faceCascade.detectMultiScale(
        gray,
        scaleFactor = 1.2,
        minNeighbors = 5,
        minSize = (int(minW), int(minH)),
       )

    for(x,y,w,h) in faces:

        cv2.rectangle(img, (x,y), (x+w,y+h), (0,255,0), 2)

        id, confidence = recognizer.predict(gray[y:y+h,x:x+w])

        # Check if confidence is less them 100 ==> "0" is perfect match
        if (confidence < 70):
            #MIO aquí pongo qué quiero que haga cuando detecta una cara conocida
            Hardware(id)
            # fin
            id = names[id]
            confidence = "  {0}%".format(round(100 - confidence))

        else:
            id = "unknown"
            confidence = "  {0}%".format(round(100 - confidence))

        cv2.putText(img, str(id), (x+5,y-5), font, 1, (255,255,255), 2)
#        cv2.putText(img, str(confidence), (x+5,y+h-5), font, 1, (255,255,0), 1)

    cv2.imshow('camera',img)

    k = cv2.waitKey(10) & 0xff # Press 'ESC' for exiting video
    if k == 27:
        break

# Do a bit of cleanup

print("\n [INFO] Exiting Program and cleanup stuff")
cam.release()
cv2.destroyAllWindows()
# MIO
#cleaup GPIO
GPIO.cleanup()



No comments to display
No comments to display